background image


www.powermaxfitness.net 

10 

4.


 USING INSTRUCTIONS 

Using treadmill 

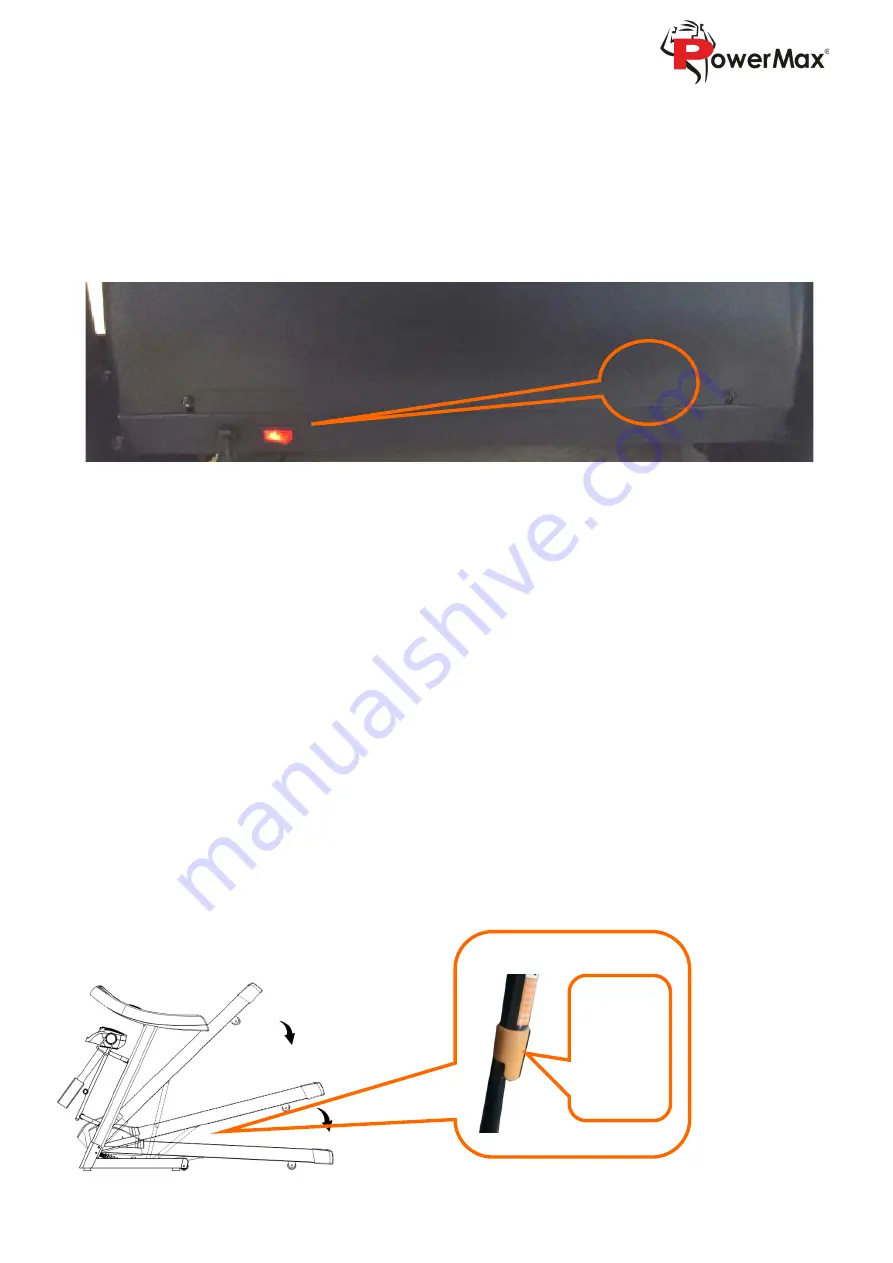
1) Insert the power plug properly and turn on the switch (in red colour)


When the light is on, there will be a sound of “Di”, and then the screen will be light 

up 

(Systems with TFT screen takes more time to enter the start interface). 


2) Please keep the safety key away from children when the treadmill is not in use. Please put the 
silicon oil bottle in places children cannot reach. If it is eaten or split into eyes by mistake, please 
use water to wash and consult doctor immediately. 

3) Safety key Introduction 
The treadmill can only start when the safety key is put on the yellow area of the console. Clip the 
safety key on clothes when using the treadmill to prevent accidents.  

4) Folding Instructions 
Fold the treadmill: 
It will save space when the treadmill is folded. 
Please turn off the switch and pull out the power plug before folding. Lift the running deck until 
it is held. 


Unfold the treadmill: 
Kick the pressure rod, hold the running deck and then let the running deck to fall gradually. 


Kick this 
part to 
lower the 
running 
deck. 

 1 

Summary of Contents for TDA-100

Page 1: ... S MANUAL Read all instructions carefully before using this product Retain this owner s manual for the future s reference Product may be slightly different with photos it is subject to actual product Thank you for purchasing the product ...

Page 2: ...obligation under this warranty is limited to replacing or repairing free of charge any parts which may prove to be defective under normal home use This warranty does not include any damage caused by improper operation misuse or commercial application From the date of purchase the frame is warranted to be free from defects for 1 one year Customer Care Phone 91 8080 206 206 Email support powermaxfit...

Page 3: ...www powermaxfitness net 3 1 PRODUCT BRIEF Single function home use treadmill ...

Page 4: ...on Running Sit up Dumbbell Massager Packing List No Name Units Qty 1 Complete machine set 1 2 Sit up dumbbells massager Option set 1 3 Accessory Bag pc 1 4 Frame of Multi function Option pc 1 5 Frame pipe of Massager Option set 2 Tools Bag No Name Qty No Name Qty 1 Inner hexagon wrench 6mm 1 6 Silicon Oil 1 2 Inner hexagon wrench 5mm 1 7 Screws M8 42 2 3 Combination Wrench 1 8 Screws M8 22 2 4 Saf...

Page 5: ...www powermaxfitness net 5 EXPLODED VIEW ...

Page 6: ...ndition If you feel not very well when using this machine please stop and consult a doctor Silicone oil must be kept away from children after use If power cord is damaged please contact our qualified maintenance personnel for service rather than disassemble it at your own discretion Forbidden Don t use the machine in the status of the shell break in or break off the internal structure exposed or u...

Page 7: ... by children aged from 8 years and above and persons with reduced physical sensory or mental capabilities or lack of experience and knowledge if they have been given supervision or instruction concerning use of the appliance in a safe way and understand the hazards involved children shall not play with the appliance cleaning and user maintenance shall not be made by children without supervision Gr...

Page 8: ...son responsible for their safety Children should be supervised to ensure that they do not play with the appliance 3 INSTALLATION INSTRUCTIONS When installing simple fix all screws first then tighten screws when the installation of frame is done 1 Put the machine flat on the ground And stand the upright columns and console as bellow 2 Use 5 inner hexagon wrench and M8 42 A to lock washers and nuts ...

Page 9: ... make sure the treadmill starts normally NOTE please confirm that all screws are locked uniformly according to the requirements after installation and check no part is left out before plugging electricity Note Safety key is in red colour It is put in a plastic bag together with screws and tools Please place it on the yellow area of the console to start the treadmill Screw M8 25 ...

Page 10: ... is eaten or split into eyes by mistake please use water to wash and consult doctor immediately 3 Safety key Introduction The treadmill can only start when the safety key is put on the yellow area of the console Clip the safety key on clothes when using the treadmill to prevent accidents 4 Folding Instructions Fold the treadmill It will save space when the treadmill is folded Please turn off the s...

Page 11: ...leared and the treadmill gradually comes into a complete stop and returns to the manual mode Program key In standby mode pressing this key can cycle the options from manual mode to P1 to P12 automatic programs Manual mode is the system defaulting running mode Mode key In standby mode press this key can cycle the options of 3 different countdown running mode time countdown running mode distance cou...

Page 12: ...SPEED 3 3 6 5 5 4 4 4 4 3 INCLINE 0 3 3 3 4 4 4 1 1 0 P2 SPEED 3 3 4 4 5 5 5 6 6 4 INCLINE 2 2 2 3 3 3 3 4 4 2 P3 SPEED 2 4 6 8 7 8 6 2 3 2 INCLINE 3 5 4 4 3 4 4 3 4 2 P4 SPEED 3 3 5 6 7 6 5 4 3 3 INCLINE 0 3 3 2 2 5 5 3 3 2 P5 SPEED 3 6 6 6 8 7 7 5 5 4 INCLINE 3 5 3 4 2 3 4 2 3 2 P6 SPEED 2 6 5 4 8 7 5 3 3 2 INCLINE 3 4 5 6 3 5 5 6 4 3 P7 SPEED 2 9 9 7 7 6 5 3 2 2 INCLINE 0 3 3 3 4 4 4 1 1 0 P8 S...

Page 13: ...the treadmill is energized hold the heartbeat sensor piece for 5 seconds and the heart rate will be shown on the screen the display range is 60 160 times min The heart shaped mark flashes while testing This data is for reference only it cannot be considered as medical data AUTOMATIC PROGRAMS Each program is divided into 10 segments and the running time of each segments is evenly divided The time a...

Page 14: ...ossible Cause Overloading leads to excessive current and the system stop out of self protection or some part is stuck causing the motor to stop Adjust the treadmill and restart it Check if there is liquid or burnt smell while the motor is running if yes replace the motor check if the controller has a burnt smell if yes replace the controller check the power supply voltage if it does not match the ...

Page 15: ...o check the board regularly If the board s surface is damaged please contact our customer service centre We advise using lubricant between running belt and running board with following schedule Lightweight user use less than 3 hours a week once per month Heavyweight use use more than 7 hours a week once every half month 1 In order to better safeguard your electric treadmill and extend the life of ...

Page 16: ...riate B If your instantaneous step stops the running belt but the multi wedge belt and former roller is still running it indicates that the running belt is loose and appropriate adjustments must be made to facilitate the safe use C If you observe that the instantaneous step makes the treadmill belt and multi wedge belt stop but the motor is still running it indicates that the multi wedge belt is l...

Page 17: ...aped cover on left right endcaps picture 2 Step 4 Open the teardrop shaped cover picture 3 Step 5 Drop silicon oil into oil guiding Note 1 4 of the bottle picture 4 Step 6 After applying the silicon oil adjust the speed to 4 5 km h and run on it to make sure the oil is distributed evenly picture 1 picture 2 picture 3 picture 4 6 Application Using Instruction Scan QR code to download the applicatio...

Reviews: