background image


4. Using Instructions 

Using treadmill 

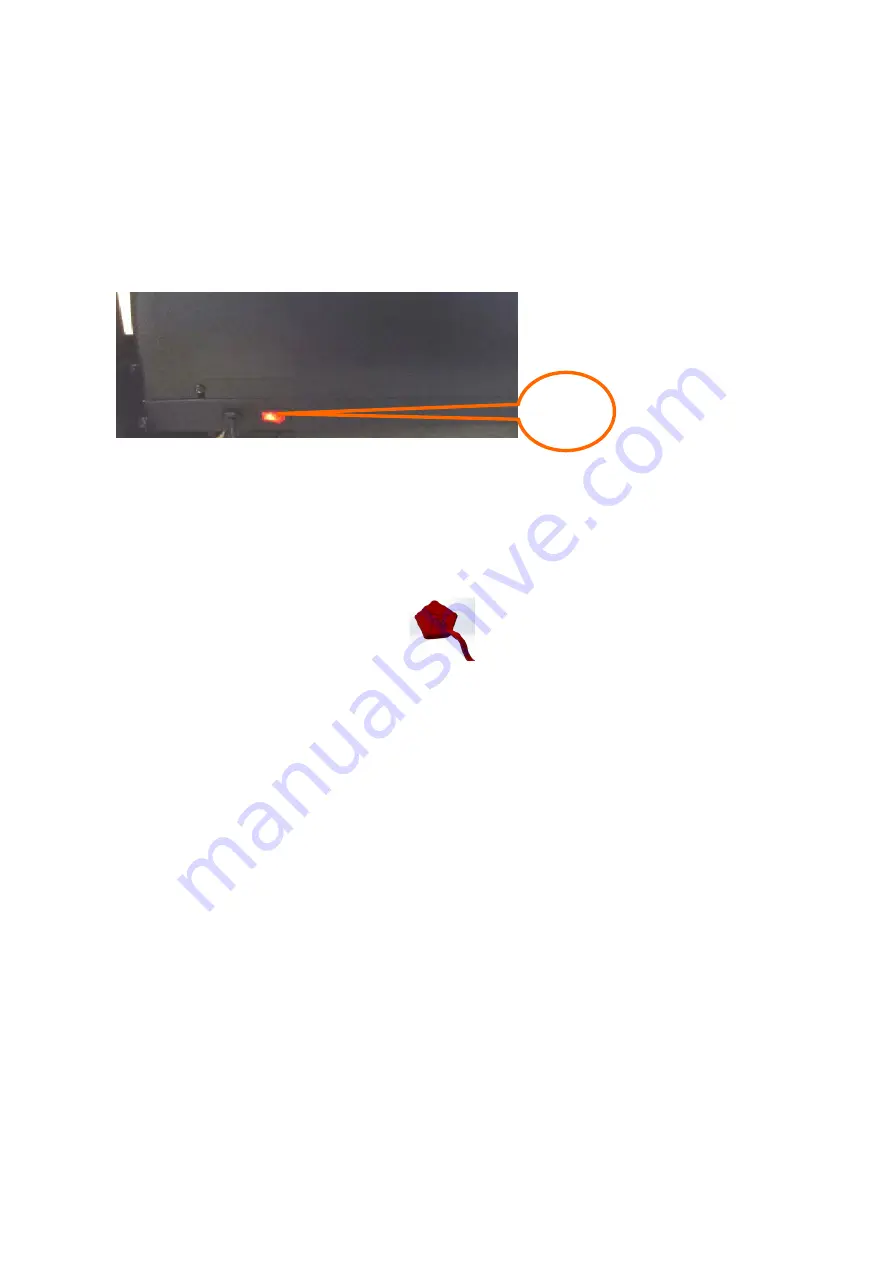
1. Insert the power plug properly and turn on the switch(in red color)(1). When the light is on, 
there will be a beep sound, and then the screen will be light up(Systems of TFT screen takes 
more time to enter the start interface). 


2.


Please keep the safety key away from children when the treadmill is not in use.Please put 

the silicon oil bottle in places children cannot reach. If it is eaten or split into eyes by mistake, 
please use water to wash and consult doctor immediately. 
3.


Safety key Introduction 

The treadmill can only start when the safety key is put on the yellow area of the console. Clip 
the  safety  key  on  clothes  when  using  the  treadmill  to  prevent  accidents.  Put  the  safety  key 
back when continue using the treadmill.   
 

System instructions


1. Start 

Press this button to start the treadmill when in standby mode. 

2. Stop   
       

Press this button to stop the treadmill when in running mode. 

3. Program 

      A. In standby mode, press this button to cycle by the order of  P1→P2...P12→FAT→P0 
(standby).


      B.  In  standby  mode,  press  this  button  for  long  time  to  set  the  parameter  values(please 
refer to the parameter setting instructions for details). 

4. Mode 
   

  In  standby  mode,  press  this  button  to  cycle  by  the  order  of  Time  countdown→Distance 

countdown→Calorie countdown→Standby. 
      In FAT mode, press this button to set the value of gender, height and weight(please refer 
to FAT instructions for details).


5. Speed 3km/h, 5km/h, 7km/h, 9km/h and 12km/h shortcut key 
     

In running mode, press these shortcut keys to change the speed immediately. 

6. Speed +/ Speed - 
 

    A. In running mode, press speed+/speed- to adjust the speed value. 

      B. In standby mode, press these buttons to set the values of the parameters of programs 
and modes.   
 

Summary of Contents for TAC-360

Page 1: ...AC 360 U US SE ER R S S M MA AN NU UA AL L Note Following the principles of sustainable development we may modify machines when necessary and will not notify again It all depends on the actual product...

Page 2: ...CONTENTS 1 Product Brief 1 2 Security Precautions and Warning 3 3 Installation Instructions 6 4 Using Instructions 9 5 Routine Maintenance and Instructions 13 6 Application Using Instruction 15...

Page 3: ...1 1 Product Brief Motorized Treadmill...

Page 4: ...ager dumbbells Packing list No Name units Qty 1 Complete machine set 1 2 Dumbbell Massager Option set 1 3 Accessory Bag set 1 4 Multifunction frame Option pc 1 5 Massager pipe Option pc 2 Accessory ba...

Page 5: ...h power plug must be grounded electric outlet should have a dedicated circuit do not share with other electrical equipment Keep children away from the machine to avoid accidents Avoid too long time an...

Page 6: ...pace such as the bathroom Don t place machine in direct sunlight or high temperature places such as near a stove or a heating appliance Otherwise may cause the leakage and burst into flames Don t use...

Page 7: ...oncerning use of the appliance by a person responsible for their safety Children should be supervised to ensure that they do not play with the appliance Ground protection system This product must be g...

Page 8: ...d console with the direction shown in the picture bellow The machine is heavy please ensure there are two people to install it 2 Use 5 inner hexagon spanner screw M8 50 and screw M8 20 to lock the col...

Page 9: ...se be careful and do not stuck or cut the lines adjust the position and use screw M8 20 to lock it tightly 5 Silicon oil needs to be added before using the treadmill method is as follow A Open the cov...

Page 10: ...s the start button to start the treadmill NOTE please confirm that all screws are locked uniformly according to the requirements after installation and check no part is left out before plugging electr...

Page 11: ...eadmill System instructions 1 Start Press this button to start the treadmill when in standby mode 2 Stop Press this button to stop the treadmill when in running mode 3 Program A In standby mode press...

Page 12: ...eart icon flashes while testing FAT Function Instructions 1 In standby mode press program button to enter the FAT test 2 F1 Gender screen displays 01 stand for male 02 stand for female Press SPEED or...

Page 13: ...6 6 4 Incline 2 2 2 3 3 3 3 4 4 2 P3 Speed 2 4 6 8 7 8 6 2 3 2 Incline 3 5 4 4 3 4 4 3 4 2 P4 Speed 3 3 5 6 7 6 5 4 3 3 Incline 0 3 3 2 2 5 5 3 3 2 P5 Speed 3 6 6 6 8 7 7 5 5 4 Incline 3 5 3 4 2 3 4 2...

Page 14: ...e Overloading leads to excessive current and the system stops for self protection or some part of treadmill is stuck causing the motor to stop Adjust the treadmill and restart it Check if there is ove...

Page 15: ...to check the board regularly If the board s surface is damaged please contact our customer service center We advise using lubricant between running belt and running board with following schedule Light...

Page 16: ...en stand on the running belt grip the armrests and tread the treadmill belt slightly we advise treading the treadmill belts with the user s own weight A The instantaneous step can not stop the belt th...

Page 17: ...15 6 Application Using Instruction Scan QR code to download the application...

Reviews: