background image


15


A chipbreaker set too low or 

with excessive tension may prevent stock 
from feeding into the machine.


Pressure Bar 

Most planing problems can be traced to 
improper setting of the pressure bar. Its function 
is to hold down the material after it passes under 
the cutterhead and throughout the remainder of 
the cut. Its basic setting is to be in line with the 
arc of the cutterhead knives. 

If it is too high, a shallow “clip” will occur at each 
end of the board. If it is too low, stock will not 
feed through. 

Use a gauge to set the full length of the 
pressure bar to be .000-.001” (.02mm) below the 
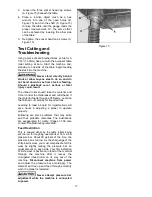
arc of the cutterhead. Figure 11 shows the 
height adjustment screw (D) and the spring 
tension adjustment screw (E) for the pressure 
bar. This initial setup is a starting point and final 
adjustment may have to be made during a test 
cut. 

Outfeed Rollers 

The two outfeed rollers are of smooth, one-piece 
construction to help avoid marring the finished 
surface of the material being cut. Their function 
is to continue to feed the material through the 
machine after it leaves the infeed roller. The 
correct free position setting is 1/32” (.8mm) 
below the arc of the cutterhead knives. 

Use a gauge, such as a bed and feed roll gauge 
or wood gauge block, to check the outfeed 
rollers in the same manner as the infeed roller.  

Adjust as necessary using the screws (F, Figure 
11). When finished adjusting, tighten the hex 
nuts on the screws (F, Figure 11). 

Table Rollers 

The Planer has two table rollers which help 
reduce friction of the stock on the table as it 
feeds through the machine. It is not possible to 
give exact height setting of the table rollers 
because each type of wood behaves differently. 
As a general rule, however, the table rollers 
should be set high when planing rough stock, 
and set low for finish cuts.  

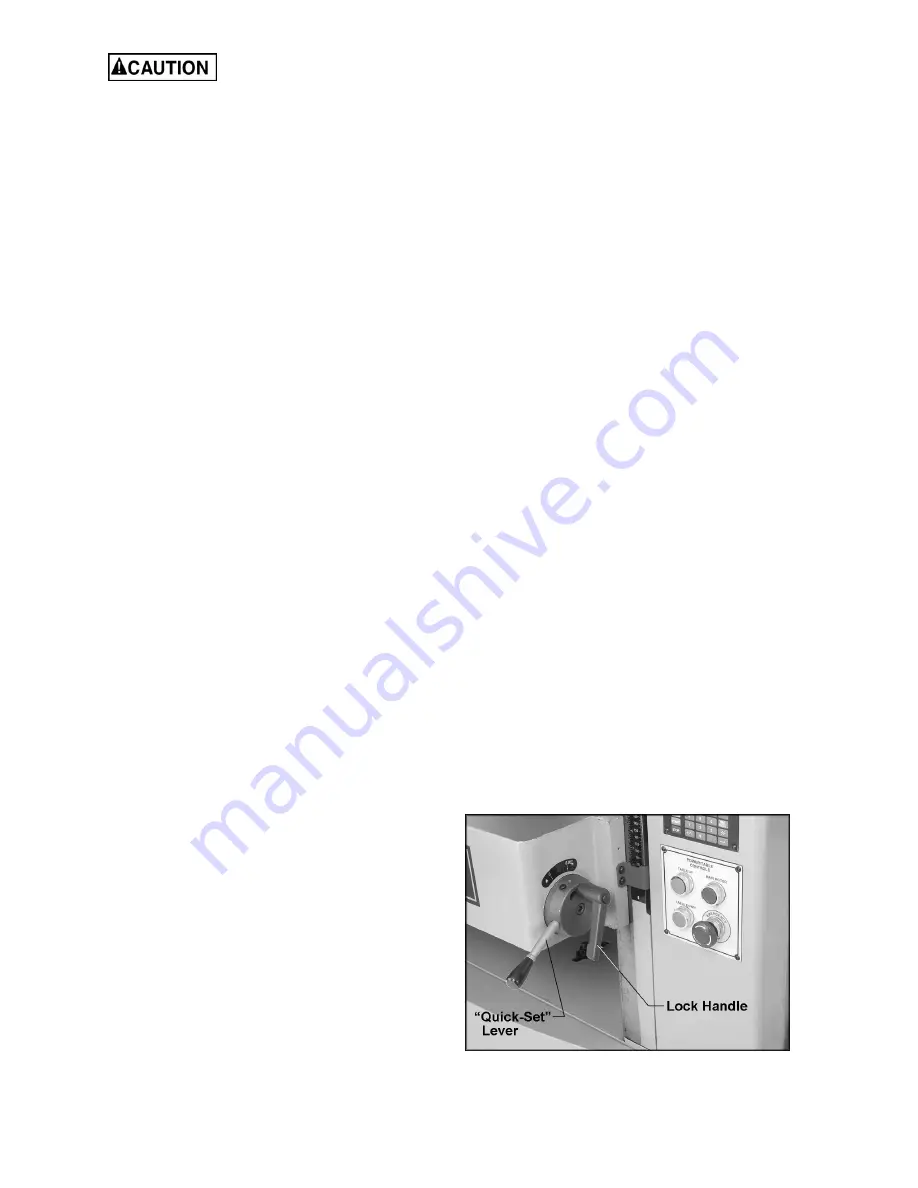
The planer is equipped with a quick-set table 
roller adjustment. With a single lever, you can 
raise the rollers from their finishing board height 
to a roughing board height. See Figure 12. The 
range is 0.00 to 0.05”. 

To adjust the height of the table rollers, loosen 
the lock handle (Figure 12) and turn the quick-
set lever. Re-tighten the lock handle to lock the 
setting. 


Figure 12 

Summary of Contents for WP2510

Page 1: ... Instructions and Parts Manual 25 inch Planer Model WP2510 WMH TOOL GROUP 2420 Vantage Drive Elgin Illinois 60124 Part No M 1791303 Ph 800 274 6848 Revision B3 2 07 www wmhtoolgroup com Copyright WMH Tool Group ...

Page 2: ...or examination postage prepaid to a location designated by us For the name of the location nearest you please call 1 800 274 6848 You must provide proof of initial purchase date and an explanation of the complaint must accompany the merchandise If our inspection discloses a defect we will repair or replace the product or refund the purchase price at our option We will return the repaired product o...

Page 3: ...es 21 3 Fast Program 10 sets 24 4 Select Counting direction 26 5 Select Positioning Mode 26 6 Set Software Limit Hi Lo End 27 7 Set Tolerances 27 8 Set Low Speed Limit 28 9 Set Linear Correction 29 10 Enter Parameter Setttings Mode 29 11 Check Software Version 30 12 Load Datum Values 30 13 IN MM Conversion 32 14 Set Device Resolution 32 15 Calibration 33 16 M15S Troubleshooting 33 17 M15S Specific...

Page 4: ...4 Parts List Electrical Box Assembly 53 Electrical Connections 230Volt 54 Electrical Connections 460Volt 55 ...

Page 5: ...roducts Arsenic and chromium from chemically treated lumber Your risk of exposure varies depending on how often you do this type of work To reduce your exposure to these chemicals work in a well ventilated area and work with approved safety equipment such as face or dust masks that are specifically designed to filter out microscopic particles 10 Do not operate this machine while tired or under the...

Page 6: ...thickness behind it to help it through the planer Be sure the last board of a butted sequence is 12 or longer 25 Do not feed stacked boards through a planer a kickback may occur causing severe or fatal injury 26 Do not plane boards with loose knots or with nails or any foreign material on its surface Twisted warped or wind in stock should first be jointed on one surface before attempting to plane ...

Page 7: ...r 1791303 Main Drive Motor TEFC 15HP 3Ph 230 460V pre wired 230V Table Hoist Motor TEFC 1 2HP 3Ph Maximum Cutting Width in 25 Maximum Cutting Thickness in 9 Full Width Cutting Depth in 1 8 Maximum Cutting Depth in 1 4 Minimum Planing Length in 10 Number of Knives Helical Head 168 four sided carbide inserts Segmented Infeed Roll Diameter in 3 Steel Outfeed Roll Diameter in 2 1 2 Cutterhead Speed RP...

Page 8: ...dwheel see Figure 3 and rotate the handwheel to lower the table Contents of the Shipping Container 1 Planer 1 Dust Hood A 4 Foot Pads B 1 Air Impact Screwdriver C 1 RA 30E 460V Overload Relay D 5 Star Point Screwdrivers E 1 Breaker Bar F 1 Air Valve G 1 Air Valve Mounting Bracket H 1 Air Valve Pressure Gauge J 20 Flat Head Spline Socket Screws M6x14 K 10 Spline Bits T 20 L 10 Replacement Knife Ins...

Page 9: ...er the leveling screws and place the four foot pads beneath the leveling screws See Figure 1 Lower the machine slowly onto the foot pads The screws can be turned as necessary until the planer table is level Tighten the hex nuts against the base to secure the screw settings Exposed metal parts have been coated with a rust preventative This should be removed with a soft cloth moistened with kerosene...

Page 10: ...nderstood or if in doubt as to whether the tool is properly grounded Repair or replace a damaged or worn cord immediately Make sure the voltage of your power supply matches the specifications on the motor plate of the Planer The machine should be connected to a dedicated circuit The use of an extension cord is not recommended for the WP2510 Planer 230 Volt Operation The Planer is factory wired for...

Page 11: ...e of the machine If cutterhead rotation is incorrect disconnect machine from power source and switch any two of the three wires at R S T see Electrical Connections pages 54 and 55 3 Re connect machine to power source Controller Set Up To program settings in the Controller for table movement refer to the section beginnning on page 20 Adjustments Depth of Cut Depth of cut is adjusted by raising or l...

Page 12: ...ead remove the two shoulder screws Figure 4 NOTE The planer has a limit switch which prevents operation while the hood is open Knife Inserts Knife inserts are extremely sharp Use caution when working with or around the cutterhead The knife inserts are four sided When dull simply remove each insert rotate it and re install it To maintain quality of cut replace or rotate all inserts at the same time...

Page 13: ...rovided or use the air operated screwdriver set at 45 psi 7 When finished pre setting the knife insert set the air operated screwdriver to 85 psi and fully tighten the screw 8 Repeat for all knife inserts Make sure all knife inserts are secure in the cutterhead Failure to comply may allow knife inserts to loosen and be flung from the machine during operation The Planer s Feed System Figure 8 1 Ant...

Page 14: ...rve Zero the gauge at that position 4 Move the gauge to the extreme left side of the infeed roller and check the measurement It should be 1 16 below the knife measurement 5 If it is not 1 16 correct by loosening the hex nut A Figure 11 and turning the adjustment screw B Figure 11 with a hex wrench 6 Move the gauge to the extreme opposite end of the infeed roller and check Make necessary adjustment...

Page 15: ...tion is to continue to feed the material through the machine after it leaves the infeed roller The correct free position setting is 1 32 8mm below the arc of the cutterhead knives Use a gauge such as a bed and feed roll gauge or wood gauge block to check the outfeed rollers in the same manner as the infeed roller Adjust as necessary using the screws F Figure 11 When finished adjusting tighten the ...

Page 16: ...ht to help prevent skewing of the board as it feeds through the machine 7 Re tighten the hex nuts C Figure 13 on both ends of the table roller 8 Repeat the procedure for the second table roller Table Adjustments The planer table is raised and lowered by twin screws supported on bearings and is guided by machined surfaces on the side panels The fit up to prevent the table from rocking is controlled...

Page 17: ...If the material feeds through effortlessly examine the finished cut carefully for imperfections Learning to read a board for imperfections will save hours in adjusting a planer to operate properly Following are some problems that may arise and their probable remedies The illustrations are exaggerated for clarity Pages 37 39 also contain Troubleshooting remedies Feed Restriction This is caused eith...

Page 18: ... roller is too high causing a slight lift of the material as it passes through the machine Normally these snipes are more noticeable on the trailing end of the board than on the lead end and most often occur during planing of rough lumber Table rollers must be elevated for running rough or resaw lumber through the machine When material is turned over to surface the other side and you neglect to lo...

Page 19: ...ndition that dust has not accumulated in the electrical enclosures and that there are no loose or worn electrical connections Buildup of sawdust and other debris can cause your machine to plane inaccurately Periodic cleaning is not only recommended but mandatory for accurate planing Close fitting parts such as the link plates below the table and the platforms on the cutterhead which seat the knife...

Page 20: ...r pour the oil directly on the chain Over oiling defeats the purpose of the lubrication since it tends to invite the collection of dust shavings etc and works into members of the chain This hastens wear and leads to premature replacement The bearings on the cutterhead and feed rollers are factory lubricated and sealed They require no further attention Controller M15S Operating Instructions 1 Front...

Page 21: ...mode MANUAL MODE Keyboard Function For planer table operations the fast forward and fast backward keys have the same function as the forward and backward keys When the forward key is pressed the planer table moves down This is also achieved using the Table Down push button on the planer When the backward key is pressed the planer table moves up This is also achieved using the Table Up push button ...

Page 22: ...arts blinking Step 2 Enter the target value using numerical keypad Step 3 Press to complete LED lamp starts blinking the device is ready to start the positioning Start Stop Cancel Press to start the positioning The LED lamp now stops blinking and remains on during the procedure Press to cancel the positioning The LED lamp is turned off If the key is pressed while the positioning is running the pro...

Page 23: ... To change the target value to 20 25mm Step 1 Press the LED lamp on Target window is blinking Display Step 2 Enter new target value example 20 25mm Press Display Step 3 Press to complete The LED lamp is blinking ready for positioning Press to start the positioning or press to cancel ...

Page 24: ...lly and the positioning can be started immediately Entering preset target values Step 1 Press Step 2 Select a key 0 to 9 total of 10 values Step 3 Enter the target value Step 4 Press to confirm Follow the same procedure for entering the other preset target values Press to exit Example Program 0 10 00mm Program 1 20 00mm Step 1 Press Display Step 2 Press select program key 0 Step 3 Press enter valu...

Page 25: ...tep 1 Enter single mode LED lamp is off Step 2 Press a key 0 to 9 LED lamp is blinking ready for start Example Program 0 10 00mm Program 1 20 00mm Step 1 In Single Mode LED lamp is off Step 2 Press Program 0 Now you will see the preset value 10 00mm Program 0 LED lamp is blinking complete Press to begin positioning ...

Page 26: ...default Step 2 Press to change the direction dir numbers decrease as table rises accords with scale on planer dir numbers increase as table rises Step 3 Press to confirm or press to clear 5 Select Positioning Mode Step 1 Press Step 2 Press to select a both directions b left c right Step 3 Press to confirm or press to clear ...

Page 27: ...se are exceeded the display will give an error message To set the Lo_End press To set the Hi_End press 7 Set Tolerances The tolerance defines the accuracy of the positioning Step 1 Press Display default Step 2 Enter the value for tolerance Step 3 Press to confirm or press to clear ...

Page 28: ...rts the table movement up or down and the table does not move or moves with a speed lower than defined it stops the machine and displays Press to clear To set low speed limit Step 1 Press Display default Step 2 Enter the low speed level 0 to 99 0 Machine test is disabled 1 very low 99 high Step 3 Press to confirm or press to clear ...

Page 29: ...99 Step 3 Press to confirm or press to clear 10 Enter Parameter Setttings Mode With this function you can select each parameter to be locked or unlocked When a parameter is locked then the end user can only see the value but can not change it Step 1 Press Display Step 2 Enter the password Step 3 Use to scroll through the parameters Step 4 Press to lock or unlock On unlock Off lock Step 5 Press to ...

Page 30: ...the machine table and the cutterhead Thus the cutterhead defines the zero point of the machine It is however difficult or impossible to move the planer table to this point Therefore the zero point should be identified by either placing a gauge between table and cutterhead knife insert or by planing a test board then measuring the board thickness with calipers Program this real value into the Contr...

Page 31: ...he real value Step 1 Press Display Step 2 Press to confirm or press to cancel Example The current value is 10 00mm but the actual thickness is 10 50mm Step 1 Press Display Step 2 Press Step 3 Press Step 4 Press ...

Page 32: ...ch of the units between millimeters and inches The LEDs on the key indicate the selected unit Switching between MM and INCHES has no effect on the control functions 14 Set Device Resolution Step 1 Press Step 2 Use to select resolution Step 3 Press to confirm or press to clear ...

Page 33: ...shooting Display Change RST message appears when the Controller detects a motion in the wrong direction For example the Controller switches the outputs to move upward but the table starts moving in the reverse direction Usually this is caused by the wrong wiring of the three phase motor Press to clear Check the wiring and change if necessary ...

Page 34: ...ion Excluding Press to clear Display This message appears after power on and indicates battery discharged The C type battery MUST be replaced to resume the operation of the device Change as follows 1 Open the planer s top right side panel to access the rear of the Controller 2 Turn the power off Be careful not to move the table during power off Replace the battery and turn the power on The device ...

Page 35: ...35 17 M15S Specifications ...

Page 36: ...cut Knife inserts cutting against grain Try to cut with the grain for finish cut Torn grain Dull knife inserts Rotate or replace knife inserts Dull knife inserts Rotate or replace knife inserts Excessive depth of cut Decrease cutting depth Rough raised grain Moisture content too high Remove high moisture content from wood by drying or use different stock Rounded glossy surface Dull knife inserts R...

Page 37: ...achine to adequately cool before attempting restart If problem persists check amp setting on the motor starter inside the electrical box Planer frequently trips One cause of overload trips which are not electrical in nature is too deep a cut The solution is to take a lighter cut If too deep a cut is not the problem check the amp setting on the overload relay Match the full load amps on the motor a...

Page 38: ... options Have a qualified electrican test the motor for function or remove the motor and take it to a quality electrical motor repair shop and have it tested Miswiring of the machine Double check to confirm all electrical connections are correct Refer to appropriate wiring diagrams on pages 54 and 55 to make any needed corrections Machine will not start restart or repeatedly trips circuit breaker ...

Page 39: ...39 Column Assembly ...

Page 40: ... 26 TS 2171012 Pan Head Screw M4x6 1 27 WP2510 427 Pin 1 28 6012214 Handle Knob 1 29 6012213 Handle Shaft 1 30 WP2510 430 Shift Hub 1 31 WP2510 431 Steel Ball 1 32 WP2510 432 Spring 1 33 TS 1524031 Set Screw M8x12 1 35 WP2510 435 Right Column 1 36 WP2510 436 Plastic Cover 3 37 TS 1550021 Flat Washer M4 6 38 WP2510 438 Limit Switch Cord 18AWG x 2C x 750mm 1 39 WP2510 439 Limit Switch 1 40 TS 228430...

Page 41: ...S 1550061 Flat Washer M8 1 67 TS 1504121 Socket Head Cap Screw M8x60 1 68 TS 1540061 Hex Nut M8 1 69 WP2510 469 Inner Plate 1 70 WP2510 470 Outer Plate Controls 1 71 WP2510 471 Main Motor Pushbutton Switch 1 72 WP2510 472 Emergency Stop Pushbutton Switch 1 73 WP2510 473 Table Pushbutton Switch 2 74 WP2510 474 Screw M3x15 2 75 TS 2244102 Button Head Socket Screw M4x10 8 76 TS 2246102 Button Head So...

Page 42: ...42 Gearbox Assembly ...

Page 43: ...6204VV 2 14 6012037 Gear 20T 2 15 WP2510 115 S Ring 4 16 BB 6201VV Ball Bearing 6201VV 6 17 WP2510 117 Oil Seal 1 18 WP2510 118 S Ring 1 19 WP2510 119 Key 8x7x72 1 20 WP2510 120 Shaft 1 21 WP2510 121 Gear 1 22 WP2510 122 Shaft 1 23 6012041 Gear 60T 2 24 WP2510 124 Key 5x5x20 2 25 WP2510 125 Shaft 1 26 WP2510 126 Oil Level Sight Glass 1 27 WP2510 127 Gear 1 28 WP2510 128 Shaft 1 29 WP2510 129 Gear ...

Page 44: ...cket 22T 2 26 WP2510 226 S Ring 1 27 WP2510 227 Ball Bearing 6210VV 2 28 WP2510 228 Bushing 1 29 WP2510 229A Cutterhead 1 30 BB 6008VV Ball Bearing 6008VV 1 31 BB 6007VV Ball Bearing 6007VV 1 32 WP2510 232A S Ring 1 33 WP2510 233 Chain 40 x 58P 1 34 WP2510 234 Chain 40 x 74P 1 35 TS 1505081 Socket Head Cap Screw M10x50 4 36 TS 1551071 Lock Washer M10 6 37 WP2510 237 Pin 4 38 TS 1505021 Socket Head...

Page 45: ...1 6012175 Spring 11 63 WP2510 263 Infeed Roller Shaft 1 64 TS 1505041 Socket Head Cap Screw M10x30 2 65 WP2510 265 Left Bracket 1 66 6012174 Chipbreaker 11 67 WP2510 267 Chain 40 x 24P 1 68 WP2510 268 Knife Screw M6x14 168 69 WP2510 269 Knife Insert sold as set of 10 15x15x2 5mm 168 ...

Page 46: ...46 Table Assembly ...

Page 47: ...12 Pan Head Screw M4x6 1 24 WP2510 111 Key 5x5x10 2 25 WP2510 525 Rear Linking Plate 1 26 6012258 Shoulder Screw 1 27 WP2510 527 Front Linking Plate 1 28 WP2510 528 Key 5x5x8 1 29 6012249 Shaft 1 30 WP2510 530 Pointer 1 31 6012214 Handle Knob 1 32 6012213 Handle Shaft 1 33 TS 1505021 Socket Head Cap Screw M10x20 2 34 TS 1550071 Flat Washer M10 1 35 WP2510 535 E Clip 1 36 6012252 Hub 1 37 TS 152302...

Page 48: ...48 Base Assembly ...

Page 49: ...Driven Lead Screw 1 27 WP2510 111 Key 5x5x10 3 28 WP2510 628 C Ring 2 29 BB 6008VV Ball Bearing 6008VV 2 30 BB 51105 Thrust Bearing 51105 4 31 TS 1504041 Socket Head Cap Screw M8x20 6 32 6012075 Bracket 2 33 WP2510 633 Sprocket 3 34 WP2510 634 Star Washer M25 2 35 WP2510 635 Special Nut 2 36 WP2510 636 Drive Lead Screw 1 37 WP2510 637 Washer 1 38 WP2510 638 Pin 4 39 TS 154010 Hex Nut M16 5 40 TS 1...

Page 50: ...P 230 460V 3Ph 1 86 WP2510 686 Key 5x5x22 1 88 WP2510 688 Gear 1 89 WP2510 689 Bushing 1 90 BB 6204ZZ Ball Bearing 6204ZZ 1 91 WP2510 691 Gearbox 1 92 WP2510 692 Oil Seal 1 93 BB 6205ZZ Ball Bearing 6205ZZ 1 94 TS 1524011 Set Screw M8x8 1 95 WP2510 111 Key 5x5x10 2 96 WP2510 696 Worm 1 97 WP2510 697 Gear 24T 1 98 BB 6203ZZ Ball Bearing 6203ZZ 2 99 BB 6201ZZ Ball Bearing 6201ZZ 1 100 WP2510 6100 S ...

Page 51: ...510 6125 White Cord 1 126 WP2510 6126 Black Cord 1 127 WP2510 6127 Grounding Cord 1 128 WP2510 6128 Casing 1 WP2510 MCA Main Motor Cord Assembly 129 133 1 129 WP2510 6129 Red Cord 1 130 WP2510 6130 White Cord 1 131 WP2510 6131 Black Cord 1 132 WP2510 6132 Grounding Cord 1 133 WP2510 6133 Casing 1 134 WP2510 6134 Junction Box 1 ...

Page 52: ...ver 1 7 TS 2246122 Button Head Socket Screw M6x12 19 8 WP2510 308 Deflection Plate 1 9 WP2510 309 Top Cover 1 10 TS 2361061 Lock Washer M6 19 11 TS 1550041 Flat Washer M6 19 12 6012181 Dust Chute 1 13 TS 1541041 Nylon Insert Lock Nut M10 2 14 TS 1540031 Hex Nut M5 4 15 TS 1481061 Hex Cap Screw M5x25 2 16 WP2510 316 Pad 2 17 6012190 Shoulder Screw 2 18 6012189 Handle 1 19 TS 1504051 Socket Head Cap...

Page 53: ...rd 1 8 WP2510 708 Contactor for 15HP Motor 1 9 WP2510 709 Contactor for 1 2HP Motor 2 10 WP2510 710 Overload for 230V Big Conductor RA 30 32 50A 1 11 WP2510 711 Terminal Board 1 12 WP2510 712 Transformer 1 13 WP2510 713 Overload for Small Conductor RA 20 1 6 2 5A 1 14 WP2510 714 Fuse Support Base 2 15 WP2510 715 Terminal Board 1 16 WP2510 716 Overload for 460V Big Conductor RA 30E 18 26A 1 17 WP25...

Page 54: ...54 Electrical Connections 230Volt ...

Page 55: ...55 Electrical Connections 460Volt ...

Page 56: ...56 WMH Tool Group 2420 Vantage Drive Elgin Illinois 60124 Phone 800 274 6848 www wmhtoolgroup com ...

Reviews: