10
11
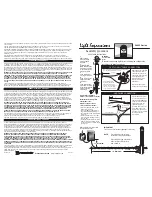
for the attachment part to be inserted
2
as illus-
trated in
(A2)
.
Charging the battery with the integrated
solar panel (A4)
1. Before you start the charging process, switch off
the
1
work lamp. To do this, press the push but-
ton
5
.
3. Press the locking button
10
.
4. Fold out the solar panel
11
and adjust it accord-
ing to the sun’s rays.
When the charging process is complete, fold the so-
lar panel closed
11
again until the locking button
clicks in
10
audibly.
NOTE!
In order to perform a charging with the solar panel,
you may detach
11
the attachment part
2
from the
1
work lamp. Please note that charging with a solar
panel
11
may take up to 50 hours.
NOTE!
During further charging processes with the mains
power adapter,
3
the charging time (maximum 12
hours) will be shortened depending on the remain-
ing battery capacity.
NOTE!
The lamp should be charged once a month if it
will not be used for a long time. If the lamp wasn’t
charged for an extended period of time (approx. 2
months), the battery will be in sleep mode. The lamp
should then be recharged and discharged several
times so that the battery is reactivated.
Setting up the lamp
Place the lamp in an appropriate location.
NOTE!
- The surface should be level so that the lamp
cannot fall over. There should be sufficient open
space around the lamp.
Switching the lamp on and off
1. Switch on the lamp by pressing the push button
5
.
- By pressing the push button
5
again, the lamp
can be turned off.
Adjusting the handle (A5)
The handle
12
of the lamp can be used in 2 posi-
tions:
- Position 1): the handle is parallel to the lamp.
- Position 2): the handle is at a right angle to the
lamp.
1. To change the position of the handle
12
, press
the locking button
13
and move the handle to
the
12
desired position at the same time. When
the new position is reached, the locking button
engages
13
audibly.
2. If the handle
12
is to be moved to the old posi-
tion again, press the locking button
13
and move
the handle
12
back to the initial position until the
locking button
13
audibly clicks into place.
Variable lamp base (A6)
The lamp has a base
14
which can be used in 3
height levels. To do this, simply fold down the base
14
. It engages at the respective levels:
- Height level 1): the base
14
is followed in, the
lamp is parallel to the ground.
- Height level 2): the base
14
is folded out in posi-
tion 1 and allows the lamp to be positioned at an
angle of approx. 35°.
- Height level 3): the base
14
is folded out com-
pletely, and allows the lamp to be positioned at
an angle of approx. 20°.
!
CAUTION!
If the lamp is not being used, the handle
12
and the
base
14
should each be folded in at the position 1).
Otherwise, injuries could occur.
8. Troubleshooting
ERRORS
POSSIBLE CAUSE AND
REMEDY
No function
With a connection via mains
power adapter:
- The mains power adapter
3
is
not fully plugged in.
- Check that the power outlet is
working properly
- Check the fuses of the building.
No function
When connected to the ciga-
rette lighter:
- Is the cigarette lighter supplied
with power? Some cigarette
lighters only switch on when the
car is started.
- Check the fuses of the vehicle.
Charging process
takes a very long
time
When connected to the ciga-
rette lighter:
- Is the car's battery too old or too
weak?
- Check the fuses of the vehicle.
9. Cleaning and care instructions
!
WARNING!
Risk of injury!
Prior to cleaning, the mains power
adapter must be disconnected from
the power supply. There is a risk of
electric shock!
- only clean with a dry cloth
- do not use any harsh detergents/chemicals
- do not immerse in water
- store in a cool, dry place, protected from UV light
NOTE!
- Allow the lamp to cool completely before
storing. There is a risk of excessive heating.
10. Conformity declaration
This device complies with the fundamental
requirements and other relevant regula-
tions of the European Electromagnetic
Compatibility Directive 2014/30/EU, as well as the
Low-Voltage Directive 2014/35/EU and the RoHS
Directive 2011/65/EU. The complete original con-
formity declaration is available from the importer.
11. Disposal
The packaging and operating instruc-
tions are made of 100 % environmen-
tally friendly materials, which you may
dispose of at local recycling centres.
Disposal of the battery
- Defective or used rechargeable batteries
have to be recycled in accordance with Di-
rective 2006/66/EC and its amendments.
- Batteries and disposable batteries are not per-
mitted to be disposed of with household waste.
They contain harmful heavy metals. Marking: Pb
(= lead), Hg (= mercury), Cd (= cadmium). You
are legally obligated to return used batteries and
rechargeable batteries. After use, you can either
return batteries to our point of sale or in the di-
rect vicinity (e.g. with a retailer or in municipal
collection centres) free of charge. Batteries and
rechargeable batteries are marked with a crossed-
out waste bin.
The product may not be disposed of with nor-
mal household waste. Please find out about
disposal options for the product from your
local authority or town administration.
Only dispose of the product at a collection point for
electrical waste. Batteries and rechargeable batter-
ies should not be disposed of with household waste!
Please return batteries and/or rechargeable batter-
ies and/or the device via the respectively provided
collection facilities. The old appliances disposal is
not performed at the point of sale.
GB/IE/NI
GB/IE/NI