background image


16 


WARNING:


When servicing, use only original equipment replacement parts. The use of any 

other parts may create a safety hazard or cause damage to the screwdriver. 
 
Any attempt to repair or replace electrical parts on this screwdriver may create a safety hazard unless 
repairs are performed by a qualified technician. For more information, call the Toll-free Helpline, at  
1-866-349-8665 (Monday through Friday 9am 

– 5pm Eastern Time).


Always order by PART NUMBER, not by key number. 


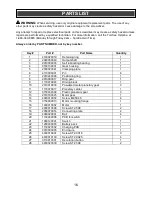
Key # 

Part # 

Part Name 

Quantity 

4100020019 

Retaining ring 

2040050040 

Output shaft 

2010080033 

Self lubricating bearing 

3160100001 

Gear housing 

2030020041 

Clamping plate 

4110090001 

Pin 

2010240008 

Positioning ring 

2010090017 

Ring gear 

1170070024 

Driving block 

10 

2010010030 

Powdered metal planetary gear 

11 

1170070017 

Planetary carrier 

12 

3150030004 

Plastic planetary gear 

13 

2010180025 

Motor gear 

14 

4020010054 

Screw M2.5X4.5 

15 

3150090013 

Motor mounting flange 

16 

1039010002 

Motor 

17 

4030010008 

Screw ST2.5X8 

18 

2050070014 

Connecting plate 

19 

4080020001 

Ball 

20 

1130060006 

PCB for switch 

21 

1060120001 

Switch 

22 

1260030003 

Battery pack 

23 

1130020002 

Charging PCB 

24 

3010030005 

Enclosure 

25 

4030010034 

Screw ST2.9X16 

26 

4030010130 

Screw ST2.9X25 

27 

3110010031 

Decoration button 

28 

4030020039 

Screw ST2.5X8 


PARTS LIST 

Summary of Contents for JD500203

Page 1: ...Weight 1 lb 2 oz 0 47 kg BATTERY CHARGER Battery voltage 3 6 V Charger 3 5 Hour Class 2 Charger input 120 240V AC 50 60Hz 8W Charger output 6V DC 300mA Need Assistance Call us on our toll free customer support line 1 866 349 8665 Monday through Friday 9am 5pm Eastern Time Technical questions Replacement parts Parts missing from package ...

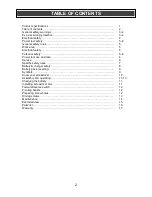
Page 2: ...nal safety 5 6 Power tool use and care 6 Service 6 Specific safety rules 7 Battery charger safety 8 Battery pack recycling 8 Symbols 9 Know your screwdriver 10 Assembly and operating 11 13 Charging the battery 11 Installing screwdriver bits 11 Forward reverse switch 12 Pivoting handle 12 Preparing screw holes 12 Driving screws 13 Maintenance 14 Exploded view 15 Parts list 16 Warranty 17 TABLE OF C...

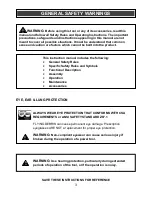
Page 3: ...nt eyewear can cause serious injury if broken during the operation of a power tool SAVE THESE INSTRUCTIONS FOR REFERENCE WARNING Use hearing protection particularly during extended periods of operation of the tool or if the operation is noisy GENERAL SAFETY WARNINGS WARNING Before using this tool or any of its accessories read this manual and follow all Safety Rules and Operating Instructions The ...

Page 4: ...st that is created by power sanding sawing grinding drilling and other construction activities may contain chemicals that are known to cause cancer birth defects or other genetic abnormalities These chemicals include Lead from lead based paints Crystalline silica from bricks cement and other masonry products Arsenic and chromium from chemically treated lumber The level of risk from exposure to the...

Page 5: ...of electric shock When operating a power tool outdoors use an extension cord suitable for outdoor use Use of a cord suitable for outdoor use reduces the risk of electric shock If operating a power tool in a damp location is unavoidable use a residual current device RCD protected supply Use of a ground fault circuit interrupter GFCI reduces the risk of electric shock Personal safety Stay alert watc...

Page 6: ...ower tool or these instructions to operate the power tool Power tools are dangerous in the hands of untrained users Maintain power tools Check for misalignment or binding of moving parts breakage of parts and any other condition that may affect the power tool s operation If damaged have the power tool repaired before use Many accidents are caused by poorly maintained power tools Keep cutting tools...

Page 7: ...ck to the operator Do not drive screws or break into existing walls or other blind areas where electrical wiring may exist If this situation is unavoidable remove all fuses or disconnect all breakers feeding the work area Secure the workpiece in a vice or with clamps Never hold it in your hand or across your legs The rotating action of the driver may cause the bit to come loose from the screw and ...

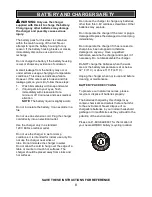
Page 8: ...indoor use only Do not use the charger near sinks or tubs Do not immerse the charger in water Do not allow the cord to hang over the edge of a table or counter or touch hot surfaces The charger should be placed away from sinks and hot surfaces Do not use the charger to charge any batteries other than this 3 6V cordless screwdriver Other batteries may explode Do not operate the charger if the cord ...

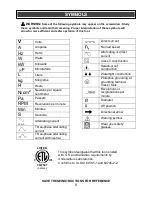
Page 9: ...tion Protective grounding at grounding terminal Class I tools Revolutions or reciprocations per minute Diameter Off position Directional arrow Warning symbol Wear your safety glasses SYMBOLS WARNING Some of the following symbols may appear on the screwdriver Study these symbols and learn their meaning Proper interpretation of these symbols will allow for more efficient and safer operation of this ...

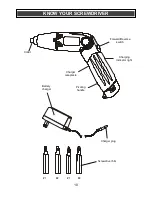
Page 10: ...10 KNOW YOUR SCREWDRIVER Collet Charging indicator light Charger receptacle Battery charger Forward Reverse switch Pivoting handle Charger plug 1 2 1 2 Screwdriver bits ...

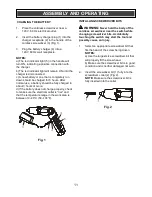
Page 11: ...more d If the battery does not charge properly check to make sure the electrical outlet is live and that the temperature range in the work area is between 10 40 C 50 104 F INSTALLING SCREWDRIVER BITS WARNING Never hold the body of the cordless screwdriver near the switch while changing screwdriver bits Accidentally touching the switch may start the tool and possibly cause an injury 1 Select an app...

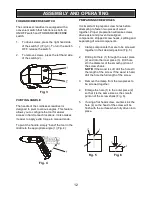
Page 12: ...ng to fasten two pieces of wood together Proper preparation will make screws drive easier and prevent misaligned components stripped screw heads splitting and separating of wood components 1 Clamp components that are to be screwed together in their desired position Fig 5 2 Drill a pilot hole 1 through the outer piece 2 and into the inner piece 3 Drill hole 2 3 the diameter of the smooth portion of...

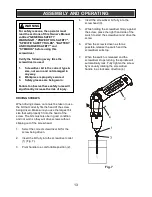
Page 13: ...he screwdriver and drive the screw 6 When the screw is driven as far as possible release the switch and the screwdriver will stop 7 When the switch is released and the screwdriver stops turning the spindle will automatically lock Fully tighten the screw by manually rotating the screwdriver handle in a clockwise direction 4 ASSEMBLY AND OPERATING For safety reasons the operator must read the sectio...

Page 14: ...ing oils etc to come into contact with plastic parts They contain chemicals that can damage weaken or destroy plastic DO NOT abuse power tools Abusive practices can damage the tool and the workpiece WARNING DO NOT attempt to modify tools or create accessories Any such alteration or modification is misuse and could result in a hazardous condition leading to possible serious injury It will also void...

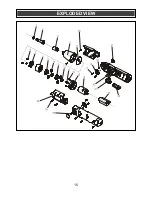
Page 15: ...15 EXPLODED VIEW ...
Page 16: ...ricating bearing 1 4 3160100001 Gear housing 1 5 2030020041 Clamping plate 1 6 4110090001 Pin 6 7 2010240008 Positioning ring 1 8 2010090017 Ring gear 1 9 1170070024 Driving block 1 10 2010010030 Powdered metal planetary gear 3 11 1170070017 Planetary carrier 1 12 3150030004 Plastic planetary gear 3 13 2010180025 Motor gear 1 14 4020010054 Screw M2 5X4 5 4 15 3150090013 Motor mounting flange 1 16 ...

Page 17: ...erty or costs This warranty does give you specific legal rights and you may have other rights which vary from province to province Be careful tools are dangerous if improperly used or maintained Seller s employees are not qualified to advise you on the use of this Merchandise Any oral representation s made will not be binding on seller or its employees The rights under this limited warranty are to...

Reviews: