background image

V4.0 

12 in. Vise Mount Box/Pan Metal Brake 

8663783 

Visit www.princessauto.com for more information 

INSTALLING THE DIES 

1.  Remove the 12 screws (#14) with a hex wrench and then the pressing 

plate (#3) from the main body (#1). 

2.  Select the appropriate dies (#6 to 9) according to the workpiece’s width. 
3.  Place the dies on the lip of the main body and place the pressing plate on top.  
4.  Insert the screws. Check that the die edges are even and level with each 

other. Adjust if there is a differences. Tighten the screws. 

OPERATION 

1.  Mark the workpiece where you want to bend it.  
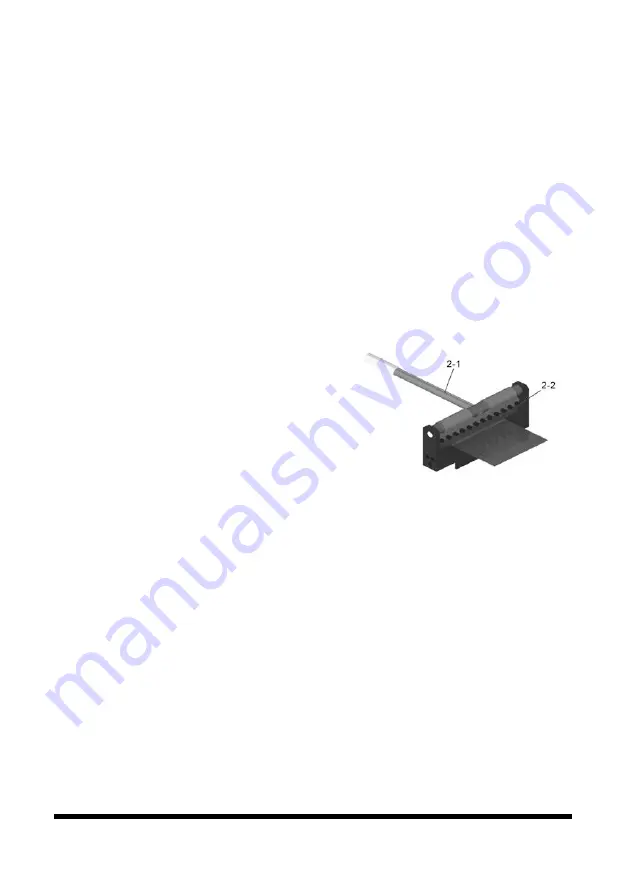
2.  Place the workpiece into the main body slot (Fig. 2). 
3.  Align the mark on the workpiece with 

the front edge of the dies (Fig. 2-2). 

4.  Pull the handle (Fig. 2-1) down until the 

workpiece is at the desired angle. 

5.  Push the handle back to the upright 

position and remove the workpiece.  

CARE & MAINTENANCE  

1.  Maintain the tool with care. A tool in good condition is efficient, easier to 

control and will have fewer problems. 

2.  Inspect the tool components periodically. Repair or replace damaged or 

worn components. Only use identical replacement parts when servicing. 

3.  Follow instructions for lubricating and changing accessories. Lubricate the 

rotating parts of the mechanism with a lightweight oil daily. 

4.  Only use accessories intended for use with this tool.  
5.  Keep the tool handles clean, dry and free from oil/grease at all times.  

WARNING! Only qualified service personnel should repair the tool. An 

improperly repaired tool may present a hazard to the user and/or others. 


Fig. 2 

Summary of Contents for 8663783

Page 1: ...V4 0 8663783 Please read and understand all instructions before use Retain this manual for future reference User Manual 12 in Vise Mount Box Pan Metal Brake ...

Page 2: ...ipment Keep this manual for safety warnings precautions operating or inspection and maintenance instructions HAZARD DEFINITIONS Please familiarize yourself with the hazard notices found in this manual A notice is an alert that there is a possibility of property damage injury or death if certain instructions are not followed DANGER This notice indicates an immediate and specific hazard that will re...

Page 3: ... personal protective equipment approved by the Canadian Standards Association CSA or American National Standards Institute ANSI PERSONAL PROTECTIVE EQUIPMENT 1 Always wear impact safety goggles that provide front and side protection for the eyes Eye protection equipment should comply with CSA Z94 3 07 or ANSI Z87 1 standards based on the type of work performed 2 Wear gloves that provide protection...

Page 4: ... use it for an unintended purpose 2 The workpiece edges may be sharp or have metal slivers protruding from it after bending Wear heavy duty gloves when handling the workpiece UNPACKING WARNING Do not operate the tool if any part is missing Replace the missing part before operating Failure to do so could result in a malfunction and personal injury Remove the parts and accessories from the packaging...

Page 5: ...nt edge of the dies Fig 2 2 4 Pull the handle Fig 2 1 down until the workpiece is at the desired angle 5 Push the handle back to the upright position and remove the workpiece CARE MAINTENANCE 1 Maintain the tool with care A tool in good condition is efficient easier to control and will have fewer problems 2 Inspect the tool components periodically Repair or replace damaged or worn components Only ...

Page 6: ...l 1 800 665 8685 DISPOSAL Recycle a tool damaged beyond repair at the appropriate facility TROUBLESHOOTING Visit a Princess Auto Ltd location for a solution if the tool does not function properly or parts are missing If unable to do so have a qualified technician service the tool ...

Page 7: ...y 1 2 The Base of Braking 1 3 Pressing Plate 1 4 Eccentric Shaft 1 5 Left Support 1 6 Upper Braking Die 1 in 1 7 Upper Braking Die 2 in 1 8 Upper Braking Die 3 in 1 9 Upper Braking Die 6 in 1 10 Hex Wrench 6mm 1 11 Handle 1 12 Handle Knob 1 13 Right Support 1 14 Screw M8X20 18 15 Spring Washer 8mm 12 16 Elastic Cylindrical Pin Φ 5X30 2 17 Screw M6X12 2 ...

Page 8: ...8663783 12 in Vise Mount Box Pan Metal Brake V4 0 8 For technical questions call 1 800 665 8685 ...

Page 9: ...783 Vous devez lire et comprendre toutes les instructions avant d utiliser l appareil Conservez ce manuel afin de pouvoir le consulter plus tard Manuel d utilisateur Frein de métal à boîte bac pour étau de 12 po ...

Page 10: ...il utilise cet outil afin de réduire le risque de blessure ou de dommage à l équipement Conservez ce manuel qui contient les avertissements de sécurité les précautions les instructions de fonctionnement ou d inspection et d entretien DÉFINITIONS DE DANGER Veuillez vous familiariser avec les avis de danger qui sont présentés dans ce manuel Un avis est une alerte indiquant qu il existe un risque de ...

Page 11: ...en éclairée et exempte de toute distraction 2 Assurez vous que les personnes qui ne portent pas l équipement de sécurité approprié ne se trouvent pas à proximité de l aire de travail 3 Rangez les outils correctement dans un lieu sécurisé et sec Gardez les outils hors de la portée des enfants SÉCURITÉ PERSONNELLE AVERTISSEMENT Portez de l équipement de protection personnelle homologué par l Associa...

Page 12: ...quilibre appropriés sont nécessaires afin d avoir un meilleur contrôle en cas de situations inattendues CONSIGNES DE SÉCURITÉ SPÉCIFIQUES DANGER Ne permettez PAS au confort ou à votre familiarisation avec l outil obtenus après un emploi répété de se substituer à une adhésion stricte aux règles de sécurité de l outil Si vous utilisez cet outil de façon dangereuse ou incorrecte vous pouvez subir des...

Page 13: ...g 1 2 dans l ouverture de l arbre excentrique fig 1 1 Serrez la poignée INSTALLATION DES MATRICES 1 Enlevez les 12 vis no 14 au moyen d une clé hexagonale suivies de la plaque de pression no 3 du corps principal no 1 2 Sélectionnez les matrices appropriées nos 6 à 9 en fonction de la largeur de la pièce à travailler 3 Placez les matrices sur le rebord du corps principal et la plaque de pression su...

Page 14: ...ent les pièces rotatives de l appareil avec une huile légère 4 Utilisez seulement des accessoires conçus pour être utilisés avec cet outil 5 Gardez les poignées de l outil propres sèches et exemptes d huile ou de graisse en tout temps AVERTISSEMENT Seul un personnel d entretien qualifié doit effectuer la réparation de l outil l appareil Un outil appareil mal réparé peut présenter un risque pour l ...

Page 15: ...aque de pression 1 4 Arbre excentrique 1 5 Support de gauche 1 6 Matrice de freinage supérieure de 1 po 1 7 Matrice de freinage supérieure de 2 po 1 8 Matrice de freinage supérieure de 3 po 1 9 Matrice de freinage supérieure de 6 po 1 10 Clé hexagonale de 6 mm 1 11 Poignée 1 12 Bouton de poignée 1 13 Support de droite 1 14 Vis M8x20 18 15 Rondelle à ressort de 8 mm 12 16 Goupille cylindrique élast...

Page 16: ...8663783 Frein de métal à boîte bac pour étau de 12 po V 4 0 8 En cas de questions techniques appelez le 1 800 665 8685 ...

Reviews: