background image

rOtatInG tHe HeaD anD blaDe assembly

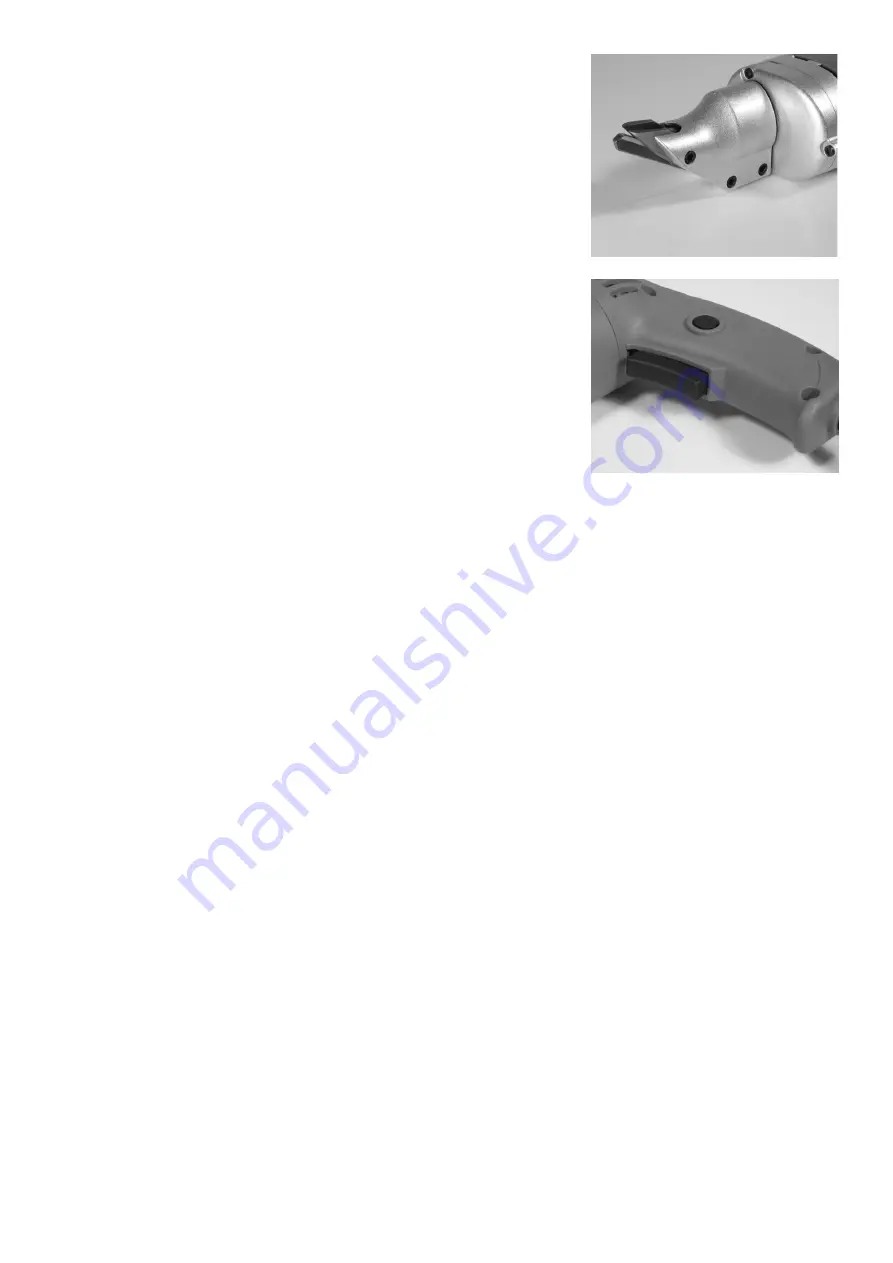
To facilitate cutting at odd angles, the head and blade assembly can be 
rotated to any angle (see Fig. 1).

1.  loosen the cap screws (5) on the head and blade assembly 

(44).

2.  rotate the head to the desired angle then tighten the screws 

again.

3.  make sure you reassemble the tool correctly.

 If you notice 

any parts loosening or wobbling while in use, unplug the tool and 
reassemble the tool correctly, making sure the pieces are in the 
correct spot.

swItcH actIOn

1.  when starting the tool, hold it firmly with both hands i.e. One 

hand on the handle and one underneath the gear base (22).

warnInG:
 

be certain that you do not hold your hands too close to the 
moving blades! 

Touching these could result in serious injury!

2.  the switch can be locked in the "On" position, convenient 

for long cutting operations. 

To lock the switch "ON", press the 

switch button down and press the lock button located on the 
handle (see Fig. 2).

3.  to unlock the switch, press and release the switch. 

The switch 

is spring loaded and will snap forward automatically.

maintEnancE

check the condition of this tool before each use.

1.  Plug in the tool, and turn it on to run freely for one minute.
2.  after the tool has run for one minute, turn it off and put 3-4 drops of light machine oil inside the 

blade set assembly (43)

tO remOve Or rePlace tHe blaDes:

1.  unplug this tool before attempting any maintenance.
2.  loosen the screws (5) holding the head and blade assembly closed (44). remove the head.
3.  remove the screw (5) holding blades in place.
4.  to reinstall new blades, first assemble the center blade (1) in between the side knife blades (2). 

Insert the assembled blades inside the aluminum head (7), and tighten the screws.

5.  make sure you reassemble the tool correctly. 

If you notice any parts loosening or wobbling while in 

use, unplug the tool and reassemble the tool correctly, making sure the pieces are in the correct spot.

rePlacInG carbOn brusHes

After considerable use, your electric metal shear may not run as well as usual. If it starts or runs slowly, makes a 
grinding noise or will not run at all, the problem may be worn carbon brushes.

1.  unplug your tool before beginning work.
2.  to examine the condition of the brushes, remove the screws (35) holding the handle half (42). 

remove the handle half and locate the carbon brushes (32).

nOte:
 

record the position of each carbon brush as you remove it, so you can replace them in exactly the 
same way.

 Carbon brushes wear into the armature. If they are replaced in a different orientation, they will 

have to undergo additional wear before they again fit properly.

3.  If the carbon brushes are worn (less than 1/8" carbon remaining) they should be replaced. 

If either 

brush is cracked or chipped, replaced both brushes. If they are glazed, but more than 1/8" in length, 
remove the glaze with a pencil eraser. If they are in good condition and more than 1/8" remains, replace 
the original brushes in their original position.

4.  to replace a carbon brush, insert it into the brush holder (31) carbon end first, with the spring end 

to the outside.

 Replace the brush cap.

nOte:
 

when replacing carbon brushes always replace both carbon brushes at the same time.

5.  after replacing the carbon brushes, reassemble the tool and let it run freely for 2 minutes before 

using it.

 This will allow the carbon brushes (42) to wear into the armature.

for any technical questions, please call 1-800-665-8685

5

fIG. 2

fIG. 1

8257370

Summary of Contents for 8257370

Page 1: ...Electric Shear 8257370 Owner s manual Please read and understand all instructions before use Retain this manual for future reference ...

Page 2: ...NSI approved dust mask or respirator when working around metal and wood dusts Wear ANSI approved earplugs 2 Do not over reach keep proper footing and balance at all times Proper footing and balance enables better control of the tool in unexpected situations 3 Dress properly wear protective equipment Do not wear loose clothing or jewelry as they can be caught in moving parts Tie back long hair Prot...

Page 3: ...grounded 3 Double Insulated tools are equipped with a polarized plug one blade is wider than the other this plug will fit in a polarized outlet only one way If the plug does not fit fully in the outlet reverse the plug If it still does not fit contact a qualified electrician to install a polarized outlet Do not change the plug in any way Double Insulation eliminates the need for a three wire groun...

Page 4: ...it repaired by a qualified electrician before using it 7 Protect your extension cords from sharp objects excessive heat and damp or wet areas Recommended Minimum Wire Gauge for 120 Volt Extension Cords Nameplate Amperes at full load Extension Cord Length 25 Feet 50 Feet 75 Feet 100 Feet 150 Feet 0 2 0 18 18 18 18 16 2 1 3 4 18 18 18 16 14 3 5 6 0 18 18 16 14 12 6 1 7 0 18 16 14 12 12 7 1 12 0 16 1...

Page 5: ...nife blades 2 Insert the assembled blades inside the aluminum head 7 and tighten the screws 5 Make sure you reassemble the tool correctly If you notice any parts loosening or wobbling while in use unplug the tool and reassemble the tool correctly making sure the pieces are in the correct spot Replacing Carbon Brushes After considerable use your electric metal shear may not run as well as usual If ...

Page 6: ...all 1 800 665 8685 6 Description Q ty 15 Bearing 1 16 Springless washer 1 17 Shaft 1 18 Gear cover 1 19 Pin 1 20 Bearing 1 21 Gear 1 22 Gear base 1 23 Wind shield 1 24 Bearing 1 25 Rotor 1 26 Gear 1 27 Screw 3 28 Shock absorbing washer 1 29 Stator 1 Description Q ty 30 Spec label 1 31 Carbon brush box 2 32 Carbon brush set 1 33 Brand label 1 34 Switch 1 35 Screw 4 36 Strain relief 1 37 Screw 2 38 ...

Page 7: ...Cisailles électriques 8257370 Manuel du Propriétaire Vous devez lire et comprendre toutes les instructions avant d utiliser l appareil Conservez ce manuel afin de pouvoir le consulter plus tard ...

Page 8: ... un endroit sec pour l empêcher de rouiller Gardez toujours vos outils sous clé et hors de la portée des enfants et des personnes non autorisées Entre les mains de telles personnes les outils peuvent devenir dangereux sécurité personelle 1 Employez l équipement de sécurité proposé Portez toujours des gants résistants et une protection efficace pour la vue approuvée par l ANSI une protection pour l...

Page 9: ...arisée dont une lame est plus large que l autre Cette fiche ne peut être introduite que d une seule façon dans une prise de courant polarisée S il vous est impossible de l introduire complètement tournez la à l envers Si c est encore impossible de la brancher demandez à un électricien professionnel d installer une prise de courant polarisée Ne modifiez jamais la fiche elle même L isolement double ...

Page 10: ...i 150 pi 0 2 0 18 18 18 18 16 2 1 3 4 18 18 18 16 14 3 5 6 0 18 18 16 14 12 6 1 7 0 18 16 14 12 12 7 1 12 0 16 14 12 10 x 12 1 16 0 14 12 10 x x 16 1 20 0 12 10 x x x X N est pas recommandé pour une rallonge électrique UTILISATION 1 En respectant toutes les exigences de sécurité déjà mentionnées branchez le cordon d alimentation dans une prise de courant de 120 volts à 60 hertz protégée par un dis...

Page 11: ... REMPLACEMENT DES BALAIS DE CARBONE Après une longue période d utilisation il se pourrait que vos cisailles électriques ne fonctionnent plus aussi bien qu autrefois Si l outil démarre ou marche lentement fait entendre un bruit de grincement ou refuse tout simplement de fonctionner la source du problème pourrait être l usure des balais de carbone 1 Débranchez votre outil avant de commencer le trava...

Page 12: ...ulement 1 13 Rondelle 1 14 Rondelle 1 Nº Description Qté 15 Roulement 1 16 Rondelle sans ressort 1 17 Tige 1 18 Couvre engrenage 1 19 Goupille 1 20 Roulement 1 21 Engrenage 1 22 Base d engrenage 1 23 Pare vent 1 24 Roulement 1 25 Rotor 1 26 Engrenage 1 27 Vis 3 28 Rondelle amortisseuse 1 29 Stator 1 Nº Description Qté 30 Étiquette de spécifications 1 31 Porte balais 2 32 Jeu de balais de carbone 1...

Reviews: