Power Fist 8052409 Owner'S Manual Download Page 4

Loading Fasteners

WARNING: Always disconnect the tool from the compressed air before

loading. When loading the tool always point the tool away from
yourself and others. Make sure that you are not holding the tool
with trigger depressed while loading the tool.

1. Insert a strip of fasteners into magazine, keeping it point down.

2. Release the latch and pusher, slid the pusher against the nails.

3. Connect the tool to the air supply. Make sure the air pressure is in the

correct range denoted in the Technical Data.

4. Then test the driving depth in a sample piece of wood before using. If the

fasteners are being driven too far or not far enough, adjust the regulator to
provide less air pressure or more air pressure. 

5. Never operate tool unless safety nose is contact with workpiece. Do not

operate tool without fasteners or damage to tool may result.

6. Never fire fasteners into air because fasteners may injury operator or

others and damage to tool may result.

7. The tool is equipped with a single firing safety system to protect the

operator.

Maintenance

Disconnect the tool from the air compressor before adjusting, clearing jams,
servicing, relocating and during non operation.

1. Regular lubrication, if your tool without using the in-liner automatic oilier,

place 2 or 6 drops of pneumatic tool oil into the air inlet before each work
day or after 2 hours of continuous use depending on the characteristic of
workpiece or type of fasteners.

2. Check and change all worn or damaged o-rings, seals, etc. Tight all the

screws and caps in case personal injury.  

3. Inspect trigger and safety mechanism to assure safe system is complete

and functional: no loose and missing parts, no building or sticking parts.

4. Keep magazine and nose of tool clean and free of any dirt lint or abrasive

particles.

Summary of Contents for 8052409

Page 1: ...2 1 2 Air Finishing Nailer 8052409 Owner s Manual Please read all safety and operating instructions before using this product Retain this manual forfuture reference ...

Page 2: ...AX AIR PRESSURE of 120 PSI 5 CARRY THE TOOL ONLY BY THE HANDLE To avoid unintentional firing of fastener do not hold the trigger or pull on safety yoke mechanism 6 KEEP THE TOOL POINTED AWAY FROM YOURSELF and others at all times and keep hands any body parts away rear area to safe guard against possible injury 7 DISCONNECT TOOL FROM AIR SUPPLY BEFORE LOADING fasteners to prevent a fastener from be...

Page 3: ...rt even during extended use Features 360 degree exhaust port that can be adjusted in any direction Economical air consumption with low noise Narrow nose is ideal for door and window trims decorative trim and cabinet work finish paneling interior finishing and furniture making AirSupply 1 Use clean dry and regulated compressed air at 60 100 PSI 2 Never exceed maximum and minimum pressure Too low or...

Page 4: ...ate tool without fasteners or damage to tool may result 6 Never fire fasteners into air because fasteners may injury operator or others and damage to tool may result 7 The tool is equipped with a single firing safety system to protect the operator Maintenance Disconnect the tool from the air compressor before adjusting clearing jams servicing relocating and during non operation 1 Regular lubricati...

Page 5: ...r damaged O rings or bumper a Loose screws b Worn or damaged O rings or seals a Worn bumper b Air pressure is too high a Inadequate air supply b Inadequate lubrication c Worn or damaged O rings or seals d Exhaust port in cylinder head is blocked Solution a Check and replace O ring b Check and replace c Check and replace trigger valve stem seal or O ring a Tighten screws b Check and replace O rings...

Page 6: ...aged fasteners b Damaged or worn driver guide c Magazine or nose screw loose d Magazine is dirty Solution a Repalce bumper or pusher spring b Clean drive channel on front plate c Magazine needs to be cleaned d O ring needs to be replaced and or lubricated e Replace sealing washer a Change and use correct fastener b Check and replace the driver c Tighten the magazine d Clean the magazine Symptom 6 ...

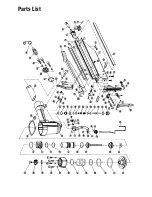
Page 7: ...Parts List ...

Page 8: ...er 38 Safety space 39 Trigger pin 40 O ring 41 Pin 42 Joint seat 43 Fixed block 44 Joint bolt 45 Steel ball 46 Spring 47 Safety seat 48 Pin 49 Snap retainer 50 Direction pin 51 Direction stand 52 Adjustment nut 53 Safety stand 54 Bolt 55 Fixed slice 56 Compressed spring 57 Block 58 Driver guide 59 Spacer 60 Snap retainer 61 Spacer pin 62 Cover plate Description 63 Bolt 64 Release latch 65 Bolt 66 ...

Reviews: