background image

10

OPERATION

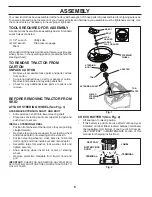
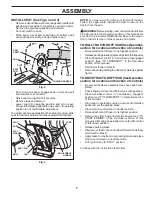
KNOW YOUR TRACTOR

READ THIS OWNER'S MANUAL AND SAFETY RULES BEFORE OPERATING YOUR TRACTOR

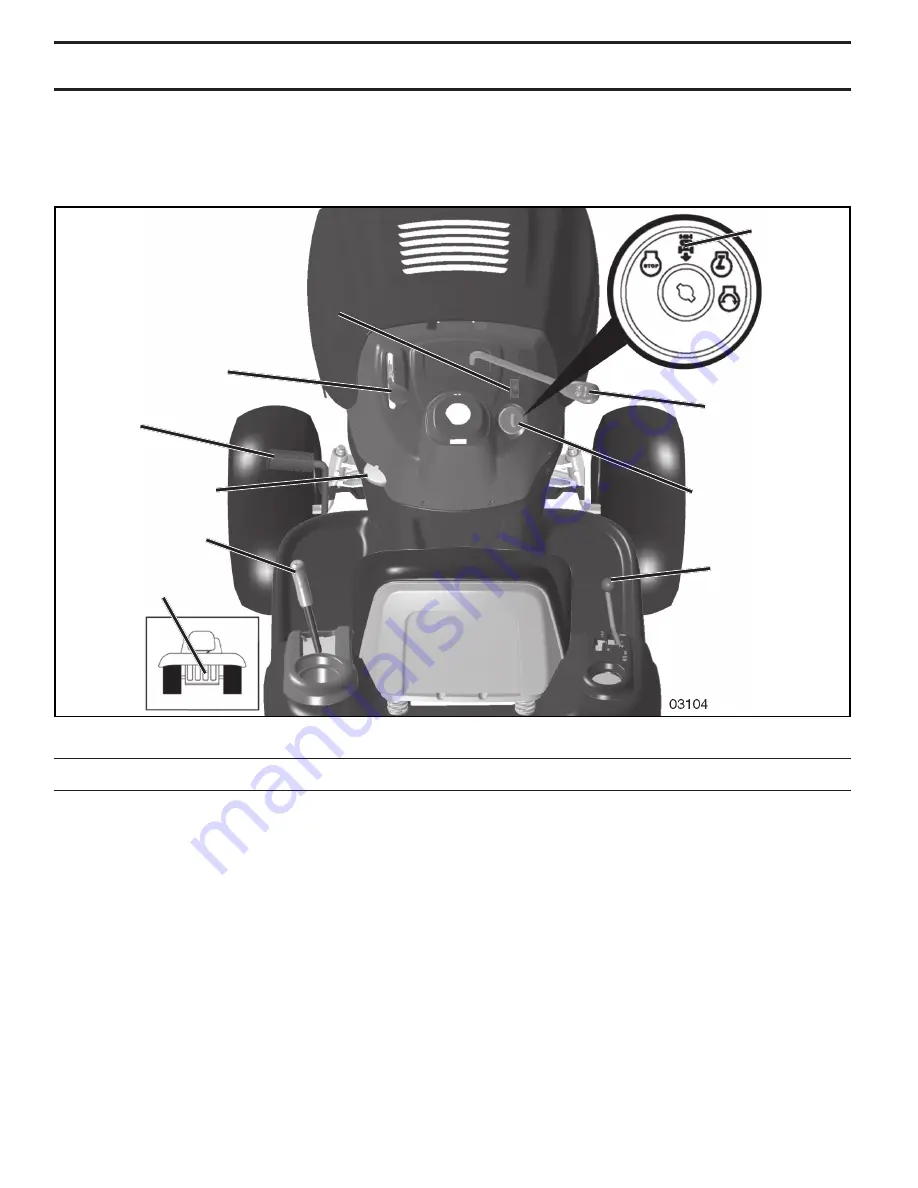
Compare the illustrations with your tractor to familiarize yourself with the locations of various controls and ad just ments.  

Save this manual for future reference.

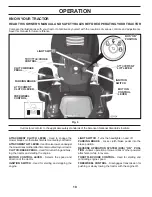
ATTACHMENT CLUTCH LEVER

 - Used to engage the 

mower blades, or other attachments mounted to your tractor.

ATTACHMENT LIFT LEVER

 - Used to raise, lower, and adjust 

the mower deck or other attachments mounted to your tractor.

CLUTCH/BRAKE PEDAL

 - Used for declutching and brak-

 ing the tractor and starting the engine.

MOTION CONTROL LEVER 

- Selects the speed and 

di rec tion of the tractor.

IGNITION SWITCH

 - Used for starting and stopping the 

engine. 

Our tractors conform to the applicable safety standards of the American National Standards Institute. 

Fig. 5

LIGHT SWITCH

 - Turns the headlights on and off.

PARKING BRAKE

 - Locks clutch/brake pedal into the 

brake position.

REVERSE OPERATION SYSTEM (ROS) “ON”  POSI-

TION -

 Allows operation of mower deck or other powered 

attachment while in reverse.

THROTTLE/CHOKE CONTROL

 - Used for starting and 

con trol ling engine speed.

FREEWHEEL CONTROL

 - Disengages transmission for 

pushing or slowly tow ing the trac tor with the engine off.

PARKING BRAKE

PARKING BRAKE

CLUTCH/BRAKE

CLUTCH/BRAKE

PEDAL

PEDAL

THROTTLE/CHOKE

THROTTLE/CHOKE

CONTROL

CONTROL

ATTACHMENT 

ATTACHMENT 

LIFT LEVER

LIFT LEVER

IGNITION

IGNITION

SWITCH

SWITCH

ATTACHMENT 

ATTACHMENT 

CLUTCH LEVER

CLUTCH LEVER

ROS "ON" 

ROS "ON" 

POSITION

POSITION

LIGHT SWITCH

LIGHT SWITCH

MOTION 

MOTION 

CONTROL 

CONTROL 

LEVER

LEVER

FREEWHEEL 

FREEWHEEL 

CONTROL

CONTROL

Summary of Contents for 419756

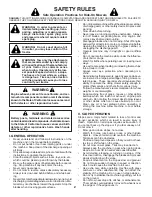
Page 1: ...ECTION DURING OPERATION Visit our website www poulan pro com WARNING Read this Manual and follow all Warnings and Safety Instructions Failure to do so can result in serious injury IMPORTANT MANUAL Do Not Throw Away 419756 Rev 1 02 19 08 AP TH Printed in the U S A 03076 ...

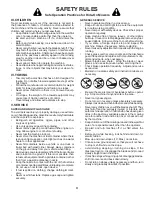
Page 2: ...king brake stop engine and remove keys before dismounting Disengage blades when not mowing Shut off engine and wait for all parts to come to a complete stop before cleaning the machine removing the grass catcher or unclogging the discharge guard Operate machine only in daylight or good artificial light Do not operate the machine while under the influence of alcohol or drugs Watch for traffic when ...

Page 3: ...owed equipment except at the hitch point Follow the manufacturer s recommendation for weight limits for towed equipment and towing on slopes Never allow children or others in or on towed equip ment On slopes the weight of the towed equipment may cause loss of traction and loss of control Travel slowly and allow extra distance to stop V SERVICE SAFE HANDLING OF GASOLINE To avoid personal injury or ...

Page 4: ...ons under Maintenance and Stor age sections of this owner s manual WARNING This tractor is equipped with an internal com bustion engine and should not be used on or near any unimprovedforest covered brush coveredorgrass covered land unless the engine s exhaust system is equipped with a spark arrester meeting applicable local or state laws if any If a spark arrester is used it should be maintained ...

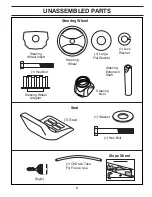
Page 5: ...Wheel Steering Wheel 1 Washer Seat 1 Seat Steering Boot Steering Extension Shaft Steering Wheel Adapter Key s Slope Sheet 1 Oil Drain Tube For Future Use 1 Hex Bolt 1 Hex Bolt 1 Lock Washer 1 Large Flat Washer Steering Wheel Insert ...

Page 6: ... slide adapter onto steering shaft extension Position steering wheel so cross bars are horizontal left to right and slide inside boot and onto adapter Assemble large flat washer lock washer bolt and tighten securely Snap steering wheel insert into center of steering wheel Remove protective materials from tractor hood and grill IMPORTANT CHECK FOR AND REMOVE ANY STAPLES IN SKID THAT MAY PUNCTURE TI...

Page 7: ...r is clear of other people and objects TOROLLTRACTOROFFSKID SeeOperation section for location and function of controls Raise attachment lift lever to its highest position Releaseparkingbrakebydepressingclutch brakepedal Place freewheel control in transmission disengaged position See TO TRANSPORT in the Operation section of this manual Roll tractor forward off skid Removebandingholdingthedeflectors...

Page 8: ...bly and tightened securely All tires are properly inflated For shipping purposes the tires were overinflated at the factory Be sure mower deck is properly leveled side to side front to rear for best cutting results Tires must be properly inflated for leveling Check mower and drive belts Be sure they are routed properly around pulleys and inside all belt keepers Check wiring See that all connection...

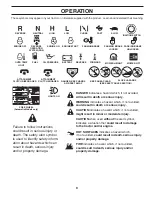
Page 9: ... injury or death The safety alert symbol is used to identify safety inform ation about hazards which can result in death serious injury and or property damage DANGER indicates a hazard which if not avoided will result in death or serious injury WARNING indicates a hazard which if not avoided could result in death or serious injury CAUTION indicates a hazard which if not avoided might result in min...

Page 10: ...tractors conform to the applicable safety standards of the American National Standards Institute Fig 5 LIGHT SWITCH Turns the headlights on and off PARKING BRAKE Locks clutch brake pedal into the brake position REVERSE OPERATION SYSTEM ROS ON POSI TION Allows operation of mower deck or other powered attachment while in reverse THROTTLE CHOKE CONTROL Used for starting and controlling engine speed F...

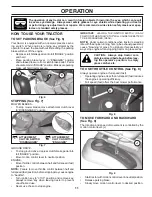
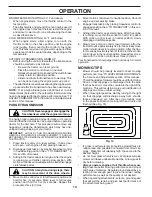
Page 11: ...utch lever to DISENGAGED position CAUTION Always stop tractor com pletely asdescribedabove beforeleav ing the operator s position to empty grass catcher etc ATTACHMENT CLUTCH SWITCH ENGAGED ATTACHMENT CLUTCH SWITCH DISENGAGED D F Fig 8 GROUND DRIVE To stop ground drive depress clutch brake pedal into full BRAKE position Move motion control lever to neutral position ENGINE Move throttle control bet...

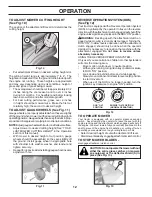
Page 12: ... during the cool season and to over 3 inches during hot months For healthier and better looking lawns mow often and after moderate growth For best cutting performance grass over 6 inches in height should be mowed twice Make the first cut relatively high the second to desired height TO OPERATE MOWER Your tractor is equipped with an operator presence sensing switch Any attempt by the operator to lea...

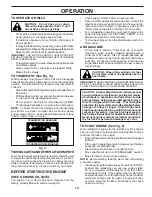
Page 13: ...RETURNTONEUTRALPOSITIONWHENTHECLUTCH BRAKE PEDAL IS DEPRESSED To restart movement slowly release parking brake and clutch brake pedal Slowly move motion control lever to slowest setting Make all turns slowly TO START ENGINE See Fig 5 When starting the engine for the first time or if the engine has run out of fuel it will take extra cranking time to move fuel from the tank to the engine Besurefreew...

Page 14: ...ing position Allow one minute for transmission to warm up This can be done during the engine warm up period Theattachmentscanalsobeusedduringtheenginewarm up period after the transmission has been warmed up NOTE If at a high altitude above 3000 feet or in cold temperatures below 32 F the carburetor fuel mixture may need to be adjusted for best engine performance See TO ADJUST CARBURETOR in the Ser...

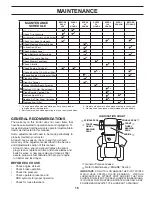
Page 15: ...y on this tractor does not cover items that have been subjected to operator abuse or negligence To receivefullvaluefromthewarranty operatormustmaintain tractor as instructed in this manual Some adjustments will need to be made periodically to properly maintain your tractor At least once a season check to see if you should make any of the adjustments described in the Service and Adjustments section...

Page 16: ... Be sure operator presence and reverse operation systems are working properly If your tractor does not function as described repair the problem immediately The engine should not start unless the brake pedal is fully depressed and the attachment clutch control is in the disengaged position CHECK OPERATOR PRESENCE SYSTEM Whentheengineisrunning anyattemptbytheoperator to leave the seat without first ...

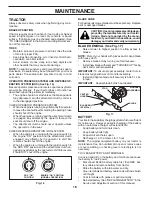
Page 17: ...etc ofallforeignmatter Keep finished surfaces and wheels free of all gasoline oil etc Protect painted surfaces with automotive type wax We do not recommend using a garden hose or pressure washer to clean your tractor unless the engine and trans mission are covered to keep water out Water in engine or transmission will shorten the useful life of your tractor Use compressed air or a leaf blower to r...

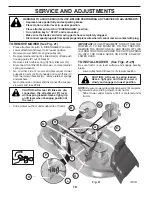
Page 18: ...ect mower suspension arm A from chassis and rear lift link C from rear mower bracket D remove retainer springs and washers Go to other side of mower and disconnect the suspen sion arm and rear lift link CAUTION After rear lift links are dis connected the attachment lift lever will be spring loaded Have a tight grip on lift lever when changing position of the lever Slide mower out from under right ...

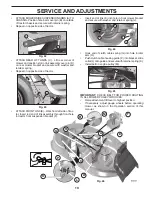
Page 19: ...g Repeat on opposite side of tractor ATTACH REAR LIFT LINKS C Lift rear corner of mower and position slot in link assembly over pin D on rear mower bracket and secure with washer and retainer spring Repeat on opposite side of tractor Insert end of link E into hole in front mower bracket and secure with washer and retainer spring J Hook end of clutch cable spring Q into hole in idler arm R Push clu...

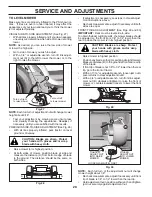
Page 20: ...n raise the low side of mower or lower the high side Go to side of mower you wish to adjust With a 3 4 or adjustable wrench turn lift link adjust ment nut A to the left to lower the mower or to the right to raise the mower NOTE Each full turn of adjustment nut will change mower height about 3 16 Test your adjustment by mowing some uncut grass and visually checking the appearance Readjust if necess...

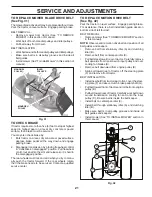
Page 21: ...ves and inside all belt guides Install mower See To Install Mower in this section of manual Fig 31 TO REPLACE MOTION DRIVE BELT See Fig 32 Park the tractor on level surface Engage parking brake For assistance there is a belt installation guide decal on bottom side of left footrest BELT REMOVAL Remove mower See TO REMOVE MOWER section in this manual NOTE Observe entire motion drive belt and positio...

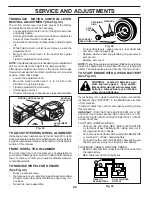
Page 22: ...nd of the BLACK cable D to good chassis ground away from fuel tank and battery TO REMOVE CABLES REVERSE ORDER BLACK cable first from chassis and then from the fully charged battery RED cable last from both batteries Fig 33 02239 ADJUSTMENT BOLT NEUTRAL LOCK GATE MOTION CONTROL LEVER TRANSAXLE MOTION CONTROL LEVER NEUTRAL ADJUSTMENT See Fig 33 The motion control lever has been preset at the factory...

Page 23: ...oose or damaged wiring may cause your tractor to run poorly stop running or prevent it from starting Check wiring See electrical wiring diagram in the Repair Parts section 03075 HOOD HEADLIGHT WIRE CONNECTOR Fig 37 TO REMOVE HOOD AND GRILL ASSEMBLY See Fig 37 Raise hood Unsnap headlight wire connector Stand in front of tractor Grasp hood at sides tilt toward engine and lift off of tractor To repla...

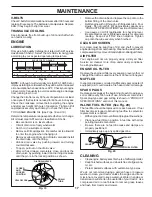
Page 24: ...FUELSYSTEMPARTSSUCH AS CARBURETOR FUEL FILTER FUEL HOSE OR TANK DURING STORAGE ALSO EXPERIENCE INDICATES THAT ALCOHOL BLENDED FUELS CALLED GASOHOL OR USING ETHANOLORMETHANOL CANATTRACTMOISTUREWHICH LEADSTOSEPARATIONANDFORMATIONOFACIDSDURING STORAGE ACIDIC GAS CAN DAMAGE THE FUEL SYSTEM OF AN ENGINE WHILE IN STORAGE Empty the fuel tank by starting the engine and let it run until the fuel lines and ...

Page 25: ...Faulty ignition switch 7 Check replace ignition switch 8 Faulty solenoid or starter 8 Check replace solenoid or starter 9 Faulty operator presence switch es 9 Contact an authorized service center department Engine clicks but will not 1 Weak or dead battery 1 Recharge or replace battery start 2 Corroded battery terminals 2 Clean battery terminals 3 Loose or damaged wiring 3 Check all wiring 4 Fault...

Page 26: ...el speed too fast 2 Shift to slower speed 3 Wet grass 3 Allow grass to dry before mowing 4 Mower deck not level 4 Level mower deck 5 Low uneven tire air pressure 5 Check tires for proper air pressure 6 Worn bent or loose blade 6 Replace sharpen blade Tighten blade bolt 7 Buildup of grass leaves and trash under mower 7 Clean underside of mower housing 8 Mower drive belt worn 8 Replace mower drive b...

Page 27: ... never across the face Do not mow slopes greater than 15 degrees Make turns gradually to prevent tipping or loss of control Exercise extreme caution when changing direction on slopes 1 Fold this page along dotted line indicated above 2 Hold page before you so that its left edge is vertically parallel to a tree trunk or other upright structure 3 Sight across the fold in the direction of hill slope ...

Page 28: ...s used for rental or commercial purposes is limited to 90 days from the date of original purchase 5 This Warranty applies only to products which have been properly assembled adjusted operated and maintained in ac cordance with the instructions furnished This Warranty does not apply to any product which has been subjected to altera tion misuse abuse improper assembly or installation delivery damage...

Page 29: ...itée à quatre vingt dix 90 jours à compter de la date d achat initiale 5 Cette garantie ne s applique qu aux produits correctement montés réglés utilisés et entretenus conformément aux ins tructions données dans la documentation appropriée Cette garantie ne s applique pas aux produits qui ont été modifiés utilisés incorrectement abusés mal assemblés mal installés ou avariés lors de la livraison ou...

Page 30: ... DES PENTES AFIN D AMÉLIORER LA SÉCURITÉ D UTILISATION TONDEZ LES PENTES EN MONTANT OU EN DESCENDANT MAIS JAMAIS EN TRAVERS 15 DEGRÉS MAX P L I E Z S U I V A N T L E S P O I N T I L L É S C E C I E S T U N E P E N T E A 1 5 D E G R É S ...

Page 31: ...r de tondeuse n est pas équilibré 4 Nivelez le carter de tondeuse 5 La pression des pneus est basse ou inégale 5 Vérifiez la pression des pneus 6 La lame est usée tordue ou lâche 6 Remplacez la lame ou affilez la Serrez le boulon de lame 7 II y a une accumulation d herbe de feuilles et 7 Nettoyez dessous du boîtier de tondeuse de débris sous la tondeuse 8 La courroie d entraînement de tondeuse est...

Page 32: ...e ou le démarreur est défectueux 8 Vérifiez remplacez le solénoïde ou le démarreur 9 L interrupteur qui détecte la présence du conduc 9 Contactez un centre d entretien autorisé teur est défectueux II y a un déclic mais le 1 Batterie faible ou à plat 1 Rechargez ou remplacez la batterie moteur ne démarre pas 2 Les bornes de batterie sont corrodées 2 Nettoyez les bornes de batterie 3 Le câblage est ...

Page 33: ...UYAU D ESSENCE OU LE RÉSERVOIR D ESSENCE PENDANT L ENTREPOSAGE L EXPÉRIENCE DÉMONTRE QUE LES CARBURANTS QUI SONT MÉLANGÉS AVEC DE L ALCOOL ÉTHANOL OU MÉTHANOL ET PARFOIS APPELÉS GASOHOL PEUVENT ATTIRER L HUMIDITÉ QUI CAUSE LA SÉPARATION ET LA FORMATION D ACIDE PENDANT L ENTREPOSAGE L ESSENCE ACIDE PEUT AVARIER LE SYSTÈME DE CARBURANT DU MOTEUR PENDANT L ENTREPOSAGE Vidangez le réservoir d essence ...

Page 34: ... Serrez à fond Glissez la couverture borne au dessus de la borne Branchez le câble de masse de batterie NOIR à la borne négative avec le boulon H et écrou à taquets qui restent Serrez à fond 03075 CAPOT CONNECTEUR DES CÂBLES DES PHARES Fig 37 POUR ENLEVER LE CAPOT ET LA CALANDRE Voir la Fig 37 Soulevez le capot Débranchez le connecteur des câbles des phares Placez vous au devant le tracteur Empoig...

Page 35: ... NOIR D au châssis mis à la masse Maintenez les câbles loin du réservoir d es sen ce et de la batterie POUR ENLEVER LES CÂBLES RENVERSEZ LES PRO CÉ DU RES Débranchez premièrement le câble NOIR du châssis et ensuite de la batterie chargée complètement Débranchez ensuite le câble ROUGE des deux batteries BAGUE DE FER ME TU RE COU VER TU RE D ESSIEU RON DEL LES CLÉ CARRÉE ROUE AR RIÈRE SEU LE MENT Fi...

Page 36: ...e tracteur sur une surface de niveau Actionnez le frein de stationnement En cas de besoin un autocollant servant de guide à l installation de la courroie se trouve sur le dessous du repose pied gauche RETIRER LA COURROIE 1 Retirez la tondeuse voir POUR ENLEVER LA TON DEUSE dans la présente section du manuel REMARQUE Jetez un œil sur l ensemble de la courroie et la position de tous les guides et di...

Page 37: ...Soulevez la tondeuse à sa position la plus haute D un côté et de l autre de la tondeuse placez la lame de côté et mesurez la distance A du bord inférieur de la lame jusqu au sol La distance devrait être la même des deux côtés Si un ajustement est nécessaire voyez les étapes des in structions Ajustement visuel ci dessus Vérifiez de nouveau les mesures ajustez si nécessaires jusqu à ce que les deux ...

Page 38: ...C Soulevez le coin arrière de la tondeuse et positionnez la rainure du bras sur la tige D du support arrière de la tondeuse et fixez fermement à l aide d une rondelle et d un ressort arrêtoir Répétez de l autre côté du tracteur FIXEZ LA BIELLE AVANT E Commencez à la gauche du tracteur Insérez l embout de l assemblage de la bielle dans l orifice avant du support de suspension avant du tracteur F In...

Page 39: ...e levier le levage abaissez le lentement et enclen chez le à sa position la plus basse REMARQUE Assurez vous que les bras de suspension laté raux de la tondeuse A pointent vers l avant avant de glisser la tondeuse sous le tracteur Glisser la tondeuse sous le tracteur jusqu à ce qu elle soit au centre de celui ci POUR ENLEVER LA TONDEUSE Voir Fig 21 Placez l embrayage d accrochage à la position DIS...

Page 40: ...d auto Nous ne recommandons pas l utilisation d un tuyau d arrosage ou d un système de lavage sous pression pour nettoyer votre tracteur à moins que le moteur et la transmission soient recouverts pour éviter l infiltration de l eau à l intérieur Si de l eau s infiltre à l intérieur du moteur ou de la transmission ceci abrégera la durée de vie de votre tracteur Utiliser de l air compressé ou une so...

Page 41: ...être acheté chez votre fournisseur de pièces L endreit empêche le pnere de pourrir ou de se corroder SYSTÉME DE PRÉSENCE DE L OPÉRATEUR ET SYSTÈME DE FONCTIONNEMENT EN MARCHE ARRIÈRE ROS Voir la Fig 16 Vérifiez si les systèmes de présence de l opérateur de marche arrière et de verrouillage fonctionnent correctement Si votre tracteur ne fonctionne pas de la façon décrite réparez le immédiatement Le...

Page 42: ...veau de batterie Nettoyez la batterie et les bornes Vérifiez le refroidissement de transmission Vérifiez le niveau d huile du moteur Remplacez l huile du moteur avec un filtre Nettoyez le filtre à air Nettoyez le tamis à air Inspectez le silencieux Pare étincelles Remplacez le filtre d huile si muni d un Nettoyez les ailettes de refroidissement Remplacez la bougie d allumage Remplacez la cartouche...

Page 43: ...s la posi tion point mort Relâchez le frein de stationnement et permetez que l embrayage frein re tour ne dans la position d opération Permetez que la transmission de réchauffe pendant une minute Ceci peut être fait pendant le temps d échauffe ment Les accessoires peuvent êtres utilisés pendant le temps d échauffement du moteur après que la transmission soit chaude REMARQUE Le mélange de carburant...

Page 44: ...ant de votre trac teur Faites preure de jugement lorsque vous remorquez un accessorie Il est dan ge reux de re mor quer des char ge ments trop lourds dans une pente Les pneus peu vent perdre de l ad hé ren ce avec le terrain et vous faire perdre la maîrise de votre tracteur AVANT DE DÉMARRER LE MOTEUR VÉRIFIER LE NIVEAU D HUILE DU MOTEUR Ce moteur a été rempli à l usine avec l huile d été avant l ...

Page 45: ...e bas et vers l arrière avant de reculer Déplacez lentement le levier de vitesse sur la marche arrière R pour commencer le mouvement Lorsque l utilisation du ROS n est plus nécessaire faites tourner la clé de contact en sens horaire sur ON POUR RÉGLER LA HAUTEUR DE COUPE DE LA TON DEU SE Voir la Fig 10 La position du levier d accrochage B détermine la hauteur de la tonte Placez le levier d accroch...

Page 46: ...ARRÊTER Voir la Fig 7 LAMES DE TONDEUSE Pour arrêter les lames de tondeuse bougez le levier d em braya ge d accessoire à la position Désengagée ATTENTION Arrêtez toujours le tracteur complètement comme décrit ci dessus avant de quitter le tracteur de vider le ra mas se herbe etc D F B C COMMENT UTILISER VOTRE TRAC TEUR ENTRAÎNEMENT Pour arrêter l entraînement abaisser complètement la pé da le d em...

Page 47: ...er le moteur L INTERUPTEUR DES LUMIÈRES permet d allumer éteindre les phares du tracteur LEVIER DU FREIN DE STATIONNEMENT bloque la pédale de frein en position de frein BRAKE COMMUTATEUR DU SYSTÈME DE PRÉSENCE DE L OPÉRA TEUR ROS POSITION ON Permet le fonctionnement de la plate forme de faucheuse ou de tout autre attachement actionné tandis qu à l envers COMMANDE DES GAZ ÉTRANGLEUR permet de démar...

Page 48: ... est utilisé pour identifier les informations de sécurité à propos des risques qui peuvent avoir pour résultats la mort de sérieuses blessures et ou endommager votre propriété DANGER indique un risque qui s il n est pas évité aura comme conséquence la mort ou des blessures sérieuses AVERTISSEMENT indique un risque qui s il n est pas évité pourrait avoir comme conséquence la mort ou des blessures s...

Page 49: ...e a été ajusté à une position confortable et il a été serré à fond Tous les pneus ont été correctement gonflés Les pneus ont été surgonflés pour l expédition Assurez vous que le carter de tondeuse ait été correctement nivelé du devant à l arrière d un côté à l autre pour obtenir les meilleurs résultats Les pneus doivent être cor rec te ment gonflés pour le nivellement Vérifiez la tondeuse et les c...

Page 50: ...é du sac et démarrez le moteur voir POUR DÉMARRER dans la section Fonctionnement de ce manuel Après le démarrage du moteur dé pla cez la commande des gaz dans la position de point mort Presser la pidale d embrayage frein et la maintenir en fon cée Passer le levier de vitesse en première Relâcher lentement la pédale embrayage frein et diriger len te ment le trac teur hors de la palette Appliquer le...

Page 51: ...ette localisée entre les bor nes chargez la batterie pour un minimum d une heure à 6 10 amps Voir BATTERIE dans la section Entretien de ce manuel AVANT DE RETIRER LE TRACTEUR DE LA PALETTE FIXER LE VOLANT DE DI REC TION Voir la Fig 1 ASSEMBLER L ARBRE DE RALLONGE ET LE MAN CHON DE DIRECTION Glissez l arbre de rallonge sur l arbre de direction inférieur Mettez les pattes du manchon de direction par...

Page 52: ...olant de direction Volant de direction Adaptateur Manchon de direction Rondelle Insert du volant de direction 1 Boulon 1 Boulon Serrure Rondelle Arbre de rallonge 1 Rondelle 1 Siège Siège Clé s Guide pente 1 Tube de Vidange ...

Page 53: ... pas ré sou dre con tac tez le centre d entretien autorisé le plus proche Vous y trouverez des techniciens qualifiés équipés de outils ap pro priés pour l entretien et la réparation de ce tracteur Veuillez lire et conserver ce manuel Les instructions qu il con tient vous permettront de monter et d entretenir cor rec te ment votre tracteur Observez toujours les RÈGLES DE SÉCURITÉ RESPONSABILITÉS DU...

Page 54: ...squ à la fin de l opération de remplissage N utilisez pas de dispositif de verrouillage de la buse ouverte Si du carburant tombe sur vos vêtements changez les immédiatement Ne faites jamais déborder le réservoir Remettez le capuchon de gaz en place et serrez solidement ENTRETIEN GÉNÉRAL Ne faites jamais fonctionner la machine dans un endroit clos Tous les écrous et les boulons doivent être bien se...

Page 55: ...avant de nettoyer la machine ou d enlever le ramasse herbe ou de libérer la protection de l évacuation Ne faites marcher la machine que le jour ou à la lumière artificielle Ne faites pas marcher la machine si vous être sous l influence de l alcool ou de drogues Faites attention à la circulation si vous opérez à proximité d une route ou si vous la traversez Faites très attention lorsque vous charge...

Page 56: ... site web www poulan pro com AVERTISSEMENT Lisez soigneusement le man uel suivez tous les aver tis se ments et les in struc tions de sécurité Les bles sures sérieuses peuvent en résulter si vous ne lisez pas ces aver tis se ments et in struc tions de sécurité MANUEL IMPORTANT NE JETEZ PAS 419756 Rev 1 02 19 08 AP TH Imprimé aux É U 03076 ...

Reviews: