background image

Publication No. 5105703

11

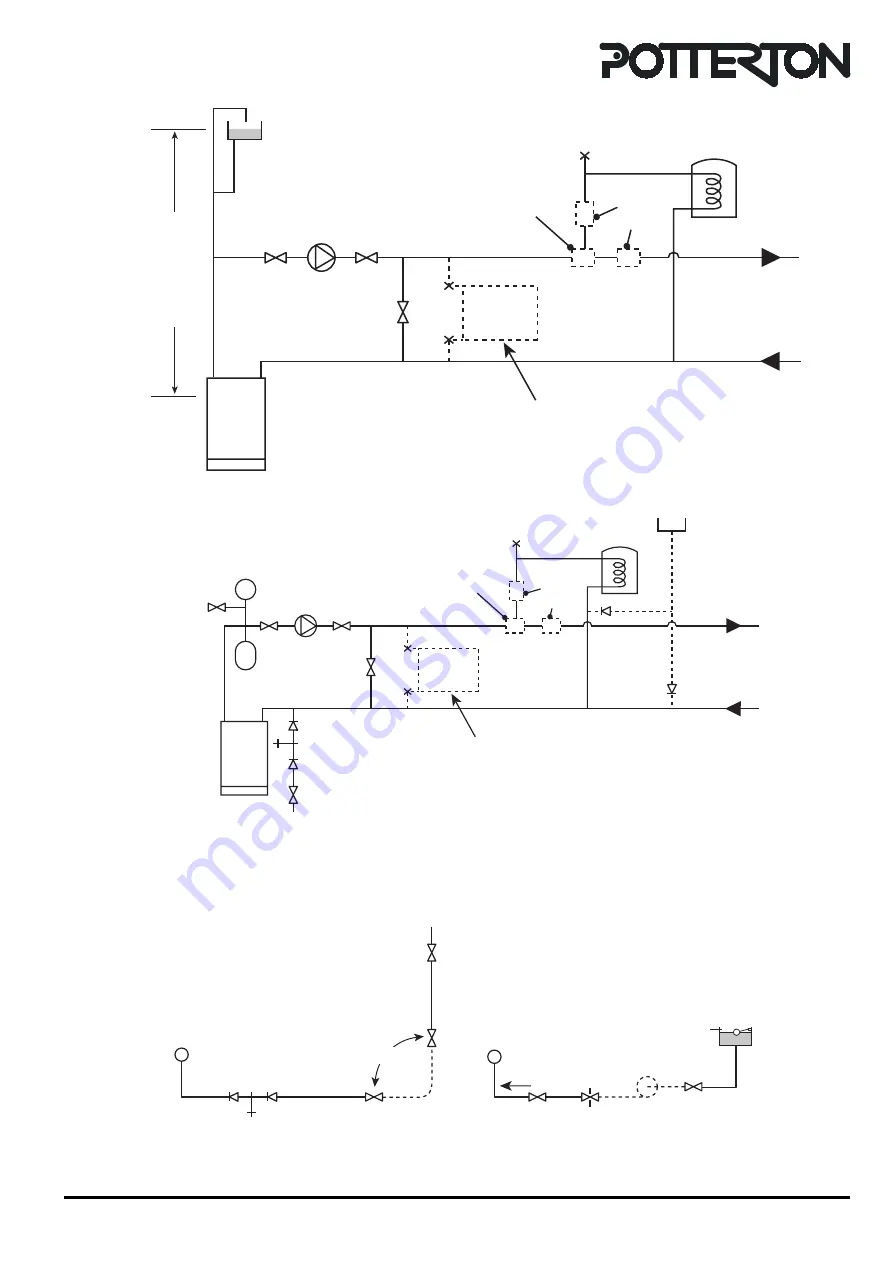
Fig. 5

Fig. 7

Installation Requirements

PRF0008A

Top
of Heat
Exchanger

Boiler

Alternative By-pass arrangement using the
Bathroom Radiator fitted with two locksheild valves

Water Level

By-pass
balancing
valve

Vent

Optional
Zone
Valves

Optional
3 Port
Valve

Max.

 30.5m (100ft)

Min.

 305mm (1ft)

PRF0009A

Boiler

Alternative By-pass arrangement using the
Bathroom Radiator fitted with two locksheild valves

By-pass
balancing
valve

Safety
Valve

Pressure
Gauge

Make up
Vessel

Expansion
Vessel

Cylinder

Filling Point

Vent

Optional
Zone
Valves

Optional
3 Port
Valve

PRF0010A

Two methods of filling a sealed

water system

Method 2
Cistern Filling Method

Note: Cistern to be supplied through a
temporary connection from a service
pipe or cold water distributing pipe

Method 1
Mains Topping-up  Method

Note: This method of filling
a sealed system may only be
used if acceptable to the Local
Water Undertaking

Mains
Water
Supply

Overflow

Cistern

Pressure Pump
reducing valve
(if required)

Stop Valve

Heating System

Mains
Water
Supply
(Service
Pipe)

Hose Union

Temporary
Hose

Stop
Valve

Double
Check
Valve

Fig. 6

Summary of Contents for 40eL

Page 1: ...tofsafety itislawthatallgasappliancesareinstalledbycompetent persons in accordance with the above regulations Failure to install appliances correctly could lead to prosecution Installation must be in accordance with the Installation Service Instructions and the rules in force LeavetheseinstructionsandtheBenchmarkLogBookwiththeuserforuseonfuturecalls Installation Service Instructions Profile 40eL 8...

Page 2: ...Seal 30 5 FaultFinding 32 6 OptionalExtrasandAccessories 33 7 ShortListofSpares 34 Theboilermodelandserialnumberaregivenonlabels one ontheundersideofthecontrolscover theothertotheright handsideofthethermsotatknob andvisibleafterremoval of the controls cover Potterton is a member of the Benchmark initiative and fully supportstheaimsoftheprogramme Benchmarkhasbeen introduced to improve the standards...

Page 3: ...ad Gravity 1 2 m Gas Supply Pressure 20mbar Gas Supply Connection Rc in BSP Female MaximumFlowTemperature 82 C Flow ReturnConnections 28 mm copper WaterContent 6 5 litres Appliance Weight Installed Lift 53 0 kg Dry 62 0 kg Electricity Supply 230 v 50 Hz Fused at 3A InternalFuse Type 1A PowerConsumption 80 Watts excluding pump Classifications CAT I 2 H 2H G20 20 mbar C13 C33 IP20 SEDBUK Declaration...

Page 4: ...llowing types of flue system Standardhorizontalfluesystemsuitableforwallthickness of 100 mm to 510 mm 2metrehorizontalfluesystemwhichprovidesamaximum flue length of 1955 mm Vertical flue system which allows the flue to pass throughaflatroofandterminateatamaximumheightof 1980 mm measured from the top of the boiler case VariouskitsareavailablefortheProfilerangeofboilers see page33 1 Installation Req...

Page 5: ...s it at all times Theboilermustbemountedonaflatwallwhichissufficiently robust to take the weight of the boiler The boiler is suitable for installation to a combustible wall e g wood cladding provided that the flue duct is not closer than25mmtocombustiblematerial Ametalsleeveshould be installed to surround the flue duct to provide a 25 mm annularspace FurtherguidanceisgiveninBS5440 1 2000 sub claus...

Page 6: ... Main Burner Air Deflector Channel Gravity DHW Pump Over run Thermostat Control Box Code Badge Control Thermostat Test Socket Overheat Thermostat System Change Over Switch Burner Pressure Test Point Gas Control Valve Gas Cock Thermostat Capillary Retaining Clip Pilot Ignition Electrode Boiler Drain Cap Air Pressure Pipe Gravity DHW Pump Over run Thermostat Capillary Fan Mounting Plate Fan WARNING ...

Page 7: ...6 cm 80 277 cm Iftheboilerisinstalledinacupboardorcompartmentwithadoor allow at least 15 mm clearance between the front of the boiler and the door for air movement 1 7 Flue Systems The flue system can be run from either the left right rear or top of the boiler InstallationRequirements x PRF0006A B C 148 A D 50 300 310 50 60 30 40 125 135 25 35 64 100 Electrical Connections Inside Control Box 170 R...

Page 8: ...ned OFF IMMEDIATELY Fig 4 M G G H P F L G A A F J K N D E J Likely flue positions requiring a flue terminal guard B C FLU0001A FannedDraughtBalancedFlue A Directly below an opening air brick opening window etc B Above an opening air brick opening window etc C Horizontally to an opening air brick opening window etc D Below a gutter or sanitary pipework E Below the eaves F Below a balcony or carport...

Page 9: ...fitted in the pipework close to the boiler and in the low points of the system Note Although the system can be emptied using the drain off taps installed in the pipework around the system to empty the boiler it is necessary to remove the drain off cap positioned within the boiler case CombinedGravityHotWater PumpedCentralHeating Systems Where a cylinder thermostat and zone valve is used to control...

Page 10: ...ting device It shall be positioned in the flow pipe either horizontally or vertically upwards and close to theboiler Noshut offvalvesaretobeplacedbetween the boiler and the safety valve The valve should be installed with a discharge pipe which permits the safe discharge of steam and hot water such that no hazard to persons or damage to electrical components is caused PressureGauge Apressuregaugein...

Page 11: ...lve Pressure Gauge Make up Vessel Expansion Vessel Cylinder Filling Point Vent Optional Zone Valves Optional 3 Port Valve PRF0010A Two methods of filling a sealed water system Method 2 Cistern Filling Method Note Cistern to be supplied through a temporary connection from a service pipe or cold water distributing pipe Method 1 Mains Topping up Method Note This method of filling a sealed system may ...

Page 12: ...arepositionedas close to the pump as possible Closing of any valve must always leave the open vent unobstructed PRF0011A Cylinder Optional Zone Valve By pass using bathroom radiator connected into Gravity Circuit and fitted with two lockshield valves to be installed when a zone valve is fitted in Gravity Circuit Min Circulating Head 1 2m 4ft PRF0007A 1 076 Imp Gall min Litres sec 1 5 6 3 0 12 4 5 ...

Page 13: ...s screws and washers accessory pack A attach boiler mounting plate to the wall Ensureitislevelandthecorrectwayup i e toprovide theclearanceattherearoftheboilerallowedforwhen marking out using the template Insertwallplugsintoholes B accessory packB and holes D accessory pack D Insert flue sealing collar into wall and secure with screws provided accessory pack B Make good the internal wall surface a...

Page 14: ...eamintheairduct should be so arranged that when installed the seam in the duct will be uppermost 1 Slide rope sealing ring on to air duct 2 Engage the terminal on to the ends of the inner flue duct and press fully home Note On60 80modelsthereisasiliconeseal on the inner edge of the terminal This is to prevent recirculation of flue products 3 EngagefourscrewsfromaccessorypackC into the pre drilled ...

Page 15: ...securing screw pull controls cover forward 10 mm lower to release from the four side fixings and pull forward clear of the thermostat knob Removedoorbyundoingthetwolowerfixingscrews and lift door off the two upper hinge brackets Removethescrewssecuringthecombustionchamber front panel and remove panel Disconnect the fan supply leads from the connector adjacenttothefan Leavinginplacethethreescrews i...

Page 16: ...ng bracket so that the sides of the boiler line up with the reference lines C on the rear wall Undo the two screws securing the transportationfootanddiscardfoot Vertical alignment with rear wall can be corrected using the adjustment screws at the rear of the boiler Rotate the left hand adjustment screw to align one of the holes in the base plate with hole D inthewall Workingthroughthehole in the l...

Page 17: ...y Engage the screw from accessory pack C intothepre drilledholeintheelbow extension and screw fully home The self tapping screw will pierce the elbow and secure the extension to the elbow Whenrearfluing theelbowextensionshould bediscarded Slide the flue elbow into the flue duct and locate the flange over the studs on the fluehoodensuringthatthesealinggasketis in place Secure the elbow to fluehood ...

Page 18: ...ulb from the flow pipe before soldering A drain off tap should be installed close to the boiler if it is in a low point of the system Oncombinedgravityhotwater pumpedcentralheatinginstallationstheflowandreturnpipesforboththegravityhotwater circuitandpumpedcentralheatingcircuitmustbeconnectedtoteesfitteddirectlytotheflowandreturnpipesontheboiler The gravity circuit should be installed in 28 mm copp...

Page 19: ... be fused at 3A Care must be taken to ensure that all wiring totheboileriskeptclearofsharpedgesand hot surfaces Theboilerterminalblockwhichissituatedin the control box is not designed to accept wiring from all the on site controls and therefore the installer will usually need to incorporate a suitable junction box This maynotberequiredifaPottertonElectronic Programmer is used as this incorporates ...

Page 20: ...ked MAINS SwL Switched live from external pumped central heatingcontrolcircuittoterminalmarkedMAINS L Neutral to terminal marked MAINS N Earthtoterminalmarked adjacenttocable clamp See Note If there are no external controls fitted connect the SwL terminal to permanent live in the junction box Note Ensurethattheearthconductorislonger thantheL N SwLfromthepointofanchorage sothatthecurrentcarryingcon...

Page 21: ... thermostat knob see Fig 24 Turn on gas at the gas service cock Ensure that the time control if fitted is in an ON condition andthattheroomand orcylinderthermostats where fitted are set to high temperatures Switch on the external electricity supply to the boiler Gas will flow to the pilot only It will not be ignited as the ignition system is de energised Using a leak detection fluid check pilot un...

Page 22: ...ons to maintain sufficient water flow through the boiler to ensure that the overheat thermostat does not operateundernormaloperatingconditions Pilot Burner The pilot is pre set and no adjustment is required The pilot flame envelope should cover the electrode tip and spark earthing strip see Fig 30 If the pilot flame is not as illustrated remove and clean the pilot as described in the Servicing Ins...

Page 23: ...the householder must have the operation of the boiler and system explained by the Installer Thehouseholdermustalsobeadvisedoftheimportance ofannualservicingandoftheprecautionsnecessaryto preventdamagetothesystemandbuilding intheevent of the system remaining out of commission in frost conditions Finally complete the Benchmark Log Book and hand over all instructions PRF0028A Pilot Screw For test pur...

Page 24: ... Gravity D H W Pumped C H Systems PRF0029A L SwL Permanent Live on Fully Pumped Systems Switched Live on Fully Pumped Systems Test Socket Air Pressure Switch Fan S1 S2 Electronic Control Overheat Thermostat White White White Brown Red Red Blue Blue Blue Blue Black Orange N NO NC C 2 3 1 R R B BR R BR B B BK G Y G Y G Y G Y W BR OR R R BR BR BR Colour Key BR Brown BK Black B Blue W White OR Orange ...

Page 25: ...emoving thefrontdoorfromtheboiler mostcomponentsareexposed Remove the front of the combustion chamber to gain access to the main and pilot burner and the ignition electrode Removal of the fan and its mounting plate exposes the flue system i e the flue elbow and fluehood These must be removed to gain access to the flueways in the heat exchanger for cleaning The following notes apply to the boiler a...

Page 26: ...moftheboilercaseandliftouttheburner and gas control assembly 4 2 HeatExchanger A Working from above and below the heat exchanger use a suitable brush and remove all deposits from between the fins Slide vertical flue adapter into flue duct B Refit the fluehood ensuring that the rope seal is undamagedandthataGOODSEALismadewiththe heat exchanger Fully tighten the four nuts C Slide the flue elbow into...

Page 27: ...on the rear of burner engages correctly into the rear support bracket Make sure that the sealing gasket is in placeandundamagedbetweentheburnerflangeand the case Secure the assembly with two screws C Refit the screw securing the gas control valve to the support bracket D Reconnect electrode lead to electrode E Plug gas control valve supply leads into control box F Reconnect gas supply at gas servi...

Page 28: ...ecuringthefantothemounting plate and remove fan 5 Replacement is the reverse of removal 6 Followthefullcommissioningprocedureasdetailed in the Commissioning section of these instructions on page 21 4 10 MainBurner 1 Switch off the external electricity supply by disconnecting the plug at the socket or switching off the external isolating switch 2 Remove controls cover case door and combustion chamb...

Page 29: ...rolscoverbyopeningthedoorcovering the securing screw on the underside of the controls coverseeFig 14 Undosecuringscrew pullcontrols cover forward 10 mm lower it to release it from its four side fixings and pull forward clear of the thermostat knob 3 Removecontrolboxsecuringscrewandlowercontrol box 4 13 Fuse 1 amp 4 The fuse is located on the electronic control and can be replaced by lifting it fro...

Page 30: ...icing operations F G 12 Remove the clip securing the thermostat bulb to the flow pipe 13 Remove the split grommet in the base of the boiler and the split grommet in the fan chamber Feed the capillary and bulb through the holes 14 Replacement is the reverse of removal The bulb of the new thermostat should be coated with heat conducting paste Ensure the rubber grommets in the base of the boiler and ...

Page 31: ...Publication No 5105703 31 Intentional Blank Intentional Blank ...

Page 32: ...is will stop the spark and allow a steady flame current to be measured NOTE When pumped central heating is in operation the boiler is controlled by the main boiler thermostat When only a gravity hot water circuit is in operation the boiler is controlled by the main boiler thermostat when set at No 4 or below At setting above No 4 the temperature is limited by the operation of the gravity control t...

Page 33: ... terminal Terminal Guard to be used when the terminal is fitted less than 2 m above a balcony above ground or above a flat roof to which people have access Installation Instructions are supplied as necessary with the kits Kit Models Part Numbers 40 50 60 80 Standard Flue System 5105761 5105761 225541 225541 2 Metre Flue System 225543 225543 225544 225544 Vertical Flue System 5106368 5106369 510637...

Page 34: ...Publication No 5105703 34 Fig 32 Short List Spare Parts 7 Short List Of Spare Parts PRF0035A 1 4 2 3 16 15 10 9 13 21 12 8 11 15 7 17 19 18 21 6 ...

Page 35: ... PumpOverrunThermostat 1 404501 CL8P1501 12 337424 Flue Elbow Sealing Gasket 1 212084 13 382462 ElectronicControl 1 407677 14 336585 Fuse 1 amp 1 641903 15 338445 ThermostatKnob 1 225251 16 Pressure Switch 40 1 Pressure Switch 50 1 Pressure Switch 60 1 Pressure Switch 80 1 17 382445 Fan 80 1 409569 Fan 40 50 60 1 409583 18 382455 Overheat Thermostat LM7 P8503 1 404495 19 337371 Main Burner Gasket ...

Page 36: ...ully prepared but we reserve the right to make changes and improve mentsinourproductswhichmayaffecttheaccuracyoftheinformation contained in this leaflet All goods are sold subject to our standard ConditionsofSalewhichareavailableonrequest Toaidcontinuousimprovementandstafftraining callstothis linemaybemonitoredorrecorded General Enquiries Tel Technical Tel Service Tel Fax Literature Request Tel ...

Reviews: