background image


Part 9 

Install Cable Cover 

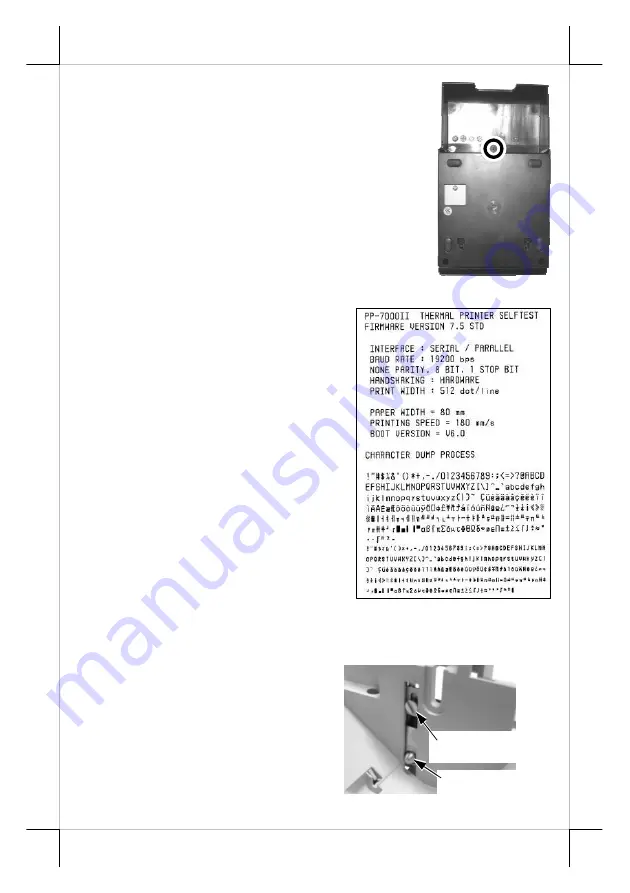
Check the bottom view of the printer, the 4 

screws for the printer itself are in quite deep holes. Insert 
the tenons of the cable cover into the 2 printer screw 
holes nearest to the connection area. Apply a cable cover 
fixing screw at the matched screw holes as circled in the 
bottom view picture at right. 

Power On 

When all the above cable connections are made 

correctly, you may connect your power adaptor to the 
wall outlet. Make sure that the type of power cord and 
the voltage requirement of the power adaptor meet the local power conditions. 
Now the printer is ready for power on. 

Self Test 

Press and hold down the feed 

button while turning the on / off switch on. 
The printer will then perform a self-test. A 
sample slip of self-test result is printed as in 
the sample at right. Please note that both 
serial and parallel interfaces are indicated. 
That means the printer is working on an 
auto-sensing and auto-select algorithm. 

The header is printed in text mode 

and the rest part of this slip is printed in 
page mode. If FEED button is pressed at 
this moment, a font table will be printed in 
text mode again. To exit the test printing, 
please turn the printer off and on again. 


SPECIAL ADJUSTMENTS 

Paper Near End Sensor 

The near end sensor for  paper 

roll in the printer is able to have the 
printer work with paper rolls of several 
bobbin sizes. Please refer to the picture at 
right from inside the paper roll 
compartment that there are a fixing screw 
and a sensor head in the wall. Slightly 
release the fixing screw to adjust the 

Fixing Screw 

Sensor Head 

Summary of Contents for Aura PP-7000U

Page 1: ...rrors or omissions contained herein nor for direct indirect incidental consequential or otherwise damages including without limitation loss of data or profits resulting from the furnishing performance or use of this material This information is provided as is and Posiflex Technologies Inc expressly disclaims any warranties expressed implied or statutory including without limitation implied warrant...

Page 2: ...he Aura PP 7200L series connects to a LAN port of Posiflex POS systems The Aura PP 7000U series connects to an USB port of Posiflex POS systems and simulates a RS232 device through driver and performs thermal printing particularly designed for POS applications The Aura PP 7000U series is already WEPOS Windows Embedded for Point Of Service certified The Aura PP 7200U series is a similar model to PP...

Page 3: ...0U PP 7200U e Option powered USB cable P N 21863256800 for Aura PP 7000U PP 7200U Length of the interface cable depends on whether the order includes the power adaptor When power adaptor is included the interface cable is 6 ft long for stand alone application When the power adaptor is not included in the order the interface cable is a shorter one for integrated application in Posiflex POS system 5...

Page 4: ...00U 6 6 7 4 10 PP 7200U 3 1 Bottom Cover Power LED Error LED Paper Out LED FEED Switch Top Hood Top Cover Hood Release Power Switch Cutter Cover PP 7000II 2 3 1 4 5 8 4 3 1 PP 7200L 9 Front View Bottom View Power Switch Screws Window Plate Screw Setup Window Cable Cover Screw Hole ...

Page 5: ...nnector 3 Frame Ground 4 Peripheral Connector 5 Serial Connector 6 Interface Bracket Screw 7 USB Connector 8 LAN Connector 9 Reset Pin Hole 10 Service Serial Port Cable Cover INDICATORS Power LED green Error LED red Paper Out LED red Tenon Tenon Screw Hole Cable Cover ...

Page 6: ...aper Whenever the printer gives paper out signal or a red line appears on the thermal paper it is the proper timing for replacing the paper Do not wait till the print engine is dragging the paper roll at the very end Remove the leftover and replace a new paper roll as illustrated above to prevent excessive paper dust in the printer and consequently possibility for paper jam CONNECTING CABLES Conne...

Page 7: ...AN Connection The LAN connector is a 8 PIN RJ45 connector in middle left of the connector area for PP 7200L Please use a LAN cable of CAT 5 with proper length to connect the LAN connector on the printer to the LAN HUB as appropriate Please also note that to keep LAN interface operative please adjust in setup window the switch positions both 1 and 2 to OFF leaving the rest unchanged as factory defa...

Page 8: ...ck With use of Posiflex cash drawer cable 21863018010 CCBLA 180 1 come with cash drawer this port can control a Posiflex cash drawer CR3100 or CR3200 or CR4000 or CR4100 or CR 6310 If a Posiflex special split cable 21863023800 CCBLA 238 is used instead this port can control two cash drawers of above models When the printer is used as a kitchen printer please use this port for kitchen bell connecti...

Page 9: ...h on The printer will then perform a self test A sample slip of self test result is printed as in the sample at right Please note that both serial and parallel interfaces are indicated That means the printer is working on an auto sensing and auto select algorithm The header is printed in text mode and the rest part of this slip is printed in page mode If FEED button is pressed at this moment a fon...

Page 10: ...not based on every off line signal Spacer Plate If the paper roll is of width less than the standard 80 58 mm it may run away from the paper near end sensor during application resulting in an error status In this case please stick the spacer plate to the wall opposite to the paper near end sensor in the paper roll compartment Each spacer plate compensates 1 mm paper roll width shortage There will ...

Page 11: ...d of paper clip to push and hold for at least 5 seconds into this hole will reset the LAN setup of the printer back to the default values at delivery so the user may re do all setup The LAN setup can be viewed in second paragraph of self test printout for the PP 7200L LAN POS Printer Manager This utility can be used to manage multiple PP 7200L s connected in same network under Windows as long as t...

Page 12: ...can clean the thermal elements of the print head and paper sensor gently using a cotton swab moistened with isopropyl alcohol solvent NOTE Never do this when print head is still hot Do not touch the print head thermal elements Do not scratch the print head Before putting back the paper roll for printing alcohol solvent must be dried completely TROUBLE SHOOTING This section gives solutions to some ...

Page 13: ...ontact a qualified service person Nothing can be printed with ERROR LED OFF Try to run self test according to previous chapter to check if the printer itself works properly If the self test passes check the following 1 Check the connection of the interface cable at both the printer and computer ends Also make sure that this cable meets the specification required for both the printer and the comput...

Page 14: ...sive paper scraps fall into the auto cutter mechanism the auto cutter may lock up and so does the print hood In such case please pull the cutter cover forward to expose the cutter mechanism Apply some mechanical assistance in below procedures to help resetting the cutter blade back to its home position Please lift up if exist a transparent protective cover over the adjustment wheel with the printe...

Page 15: ... turning printer on Close the hood To stop the dump mode Press the FEED button to print out the last line Turn off the printer During dump mode All commands except DLE EOT and DLE ENQ are disabled USEFUL TIPS Please note that only those qualified technicians may adjust several jumpers for some technical settings Please visit our web site http www posiflex com or http www posiflex com tw for detail...

Page 16: ... print head thermal elements If the surface of thermal paper is scratched with a hard object such as a nail the paper may become discolored If thermal paper touches diazzo copy paper immediately after copying the printed surface may be discolored Use only water paste starch paste polyvinyl paste or CMC paste when gluing thermal paper If thermal paper touches anything containing phthalic acid ester...

Page 17: ... 125 mm Input power type DC Input voltage 24 V 5 Dimension mm 148 W x 199 D x 144 H Weight 1 35 Kg net PAPER PAPER TYPE THERMAL ROLL PAPER Paper roll formation External side is heat sensitive side Paper width 80 or 58 0 1 mm Paper roll outer diameter 83 mm max Paper roll inner diameter 12 1 0 mm Paper thickness 60 80 um POWER ADAPTOR ITEM REQUIREMENT Input voltage 100 V AC 240 V AC Input frequency...

Page 18: ...neffective 8 Factory internal setting Application standard mode Effect of positions 1 2 on baud rate is defined as in table below with parity check set according to position 3 number of data bits always set to 8 and stop bit set to 1 When the interface used is anything other than RS232 please set these 2 switches only at exactly the specified combination SW Pos 1 ON OFF ON OFF SW Pos 2 ON ON OFF O...

Page 19: ...in the field the printer maybe subject to unpredictable damages and must be strictly prevented The factory default for each position is listed below Switch Position 1 2 3 4 5 6 7 8 Serial interface w auto cutter OFF OFF OFF OFF OFF OFF OFF OFF Parallel interface w auto cutter ON ON OFF OFF OFF OFF OFF OFF USB interface w auto cutter OFF OFF OFF OFF OFF OFF OFF OFF LAN interface w auto cutter OFF O...

Page 20: ...hould be set to ON Switch position 3 is usually set to OFF for ESC POS command application that prints at 512 dots line Only technical users shall set this switch to ON and make the printer work in the 576 dots line format SERIVCE SERIAL PORT There is an extra 9 pin female D sub connector for PP 7200U model in connection area This port is designed for technical service only DO NOT connect it for o...

Reviews: