


18
POLYPRINTDTG.COM
QUICK USER GUIDE
Troubleshooting
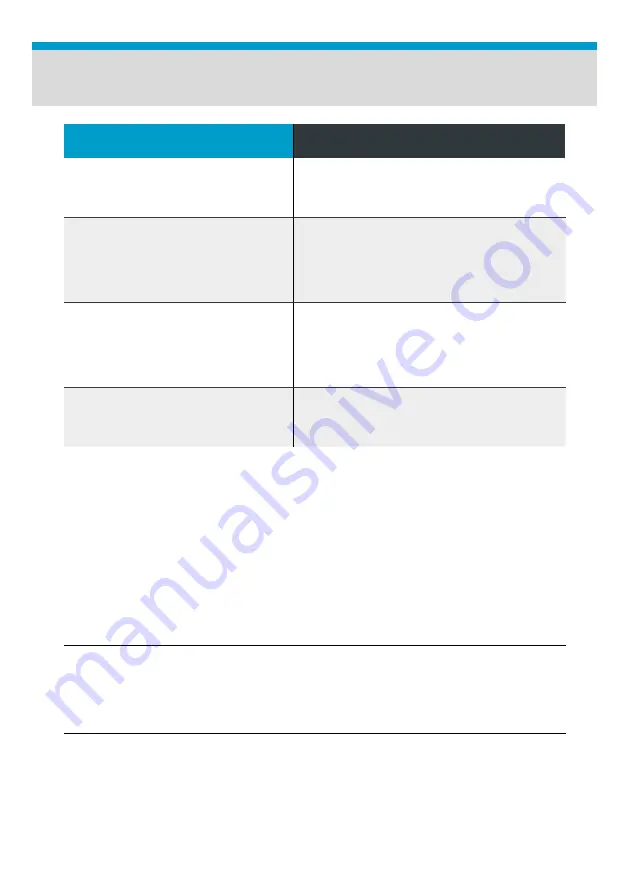
ERROR CODES
Action
1601 / 122
If error is displayed during maintenance
procedure, make sure Print Head is
locked
. Restart Printer.
1404
Air Leak.
Make sure all the cartridges are
properly inside the ink system slots.
In case of using sealed cartridges make
sure Cartridges are not completely empty.
Restart TexJet® echo².a
1401
Restart Printer.
When the Notice message
appears, press Proceed at the first two
screens. At the Continue Printing question
tap NO. Reset cartridge Chips. (page 9)
Restart printer.
PLATEN IS
NOT MOVING
Check if Emergency Button is at lock
position. Restart TexJet® echo².
In case a good nozzle test print (no visible gaps or missing lines and
vibrant test patterns) cannot be achieved, follow the steps below.
Ink Flow Troubleshooting
|
01
_STEP
Ensure capping station and wiper are clean. If they have dried ink, head
cannot lock properly on it and cleaning has no effect.
|
02
_STEP
If the issue occurs in only one channel, follow instructions on cleaning its
cartridge, page 8. If using sealed cartridge, replace it.
|
03
_STEP
Follow Weekend maintenance but instead of cleaner, use isopropyl alcohol.
After 10min, restart Printer and perform a Powerful Head Cleaning.
Summary of Contents for TexJet echo2
Page 1: ...QUICK USER GUIDE...
Page 23: ...Notes...
Page 24: ...www polyprintdtg com POLYPRINTDTG 2021 02 12_TEXJET ECHO_UG_EN_V3 3...


