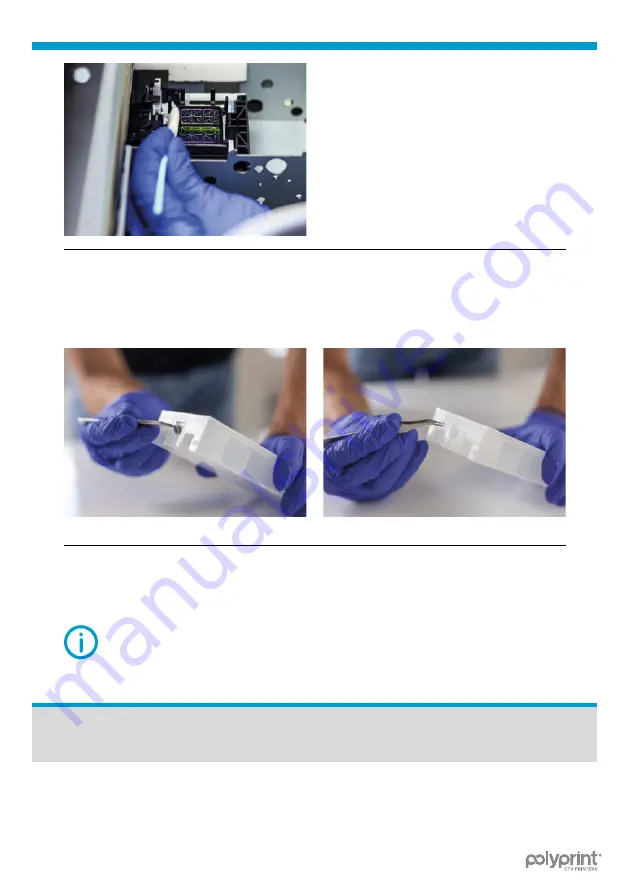
Polyprint TexJet echo2 Quick User Manual Download Page 20

17

TexJet® ECHO²

Fig.21: 

Refillable Cartridges cleaning process.

02

_STEP

Remove the rubber valve with caution as there is a spring on the other 

side. Remove the small ball and spring.

03

_STEP

Clean the above parts and reassemble the cartridges.

Fig.22: 

Refillable Cartridges cleaning process.

NOTE:

 It is highly recommended to change cartridges annually, as 

ink has dried at their bottom and that can lead to Damper and Head 

Clogging. 

Long Inactivity Maintenance

It should be performed if printer will remain idle for more than a month.

Use a fresh set of cartridges and load them with cleaning solution. Perform 

two ink charges from the adjustment program (USB connection required).

Summary of Contents for TexJet echo2

Page 1: ...QUICK USER GUIDE...

Page 2: ...dure p 02 Sealed Ink Cartridge p 04 Refillable Ink Cartridge Filling Procedure p 05 Platen Movement p 06 Emergency Stop Button p 06 Adjusting Platen Height p 07 Maintenance Cover Open Message p 07 Mai...

Page 3: ...Curing Pretreatment Heat Press Settings p 10 Maintenance Schedule p 11 Daily and Weekend Maintenance p 12 Monthly Maintenance p 15 Six Month Maintenance p 16 Long Inactivity Maintenance p 17 Troubles...

Page 4: ...nables the alternative functions of the keyboard Move Platen Out Move Platen to Start Position Home Move Platen In Eject Platen Maintenance Automatic Height Adjustment Move Platen Up available only at...

Page 5: ...ridges If refillable cartridges are used and ink level is low refill them as described at refillable ink cartridge filling procedure page 5 03_STEP Gently shake the cartridges as displayed in the pict...

Page 6: ...Head Cleaning Tap on the Settings Icon on the Printhead Control panel and navigate through Maintenance Print Head Cleaning and choose Head Cleaning 08_STEP Print a nozzle test to check the head condit...

Page 7: ...more than 10 nozzles in one channel perform a Head Cleaning If almost all nozzles in a channel s are missing perform a Heavy Head Cleaning From the Settings Icon tap on Maintenance Heavy ead Cleaning...

Page 8: ...GENTA 218 gr 85 gr YELLOW 218 gr 85 gr If refillable cartridges are used and ink level is low refill them as described in the steps below Shake the ink bottles for 1 minute each Use a funnel to fill i...

Page 9: ...on Emergency Stop Button The purpose of the Emergency Stop Button is to stop the platen in a quick and safe way when there is a risk of injury or stopping the workflow is required To continue working...

Page 10: ...aces go for Uni Directional Printing to maintain quality Maintenance Cover Open Message Table is not at printing position and there are print jobs ready for printing Press Blue Button or Start Positio...

Page 11: ...platen inside Wait for the Ready To Print message is displayed at the Platen Control panel 02_STEP Remove the maintenance cartridge empty and reset it using the chip resetter provided in the TexJet se...

Page 12: ...on on the top panel Reset procedure 01_STEP Press Start Position Button to send platen inside Wait until the Ready To Print message is displayed at the Platen Control panel 03_STEP Press on lower cont...

Page 13: ...nt Heat Press Settings Table 2 Dark shirts ink curing times DARK SHIRTS TEMPERATURE TIME DUPONT INKS with P5003 pretreatment 180 160 C 356 320 F 60 120 DUPONT INKS with P5001 pretreatment 160 C 320 F...

Page 14: ...rotection when using a manual hand sprayer Wagner to apply pretreatment Maintenance Schedule Table 5 Maintenance Schedule DAILY When in operation Capping Station Cleaning Wiper Cleaning Head Inspectio...

Page 15: ...eave printer idle for a few days up to a full month Maintenance procedure Follow the instructions Tap on the Settings Button on the touch panel Fig 15 TexJet echo Settings Button Daily Maintenance 01_...

Page 16: ...highly recommended to use cleaning liquid from the same manufacturer as the inks installed on the Texjet series printer 05_STEP 06_STEP From the right side of the printer turn the gear anticlockwise t...

Page 17: ...r clockwise until head is locked Press Start Position Button to continue 12_STEP Wait for Texjet printer to reboot Bypass the Notice screens CAUTION Avoid touching the head mirror while performing the...

Page 18: ...lockwise to release the head Repeat Step 8 use cleaner on the capping station Press Start Position Button to continue 13 b2_STEP Move the print head to parking position and turn the gear clockwise unt...

Page 19: ...iage Shaft Cleaning 2 Carriage Shaft Cleaning Pass a clean piece of cloth over the carriage shaft to clean it from the ink mist created during printing Make sure you unlock the head so you can clean t...

Page 20: ...dges Fig 22 Refillable Cartridges cleaning process NOTE It is highly recommended to change cartridges annually as ink has dried at their bottom and that can lead to Damper and Head Clogging Long Inact...

Page 21: ...t cartridge Chips page 9 Restart printer PLATEN IS NOT MOVING Check if Emergency Button is at lock position Restart TexJet echo In case a good nozzle test print no visible gaps or missing lines and vi...

Page 22: ...from the Head Check Adjusting Platen Height page 7 02_STEP Check Head Nozzle test and if there are many gaps follow the instructions on the Ink Flow Troubleshooting page 18 03_STEP Clean the Scale CR...

Page 23: ...Notes...

Page 24: ...www polyprintdtg com POLYPRINTDTG 2021 02 12_TEXJET ECHO_UG_EN_V3 3...

Reviews: