background image

Polycom Digital Signage Server Getting Started Guide 

Rack Installation

14

Polycom, Inc.


Make sure the rack / rail assemblies and screws are aligned in the rack not 

only in the front and back, but are level in height on the left and right sides 

for proper alignment for appliance installation.

Step 3

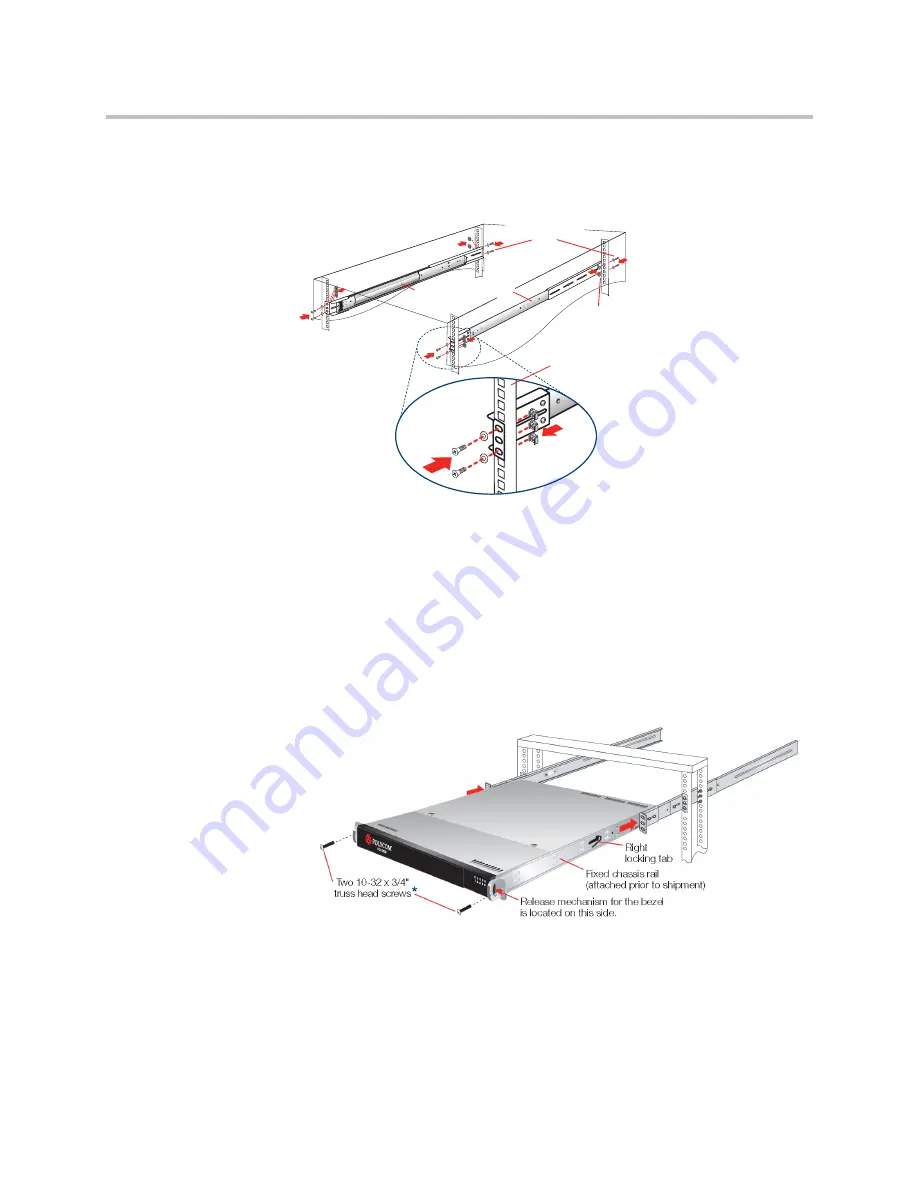
Align the fixed chassis rails on the appliance with the fixed rack rail 

brackets installed in the rack.

Carefully slide the appliance into the rack until you hear the locking tabs 

on each side of the fixed front rails click into place.

Push the appliance all the way into the rack until it stops.

Sefcure the unit in the rack using a 10-32 x 3/4" truss head screw (and a 

cage nut if not already installed) in the center hole on each rail.

2-Post Rack Installation

Unpack the appliance and locate the mounting hardware.

Two M5 x 12

flat head screws and

two cone washers

(rear)

Two cage nuts

(rear)

4-post rack

Three cage nuts

(front)

Two M5 x 12
flat head screws
and two cone 
washers

Outer fixed chassis rails

Summary of Contents for PDS 2000

Page 1: ...1 0 August 2010 3725 78600 002A3 Polycom Digital Signage PDS 2000 Server Getting Started Guide ...

Page 2: ... made to ensure that the information in this manual is accurate Polycom Inc is not responsible for printing or clerical errors Information in this document is subject to change without notice ii Trademark Information Polycom the Triangles logo ReadiManager SoundPoint SoundStation ViaVideo VoiceStation Vortex and VSX are registered trademarks of Polycom Inc Convene Global Management System iPower M...

Page 3: ...nvironmental Warning 6 Ratings 6 Electrical and General Safety Guidelines 6 Disposing of Battery Backup Units If Applicable 8 Unpacking the Appliance 10 Before you begin 10 The 4 post rack assembly consists of 11 The 2 post rack assembly consists of 11 Site Preparation 11 Setup location rack and appliance precautions 11 Rack Installation 12 4 Post Rack Installation 12 2 Post Rack Installation 14 R...

Page 4: ...Digital Signage Getting Started Guide iv Polycom Inc A Regulatory Notices 27 ...

Page 5: ...ul broadcast rendering engine that delivers the highest quality output with the highest level of reliability Unlike simple video playback devices the Polycom Digital Signage Player dynamically arranges and composes signage elements objects or zones in real time to generate the final video output This means individual content elements can be changed at any time without requiring entire video segmen...

Page 6: ... a Polycom Digital Signage network with point and click simplicity Polycom Digital Signage Agent The Polycom Digital Signage Agent software is the link between Players and the Server enabling network status and health monitoring Architecture Overview The image above presents an overview of the Polycom Digital Signage solution depicting the overarching architecture for the various components of the...

Page 7: ...Manager to distribute and manage content packages as well as issue commands to individual players or groups of players although content updates and distribution are typically handled via the Polycom Digital Signage Web Controller The Web Controller is used for day to day updates to content appearing on the monitors in a given Polycom Digital Signage network Customer Support Recognizing that techno...

Page 8: ...Polycom Digital Signage Server Getting Started Guide Customer Support 4 Polycom Inc ...

Page 9: ...ation Procedures Safety Notice and Warnings Ratings Electrical and General Safety Guidelines Unpacking the Appliance Site Preparation Rack Installation Rear Panel Connections Front Panel Operation Hardware Installation Procedures To configure the PDS Server appliance as part of the Polycom Digital Signage solution you must have a PC to initialize and configure the PDS Server appliance Ethernet cab...

Page 10: ...r 33 Best Management Practices for Perchlorate Materials This product part includes a battery that contains Perchlorate material Ratings V 100 240 VAC auto range Hz 60 50 A 4 0 Electrical and General Safety Guidelines CAUTION This appliance is intended for installation in restricted areas only Initial setup and maintenance should be performed by qualified personnel CAUTION Power down the appliance...

Page 11: ...plug cap must have an electrical current rating that is at least 125 of the electrical current rating of this product The power cord plug cap that plugs into the AC receptacle on the power supply must be an IEC 320 sheet C13 type female connector Plug the power cord s into a socket that is properly grounded before turning on the power CAUTION Required operating conditions for the appliance are Tem...

Page 12: ...le the old battery packs properly Comply with all applicable battery disposal and hazardous material handling laws and regulations in the country or other jurisdiction where you are using the BBU WARNING There is danger of an explosion if the battery is incorrectly replaced Replace it only with the same or equivalent type recommended by the manufacturer Dispose of used batteries according to the m...

Page 13: ...ssis and in the room so you can disconnect the power supply if an accident occurs Take extra precautionary measures when working with high voltage components Do not work alone Before removing or installing main system components be sure to disconnect the power first Turn off the system before you disconnect the power supply Use only one hand when working with powered on electrical equipment to avo...

Page 14: ...damage to critical components Use a grounded wrist strap designed to prevent static discharge Keep all components and printed circuit boards PCBs in their antistatic bags until ready for use Touch a grounded metal object before removing the board from the antistatic bag Do not let components or PCBs come into contact with your clothing which may retain a charge even if you are wearing a wrist stra...

Page 15: ...of A set of long fixed rack brackets Three sets of short rack brackets that attach to the long fixed rack brackets One of these sets has threaded holes for placement in the front to allow the appliance to be secured in the rack Site Preparation Setup location rack and appliance precautions Elevated Operating Ambient If installed in a closed or multi unit rack assembly the operating ambient tempera...

Page 16: ...ity Do not slide more than one appliance out from the rack at a time Extending more than one appliance at a time may result in the rack becoming unstable Install your appliance in the lower part of the rack because of its weight and also for ease in accessing appliance components Circuit Overloading Consideration should be given to the connection of the equipment to the supply circuit and the effe...

Page 17: ...s shown three in the front and two in the rear They click into place Attach the rack rail assemblies to the rack using two M5 x 12 flat head screws and cone washers in the front and back The convex side of the cone washers face toward the rack NOTE The following installation procedures for are for use with the rails and hardware provided in your ship kit If different style rails are being used or ...

Page 18: ...ack Carefully slide the appliance into the rack until you hear the locking tabs on each side of the fixed front rails click into place Push the appliance all the way into the rack until it stops Sefcure the unit in the rack using a 10 32 x 3 4 truss head screw and a cage nut if not already installed in the center hole on each rail 2 Post Rack Installation Unpack the appliance and locate the mounti...

Page 19: ...ch the assembled brackets to the 2 post rack Insert two M5 x 12 flat head screws through the short brackets into the 2 post rack in the front and back of therack as shown and tighten Make sure the brackets are aligned and level in height not only in the front and back but also on the left and right sides NOTE The following installation procedures are for use with the rails and hardware provided in...

Page 20: ...ep 3 Align the fixed chassis rails on the appliance with the fixed rack rail brackets installed in the rack Carefully slide the appliance into the rack until you hear the locking tabs on each side of the fixed front rails click into place Push the appliance all the way back into the rack until it stops Secure the unit in the rack using a 10 32 x 3 4 truss head screw in the center hole on each rail...

Page 21: ...ct any other required cables USB Port Mouse Port Keyboard Port Two Power Cords AC Power Inlets Serial Port PCI Expansion Slots VGA Port Ethernet Cable Network Interface Connector 2 1 Power Supply Locks Power Good LEDs NOTE Both power cords need to be plugged into the appliance If they are not both plugged in there is an alarm that sounds providing an alert that there is an issue with the unit ...

Page 22: ...Panel Operation Power on the appliance Remove the front bezel by pressing in on the right side of the bezel to release it To power the appliance on press the power button located on the far right on the front side of the appliance Once the system has been powered on replace the bezel Power Button ...

Page 23: ...keyboard are attached and that the Polycom Digital Signage Server is attached to the network 2 Power on the Polycom Digital Signage Server 3 A login screen will appear after startup Log into Polycom Digital Signage Server with the default credentials Administrator Polycom123 4 Launch the Windows licensing dialog Enter the Windows product key located on the Microsoft sticker on top of the server NO...

Page 24: ...ows XP Windows Vista 32 bit and Windows 7 32 bit Windows Vista and Windows 7 require the additional pre installation steps outlined below For more information on the Polycom Digital Signage Remote Manager please consult the Polycom Digital Signage Administrator Guide Pre Installation Procedures on Windows Vista and Windows 7 1 Open the Start menu Type MSconfig in the Search field and click enter T...

Page 25: ...rver Software Setup Polycom Inc 21 3 The setup wizard will appear Click Next 4 The Select Destination Location window will appear If you wish to install the Remote Manager to a specific directory provide a new pathway or click Browse otherwise click Next ...

Page 26: ...al Signage Server Getting Started Guide Installing Remote Manager 22 Polycom Inc 5 Provide a point in the Start Menu for the Remote Manager shortcut Click Next 6 Choose whether to Create Desktop Icons and click Next ...

Page 27: ...lick the Request a License Key button b Enter the PDS Serial Number Contact Polycom Support to obtain this number The PDS Serial Number is unique per customer and comprehensive across the Polycom Digital Signage solution Do not discard this number c Click Request Key to request the license key which will automatically populate the license key in the initial dialog NOTE Users operating in a secure ...

Page 28: ...nnect button in the upper left hand corner of Remote Manager The Connect to Polycom Server pop up appears a Enter the name or IP address of the Polycom Digital Signage Server The name will be PDSSERVER by default b Enter the login credentials which by default will be Administrator Polycom123 c Click Connect 3 Verify that you are able to connect to the Polycom Digital Signage Server ...

Page 29: ...on on setting up and starting the Polycom Digital Signage Player consult the Polycom Digital Signage Player Getting Started Guide For information on the using the Player or starting a new Polycom Digital Signage Network with an existing Server consult the Polycom Digital Signage Player Administrator Guide ...

Page 30: ...Polycom Digital Signage Server Getting Started Guide Starting the Remote Manager 26 Polycom Inc ...

Page 31: ...perated in a commercial environment This equipment generates uses and can radiate radio frequency energy and if not installed and used in accordance with the instruction manual may cause harmful interference to radio communications Operation of this equipment in a residential area is likely to cause harmful interference in which case the user will be required to correct the interference at his own...

Page 32: ...se Regulatory Notices Worldwide Regulatory Notices Warning This is a Class A product In a domestic environment this product may cause radio interference in which case the user may be required to take adequate measures Plugs Acts as Disconnect Device The socket outlet to which this apparatus is connected must be installed near the equipment and must always be readily accessible La prise électrique ...

Reviews: