background image


UM1A


19 


USB MP3 OPERATION 


MP3 Specifications 

x


A directory that does not include an MP3 file is skipped. 

x


Maximum number of folders: 512 (including skipped directories) 

x


Maximum number of folder levels: 12 

x


Maximum number of MP3 files: 999 

x


Maximum number of characters for MP3 file name and folder name: 32 

x


Sampling frequency: 16KHz, 22.05KHz, 24KHz, 32KHz, 44.1KHz, 48KHz. 

x


Maximum number of Characters of ID3 Tag: 

ɀ

ID3 Tag version 1.0: 32 

ɀ

ID3 Tag version 2.x: 32 

NOTE: USB flash drives with a capacity of up to 64 GB are supported.   

Inserting and Removing a USB Device 

Inserting a USB Device 

Insert the USB device into the 

USB1

 or 

USB2

 port 

and display will show the “Loading…” 

message. The unit will read the files on the USB device automatically.


Removing a USB Device 

Press the 

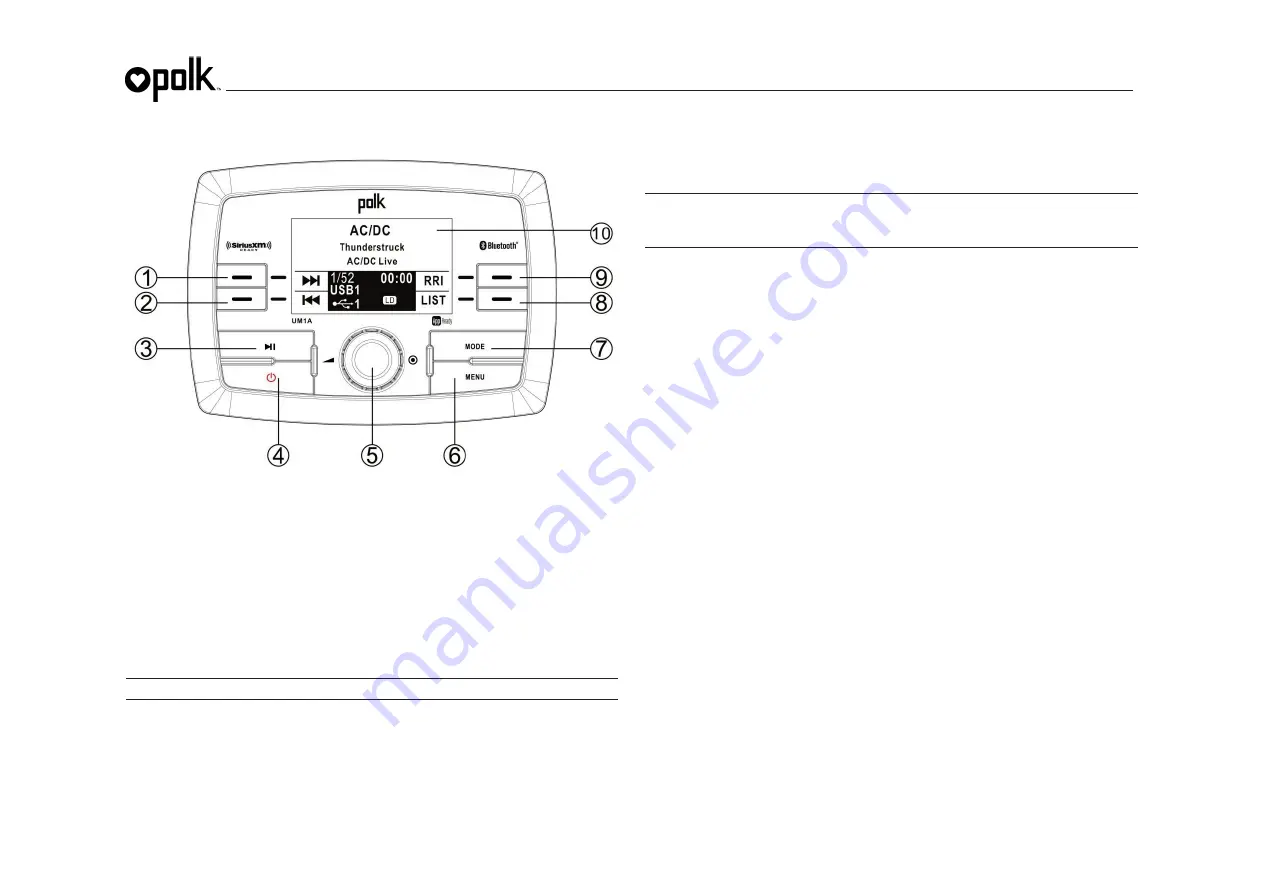
MODE

 button (7) to select another mode and then remove the USB device from 

the USB connector. 

NOTE: After loading a USB device, files and folders are accessed in the order in which 
they were written to the device. Therefore, the playing order may not be the same as 
the order in which they are expected to be played. 

Accessing USB Mode 

Switching to USB Mode 

Press the 

MODE 

button (7) twice to enter mode selection display. Press the 

USB1 

soft 

button (1) or

 USB2 

soft button (2) to change to USB mode. 

USB mode options available are |<<, >>|, LIST and RRI. 

Selecting Tracks 

Press the 

|<<

 (2)

, >>|

 (1)


soft buttons to increment or decrement to the next song file. The 

selected file name will appear on the display. 

Press and hold 

the 

|<<, >>| 

soft buttons


to fast 

forward or fast reverse through the current file. Playback begins when the button is released. 

LIST 

Browse Files/Folders 

Rotate the 

Encoder Knob 

(5) to navigate and view the list of all files/folders.    Press the 

Encoder Knob 

button


to select the highlighted file/folder. Press the   

BACK 

soft


button to reverse navigate the folders and return to the root level directory. 

Play/Pause  

Press the 

f

|| 

button to suspend playback. Press the 

f

||

 button (3) again to resume 

playback. 

RRI (Repeat, Random, Intro) 

Previewing Tracks 

Press the 

INT 

soft button (9) to play the first 10 seconds of each file in the current folder 

sequentially. Press the 

INT 

soft button


again to stop Intro Scan and resume normal playback 

of the current file. 

Repeat Play 

Press the 

RPT 

soft button (9) during song play to repeat the current file. Press the 

RPT 

soft 

button


again to stop repeat play. 

Random Play 

Press the 

RND

 soft button (9) to play all files in the current folder in random, shuffled order. 

Press the 

RND

 soft button again to stop random play.


Summary of Contents for UM1A

Page 1: ...UM1A Installation and Operation Manual ...

Page 2: ...sidiaries Visit www siriusxm com xmlineup for updates All programming channel lineup XM service subject to change or preemption All other marks and logos are the property of their respective owners All rights reserved Made for iPod and Made for iPhone mean that an electronic accessory has been designed to connect specifically to iPod or iPhone respectively and has been certified by the developer t...

Page 3: ...ainst harmful interference in a residential installation This equipment generates uses and can radiate radio frequency energy and if not installed and used in accordance with the instructions may cause harmful interference to radio communications However there is no guarantee that interference will not occur in a particular installation If this equipment does cause harmful interference to radio or...

Page 4: ...ver x Wired Remote Control Ready optional PRC100BC PRC200BC x Zone Control Expansion Ready optional UMZC4A x 4 Channel Pre amp Line Level Outputs Front Rear RCA x 1 Channel Subwoofer Outputs RCA x Auxiliary Audio Input RCA AUX1 AUX2 x Public Announcement PA Feature with Optional Microphone sold separately Content List x Polk UM1A Tuner Amp Module x Polk UM1A Wired Commander x 10 Extension Cable x ...

Page 5: ...wired commander from sunlight dust and water while not in use Protect from High Temperatures Do not mount radio within close proximity of engine compartment Use the Proper Power Supply This product is designed to operate with a 12 volt DC negative ground battery system CAUTION DO NOT OPEN COVERS AND DO NOT REPAIR BY YOURSELF PLEASE REFER SERVICING TO A QUALIFIED TECHNICIAN WARNING TO REDUCE THE RI...

Page 6: ...er x During storage use the included cover to prolong the life of your device by protecting the wired commander from direct sunlight moisture dust and other elements Wired Commander Mounting x Choose a mounting area for the wired commander that is clean and flat allowing the rear gasket to fully seal to the mounting surface x Secure the wired commander using either of the recommended mounting meth...

Page 7: ...osition do not mount with the harness exit points facing straight up as water can collect around the chassis in these areas 2 Using the shortest length of the recommended size screws possible mount the tuner amplifier as detailed in the diagram on the right 3 Route the tuner amplifier harness and cable throughout the vessel as required Keep some slack in the harness cables so it won t be too tight...

Page 8: ... FR 12 SPEAKER RL PIN NO WIRE COLOR DESCRIPTION 1 RED 12VDC 2 BLUE DATA 3 WHITE LEFT AUDIO OUT 4 YELLOW RIGHT AUDIO OUT 5 EMPTY NO CONNECTION 6 GREEN NO CONNECTION 7 GRAY NO CONNECTION 8 BLACK AUDIO GROUND 9 SHELL GROUND WARNING Wiring harnesses come with stripped and tinned leads to aid in the installation process Any unused speaker wires must have their exposed ends cut off or insulated individu...

Page 9: ...6 Treble Level Use the Encoder Knob to adjust the Treble level range from 6 to 6 Balance Use the Encoder Knob to adjust the Balance between the left and right speakers from L12 full left to R12 full right Fader Use the Encoder Knob to adjust the Fader between the rear and front speakers from R12 full rear to F12 full front Sub Level Use the Encoder Knob to adjust the Subwoofer level from 0 to 40 E...

Page 10: ...f the radio 2 Press the MODE button twice to view the AUX option 3 Press the AUX1 or AUX2 soft button to select auxiliary audio input mode PA Operation PA microphone sold separately x Connect the PA Microphone with 4 PIN connector to the PA MIC IN on rear x The unit will automatically switch to PA mode when the mic switch is pushed ON x The PA output level can be adjusted using the rotary volume e...

Page 11: ...tton to store the station The station frequency will appear in the display adjacent to the preset memory location number Recall a Station Rotate the Encoder Knob to navigate the preset list and highlight the desired preset memory location Press the Encoder Knob to select and tune to the corresponding stored station PTY Press the PTY soft button access search for stations in your area broadcasting ...

Page 12: ...l automatically pick up an FM stereo signal when available When in stereo mode the ST icon appears in the display When no stereo signal is available the unit will automatically revert to mono operation and no icon will be displayed ...

Page 13: ...0 6 162 525 162 550 1 Under normal conditions the unit will automatically tune to the strongest station in the area within 10 seconds Manual Tuning Press the Tune soft button and use the or soft buttons to adjust station tuning step by step LIST Press the LIST soft button to display the preset list Recall a Station Rotate the Encoder Knob to navigate the preset list and highlight the desired prese...

Page 14: ...D does not include the letters I O S or F Activating Your Service 1 With the radio still turned on tune to the SiriusXM preview channel on Channel 1 You should be able to hear the SiriusXM preview channel even if your service is not activated If you cannot hear the preview channel please check the installation instructions to make sure your tuner is properly installed 2 For subscriptions in the Un...

Page 15: ...enabled the Parental Control feature requires you to enter a passcode to tune to the locked channels Information about setting the user passcode locking channels and the method to access locked channels is described below Setting the User Passcode 1 Press and hold the MENU button for more than 3 seconds to enter the system menu 2 Rotate the Encoder Knob to navigate the menu list to the SXM SETUP M...

Page 16: ... lock code has now been reset to 0000 INFO Alternate Display Information INFO option is available in TUNE CAT and PSET LIST modes Press INFO soft button to change the display information in the following order NAME Artist SONG Title INFO Content if available CAT Category NAME Artist Satellite Signal Strength The display will indicate satellite reception strength as shown below Signal Strength Stre...

Page 17: ...persists disconnect and reconnect the tuner and then contact your dealer Subscription update Press Any Key to Continue Subscription Updated The radio has detected a change in your SiriusXM subscription status x Press any key to clear the message x No further action is required x Questions about your subscription in the United States please visit www siriusxm com activatenow or call SiriusXM Listen...

Page 18: ... the section on Parental Control page 15 for more information on the Parental Control feature and how to access locked channels Enter Code _ _ _ _ Enter Lock Code User prompted to enter the lock unlock code Enter the four digit code to unlock the channel Wrong Code Invalid Lock Code The unlock code entered by the user is incorrect x Input the correct four digit code to unlock the channel x Reset l...

Page 19: ...ton 7 twice to enter mode selection display Press the USB1 soft button 1 or USB2 soft button 2 to change to USB mode USB mode options available are LIST and RRI Selecting Tracks Press the 2 1 soft buttons to increment or decrement to the next song file The selected file name will appear on the display Press and hold the soft buttons to fast forward or fast reverse through the current file Playback...

Page 20: ...essage stating No Songs when it enters iPod mode Controlling Playback iPod mode options available are LIST Repeat Play and Random Play Selecting Tracks Press the 2 1 soft buttons to increment or decrement to the next song file The selected file name will appear on the display Press and hold the soft buttons to fast forward or fast reverse through the current file Playback begins when the button is...

Page 21: ...t a device from being bumped from the list when more than 5 devices are used you must lock the device To Lock Unlock a device press the Encoder Knob button to display change the Locked or Unlocked icon x DISCONNECT To disconnect a paired device press the Encoder Knob button to temporarily remove the BT link The link can be re established through your phone menu by selecting the UM1A for connection...

Page 22: ...ions of your POLK stereo right from your phone or tablet by transforming your mobile device into a functional stereo remote control Features This app controls all of the primary functions of your stereo features including x Power on off x Volume and mute x AM FM radio tuner access station recall store presets switch songs x NOAA weather band and alert x Bluetooth streaming audio x File structure v...

Page 23: ...Current Drain 15 Ampere max Chassis Dimensions 184 L x 206 W x 71 H mm Front Panel Dimensions 188 L x 58 W x 21 H mm TROUBLESHOOTING Symptom Cause Solution No Power The vessel s accessory switch is not on If the power supply is properly connected to the vessel s accessory terminal switch the ignition key to ACC Fuse is blown Replace the fuse No Sound Volume is too low Adjust volume to audible leve...

Page 24: ...www asaelectronics com v 240615 ...

Reviews: