background image


151Last Page 

15 


Operating Your TV 
 

Once you have connected your TV to an antenna or cable system, plugged the TV in, and put batteries in the 
remote, you are ready to use the TV. The first thing you should do is program your TV to memorize all of the 
available channels in your area. 
  

Basic Operation 

Power on/off 


1.


Connect to the power supply with the power adaptor 

2.


To turn on the TV 

Press power button on the TV or Remote Control 

-


To turn off TV 
Press Power button on the TV or Remote Control 


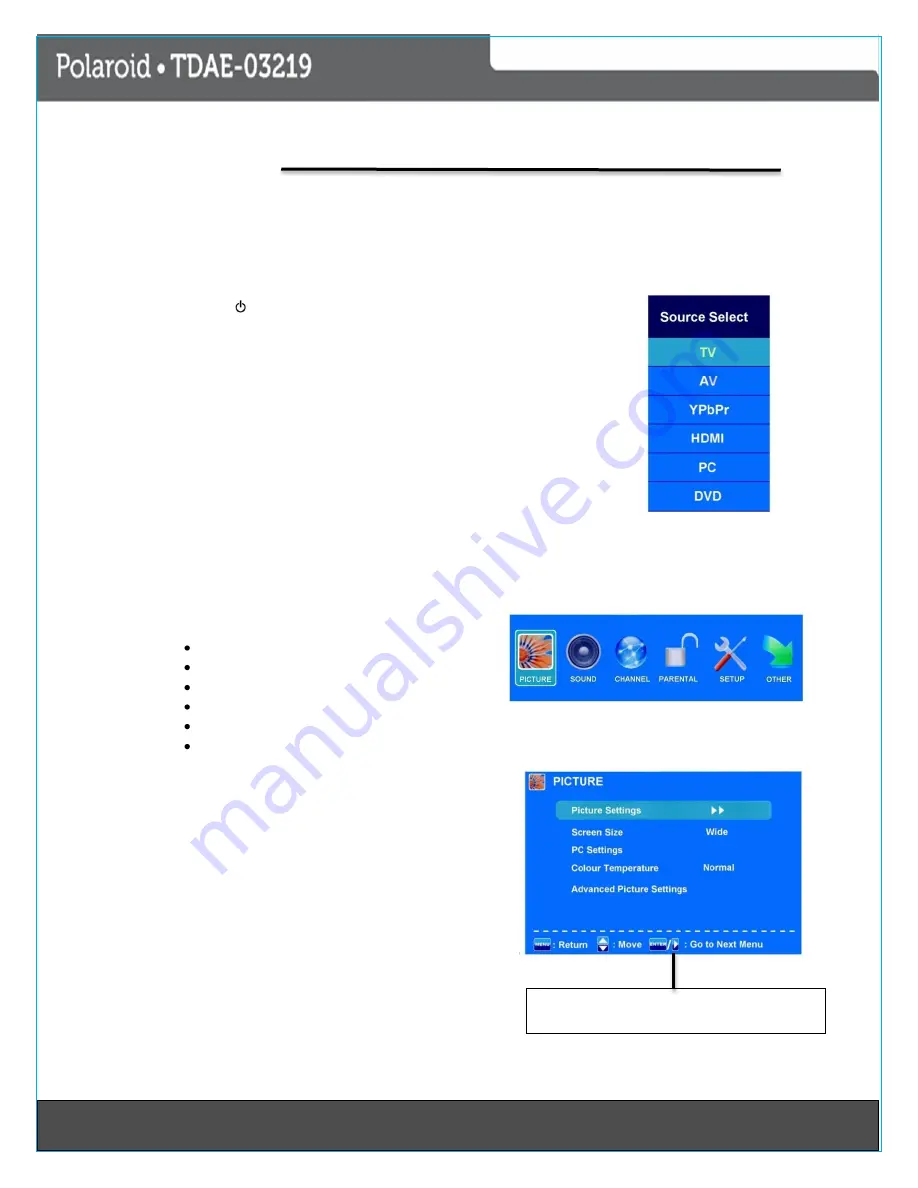
Input Source select 

Press 

INPUT 

button on the TV set or remote control to display input source menu, and 

use

 CH+/- 

on the TV set


or


/


buttons on the remote control to select the input 

source, press

 OK 

button on the remote control to enter. 

Note: Before you select the input source, make sure the connections are prepared. 


First Time installation 

When you power ON the unit for the first time, the screen will show the initial setup dialog. 

Initial setup menu: 


Picture 


Sound 


Channel 


Parental  


Setup 


Press OK button 


Other 

Picture 

Submenu (Picture menu for example) 
 
Highlight the 

PICTURE

 and press the “

ENTER” 

button to 

access to the sub-menu.


Use the 

/

 button to select the main menu and press 

OK to enter the submenu. 
In the submenu use 

/

 button to select the function, 

press the 

/

button to adjust/setup or press 

to enter the submenu. 


*(Press Menu Button to return to the upper menu 
*(Press Exit button to exit the menu display) 

Guide-This guide shows the keys (button) on the remote 
control for selecting the items in the OSD menu 

Summary of Contents for tdae-03219

Page 1: ......

Page 2: ...11Last Page 1...

Page 3: ...21Last Page 2...

Page 4: ...sink or laundry tub in a wet basement or near a swimming pool and the like 8 ACCESSORIES Do not place this product on an unstable cart stand tripod bracket or table The product may fall causing seriou...

Page 5: ...urpose of the grounding type plug 13 POWER CORD PROTECTION Power supply cords should be routed so that they are not likely to be walked on or pinched by items placed upon or against them paying partic...

Page 6: ...c If the product has been exposed to rain or water d If the product does not operate normally by following the operating instructions adjust only those controls that are covered by the operating inst...

Page 7: ...ures 32 31 5 measured diagonally wide screen TV 1366 H x 768 V native resolution for Full HD performance Integrated ATSC TV tuner for true digital connections HDMI input for true digital connections V...

Page 8: ...tandby LED Indicator Press Power to turn on and off Side View 1 DVD Slot 2 Input Button 3 Menu Button 4 Channel up button 5 Channel down button 6 Volume up button 7 Volume down button 8 Play button 9...

Page 9: ...ear View 1 Headphone Jack 7 HDMI 3 2 PC Audio IN 8 Coaxial 3 75 ohm Antenna Socket Cable 9 USB Input 4 PC IN 10 Composite Video Input 5 HDMI Input 1 11 Component Video Input 6 HMDI Input 2 12 L R Audi...

Page 10: ...nting Dimension for Mounting Hole Pattern 400mm 200mm This TV is compatible with a 400mm x 200 mm mounting hole pattern 4 pcs screws are required for installing the wall mount bracket to your TV Do no...

Page 11: ...set For the cable use a commercially available audio video cable For more information about external device connections see the operation manuals of you external devices Make sure that the correspond...

Page 12: ...uttons 14 Return previous 3 Picture button 15 Display Button 4 Sound Button 16 Sleep Set 5 Volume 17 Channel 6 Mute Button 18 Channel 7 Volume 19 Menu 8 Exit button 20 Stop 9 OK or Enter button 21 Set...

Page 13: ...y Pause button 11 Stop Button 2 Eject Button 12 Setup Button 3 Fast Reverse 13 Next Chapter 4 Fast Forward 14 Previous Chapter 5 Language Button 15 Slow 6 Zoom 16 Subtitle 7 Menu 17 GOTO 8 Angle 18 Ti...

Page 14: ...ouse hold waste Check with your local authority for disposal regulations The batteries battery pack or batteries installed shall not be exposed to excessive heat such as sunshine fires or the like Cau...

Page 15: ...ect ratio Press the ZOOM button to change the aspect ratio of picture size To return to the previous channel viewed Press the SWAP button to review the previous channel To turn on or turn off the clos...

Page 16: ...trol to select the input source press OK button on the remote control to enter Note Before you select the input source make sure the connections are prepared First Time installation When you power ON...

Page 17: ...them appear natural Sharpness Set the amount of fine detail on the picture Screen Size Select the display mode of the picture between Wide Cinema Zoom Normal and Just Scan PC Settings If the Video inp...

Page 18: ...ow Medium and High 2 Sound Menu Description Sound Settings Press to enter the Sound Setting menu Sound Mode Select your desired picture mode as follows Dynamic Standard Soft and User You may select th...

Page 19: ...ress button to select the item and press OK button to change the settings Signal Type Allows you to select between Air and Cable Auto Channel Search Press OK to start Auto Channel Search If you select...

Page 20: ...ting MPAA is used for original movies rated by the Motion Picture Association of America MPAA as broadcasted on cable TV and not edited for television Use button to select Rating Description G General...

Page 21: ...ivate the Block Unrated Show function Downloadable Rating Setting the Downloadable Rating in DTV mode when the program has the rating information Clear Downloadable Data Clear the downloadable data of...

Page 22: ...5 and Service 6 Digital CC Preset Select the Digital CC Preset between Default and Custom Digital CC Style Setting the Digital CC Style Menu Language Select OSD menu language Clock Press button to ent...

Page 23: ...gram is often available in the EPG The availability and the amount of program details will vary depending on the broadcaster To use the EPG In digital TV mode select a channel you want to watch Press...

Page 24: ...l to eject the disk NOTE The build in DVD player is not compatible with Blu Ray disks It is recommended to take the disk out after the disc is ejected otherwise the same disc cannot load onto disc slo...

Page 25: ...is saver can keep the screen from being damaged ON Start the screen saver Off Remove the screen saver Last Memory You can set the last memory on and off option If you select ON the machine will shut d...

Page 26: ...select Speaker Setup item press OK Enter or button to get into the Speaker Setup Page Downmix LT RT A disc recorded multi channel soundtrack the output signal will be incorporated to left and right ch...

Page 27: ...trol the sound volume contrast You must press Stop twice to enter Preference Page or NO Disc TV Type PAL This is selected when the player is connected to a PAL System TV Multi The player will set the...

Page 28: ...e recorded language will be used Subtitle If a language listed below is recorded on the disc you can set the subtitles to be displayed in such language if not the recorded language will be used Disc M...

Page 29: ...suitable for children PG 13 Parental guidance strongly suggested Some material may not be suitable for children under 13 years of age R Restricted guidance Not suitable for children 17 years of age un...

Page 30: ...it may be a station problem Check that the antenna is connected and adjusted correctly in good working order and has no broken wires There is poor reception on some channels Try another station If the...

Page 31: ...mperatures can shorten the life of electronic devices damage batteries and can even distort or melt certain plastics Do not drop your product This will likely result in failure to operate Do not use o...

Page 32: ...p 720p 1080i General AC Power Supply Power Consumption Remote Control Batteries Dimensions mm w stand Dimensions mm without Stand Net Weight AC 120V 60Hz 36W AAA x 2 L810 x W70xH530 mm L810xW21 2xH560...

Reviews: