background image


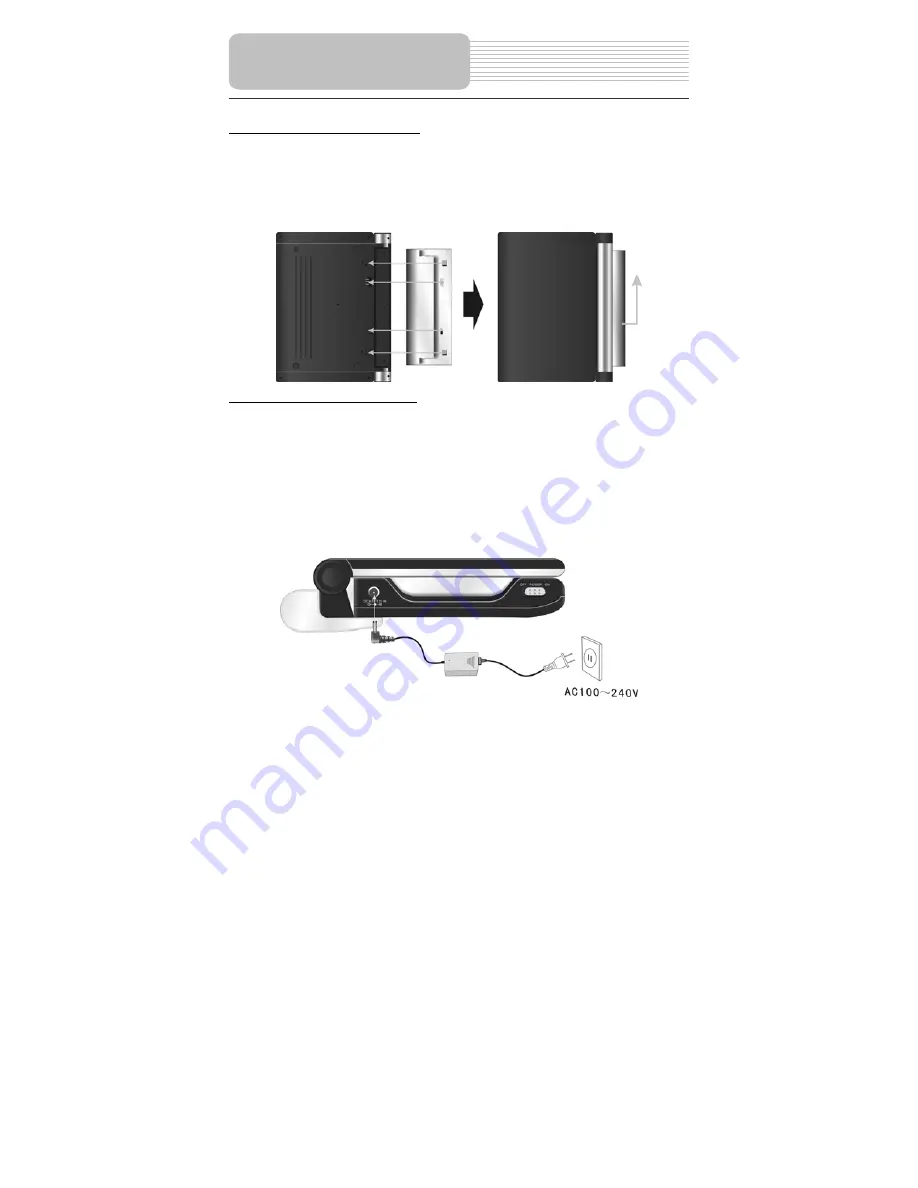
Attaching the Battery Pack 

Refer to the following steps for attaching the Battery Pack: 

1.     With one hand on the DVD Player to prevent it from moving, take the battery and 

align the plastic tabs on the battery pack with holes on the player, and push the 

battery pack into the DVD Player. 

2.     Slide the Battery Pack until you hear it click and lock into place. 


Charging the Battery Pack 

The battery pack must be attached to the DVD player to charge it by using the supplied 

AC Power Adapter.   

1. 

Attach the battery pack to the DVD player. 

2. 

Plug the supplied AC Power Adapter into the player’s power jack marked with “DC 

9.5/12V IN”, which is located on right side of the DVD Player. 

3. 

Plug the other end of the AC Power Adapter Cord into a household AC Outlet as 

shown below: 


Rechargeable Battery 

19

Summary of Contents for PDX-0073

Page 1: ...7 Portable DVD Player PDX 0073 User s Manual 20060620 1...

Page 2: ...CAUTION TO REDUCE THE RISK OF ELECTRIC SHOCK DO NOT REMOVE COVER OR BACK NO USE SERVICEABLE PARTS INSIDE REFER SERVICING TO QUALIFIED SERVICE PERSONNEL The lightning flash with arrowhead symbol within...

Page 3: ...ng is provided for your safety If the provided plug does not fit into your outlet consult an electrician for replacement of the obsolete outlet 10 Protect the power cord from being walked on or pinche...

Page 4: ...ibited Region code information DVD players and discs are coded by region If the region number described on the DVD disc does not correspond to the region number of this product this product cannot pla...

Page 5: ...r Performance Multi speed fast forward fast backward slow playback and repeated playback Search by Time Search for a certain track of a disk by selected time Last Memory Playback Memorizes the stopped...

Page 6: ...y 1 Power Supply Cord with AC Adapter 1 Rechargeable Battery Pack 1 DC Adapter Car Adapter 1 Audio Video Cable 1 Headphone 1 Carrying Case 1 Operation Manual 1 NOTE Accessories and their parts numbers...

Page 7: ...ack Troubleshooting Specifications System Setup Definition Important Safety Instructions Features Notes on Discs Playback Operation Remote Control Power Supply Preparation Rechargeable Battery System...

Page 8: ...kers output high quality sound 3 IN OUT Button Press to play disc or output AV signal or input external Audio Video signal 4 TITLE Button Press to display title menu if it exits in the disc 5 DISPLAY...

Page 9: ...n Press to select different items Press and hold it for several seconds to search backward fast Press to the previous list track chapter 14 Button Press to select different items Press and hold it for...

Page 10: ...TPUT INPUT button on the front panel to switch to input status it is AUDIO input Jack while switch to output status it is AUDIO output Jack 4 Video Input Output Jack Press OUTPUT INPUT button on the f...

Page 11: ...1 Rechargeable Battery Contacts For connecting the rechargeable battery pack View of Bottom Panel 11...

Page 12: ...ss the button again to remove information from screen 3 TITLE button Press to display title menu if the titles are coded in the disc 4 Direction button Press to select menu items 5 ENTER button Press...

Page 13: ...round the screen 14 REP button Press to repeat a chapter track title or the entire disc 15 MENU button Display the actual DVD Disc Menu on screen in playback mode 16 PAUSE button Press to pause playba...

Page 14: ...he remote control unit to the remote sensor within the range of 16 feet and angles of 60 degree and without obstacles between remote control and remote sensor Remote Control Note Improper use of the b...

Page 15: ...t you observe the color coding when connecting audio and video cables Connecting to TV Follow the drawing below to connect the DVD player to TV s Audio Video input with Audio Video cable Connecting to...

Page 16: ...press the OUTPUT INPUT button to enter AV Input statement NOTE Noise may occur in speakers when there is an external audio signal input while playing a DVD disc Unplug the audio cord to clear the noi...

Page 17: ...video software while driving a vehicle Place the unit in a proper position for viewing Detach battery pack when using the AC or car adapter as power source Disconnect the player from the Car Adapter...

Page 18: ...ot expose the battery to high temperature or store in hot sunny place Maintain well ventilated conditions around the product to avoid overheating Don t put the product on a bed sofa or anything that m...

Page 19: ...he Battery Pack until you hear it click and lock into place Charging the Battery Pack The battery pack must be attached to the DVD player to charge it by using the supplied AC Power Adapter 1 Attach t...

Page 20: ...for long periods of time the battery pack should be detached Make sure the power is turned off before detaching the Battery Pack 1 Press and hold the Battery Release Tab in the direction of the arrow...

Page 21: ...Discs Holding Discs Cleaning When loading or removing discs try not to touch their playing surfaces as the right figure Fingerprints or stain on the disc may affect the quality of sound and picture T...

Page 22: ...E control on the right panel to the desired level 6 To turn the player off switch the POWER ON OFF on the left panel to OFF Basic Operation Playback Operation LCD MODE button Press the MODE button and...

Page 23: ...u want to play and press the ENTER ENT button to confirm PAUSE button Press the PAUSE button to pause during playback and press the PLAY PLAY button to resume normal playback STOP button During playba...

Page 24: ...every time you press the AUDIO button in succession REP button Press the REP button to repeat a Chapter Title All or cancel repeat in sequence INFO button Press to display or cancel the detailed infor...

Page 25: ...button repeatedly to view different angle NOTE This function is only available for the DVD disc that coded with multi angle ANGLE button Press the buttons to move the yellow light bar to the item you...

Page 26: ...y fast forward rewind Press it and hold it for several seconds repeatedly the fast forward rewind playback will be undergoing at the speed of 2X 4X 8X 16X 32X in sequence Press the PLAY PLAY button to...

Page 27: ...Press the button to return to previous folder or directory Playback Operation INFO button Press the INFO button for detailed information on the disc playing Press it again to remove information from...

Page 28: ...or ENT on the front panel to resume normal playback Press the REP button to repeat a file folder in sequence Press it repeatedly to display as follows Shuffle Random Single Repeat One Repeat All Repea...

Page 29: ...tating zooming etc function Picture Rotate During browsing a picture you can press direction buttons to rotate the current picture Press the button to rotate the current picture clockwise as following...

Page 30: ...ormance to your own preference Read this section to learn how to set up the system Note the system should better be set up in the state that no disc is in the DVD drive or the unit is on the stop mode...

Page 31: ...e ENTER button to confirm your selection Press the direction to exit this item 3 OSD Language This item is used to set the OSD on screen display language Press the or button to highlight this item Pre...

Page 32: ...to output stereo signal Press the or button to choose the proper one Press the ENTER button to confirm your selection Press the direction button to exit this item The items included in this sub menu a...

Page 33: ...are shown as the left 1 Sharpness This item is used to adjust the sharpness of the Screen Press the or button to highlight this item Press the ENTER or to enter the item It included High Medium and Lo...

Page 34: ...d Thai Off by default Press the or button to choose the preferred Language Press the ENTER button to confirm your selection Press the direction button to exit this item 1 Audio This item is used to se...

Page 35: ...ss the direction button to exit this item 4 Default This item is used to reset the unit Press the or button to highlight this item Press the ENTER or button to enter this item Press the ENTER button t...

Page 36: ...Do not install or use this product in the front seat of a vehicle 3 To reduce the chance of injury in case of collision or a sudden stop Always keep the DVD player strapped securely inside its case wh...

Page 37: ...he top edge of the case A 2 Locate the 2 straps with hooks on each end 3 Hook one end of each strap to the rings at the top of the case A 4 Criss cross the straps around the front of the headrest B an...

Page 38: ...e case A 2 Locate the 2 straps with hooks on each end 3 Hook one end of each strap to the rings at the top of the case A 4 Wrap each strap around the headrest or seat hook the straps to a second set o...

Page 39: ...some small sections chapters Each section is numbered these numbers are called Title number or Chapter number Title 1 Title 2 Chapter1 Chapter 1 Chapter2 Track CD CDs are divided into some sections tr...

Page 40: ...be put in in the right way Put the disc in with the label side up The disc may be dirty or warped Clean or change the disc The player s region code may not as the same as the region code of DVD disc M...

Page 41: ...nection may be not correct Connect the system correctly The unit may be not in AV out mode Switch AV IN OUT on the right panel to OUT Poor AV performance The disc may be dirty or warped Clean or chang...

Page 42: ...anced Negative Power AC100 240V 50Hz 60Hz Dimensions 205mm x 153mm x 41mm Weight Approximate 1 12 Kg DESIGN AND SPECIFICATIONS ARE SUBJECT TO CHANGE WITHOUT NOTICE For service support and warranty inf...

Reviews: