Polaroid P0LMP01 User Manual Download Page 15

7. Items to check before 

    reporting a malfunction
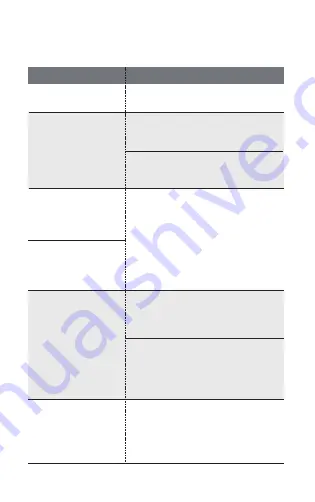


Problems

Checklist

The power does 

not turn on.

Check to see if the battery is 

charged.

Bluetooth 

connection is not 

established.

Reboot the Bluetooth of the 

phone, or connect directly from the 

Settings menu.

Try connecting in about 5 

minutes after turning on the power 

to the device.

Printing paper 

seems to be 

jammed.

Stopped during 

printing operation.

The paper is automatically 

ejected if you turn on the power 

after turning it off. Print it after 

printing out the Smart Sheet 2 to 

3 times. 

The printing paper should be 

stored in an environment with low 

temperature/humidity. 

Do not fold or crumble the paper.

The power turns 

off automatically 

after a certain 

period of time.

Check the Auto Time Off value 

within “Settings”  of the App.

(None, 3 minutes, 5 minutes, 

10 minutes)
The operating status LED 

flickering Red indicates there is no 

power remaining on the battery.

In this case, charge the battery 

with a dedicated cable. 

The printed photo 

shows a line.

A slash mark appears 

in the middle of the 

photo.

Print it again after printing out 

the Smart Sheet 2 to 3 times. 

(A line may appear in case an impact 

is applied to the printer during the 

printing operation.)

Summary of Contents for P0LMP01

Page 1: ...P0LMP01 User s manual Android GK07X0000400...

Page 2: ...cts on the environment and human health Presence of this label on the product means it should not be disposed of as unsorted waste and must be collected separately As a consumer you are responsible fo...

Page 3: ...and used in accordance with the instructions may cause harmful interference to radio communications However there is no guarantee that interference will not occur in a particular installation If this...

Page 4: ...for intended operation as described in this manual The further RF exposure reduction can be achieved if the product can be kept as far as possible from the user body or set the device to lower output...

Page 5: ...r and remodel it for yourself Do not drop or give it impact Comply with rated 5V1A voltage and current Do not place the product in a hot or humid place Keep out of the reach of children Keep away from...

Page 6: ...3 14 15 Table of Contents Components Names of parts Power on off Charging the battery 2 Application installation Installation with QR Code 4 Inserting printing paper 5 Description of LED Status Indica...

Page 7: ...1 Items confirmed before use Components Printer USB cable for charging Zink photo paper Manual Names of parts...

Page 8: ...ttery Make sure that the battery is charged fully before use Average charging time About 1 hour and 30 minutes Charging status indicator Description of status Charging in progress Charging completed U...

Page 9: ...2 Application installation...

Page 10: ...ings Image Full Paper Full Auto Power OFF Auto power off setting None 3 minutes 5 minutes 10 minutes Device Status Device status Idle Busy Paper Empty etc Battery Battery level Number of page Printed...

Page 11: ...paper after unpacking the photo printing paper pack Open the top cover and insert the Smart Sheet and printing paper as shown in the figure Push Open Notice Do not open the Cover while printing Printi...

Page 12: ...rrence of horizontal lines can be improved by repeatedly printing 2 to 3 times Recycle until the printing paper of each printing paper pack is exhausted Optimum image quality cannot be guaranteed when...

Page 13: ...Wait for print command Turn off automatically after the set time Charging in progress The battery is being charged The battery is fully charged Charging in completed Operating Flashing No paper paper...

Page 14: ...Less than 70 RH 32 C LED display Power on Standby Communication Charge Error Print Update Communication Bluetooth 4 0 External connection terminal Micro USB port charging only USB power supply Rated...

Page 15: ...ing out the Smart Sheet 2 to 3 times The printing paper should be stored in an environment with low temperature humidity Do not fold or crumble the paper The power turns off automatically after a cert...

Page 16: ...ater when the temperature is higher than ideal Please wait a moment to reach the proper temperature Printed paper comes out too late The printed image quality differs greatly from the original image q...

Page 17: ...e warranty does not state when and where the Product was purchased or the information has been forged or altered in some way 3 The product defect or damage has been caused by misuse or negligence such...

Page 18: ......

Reviews: