background image

- 40 - 

Troubleshooting                            


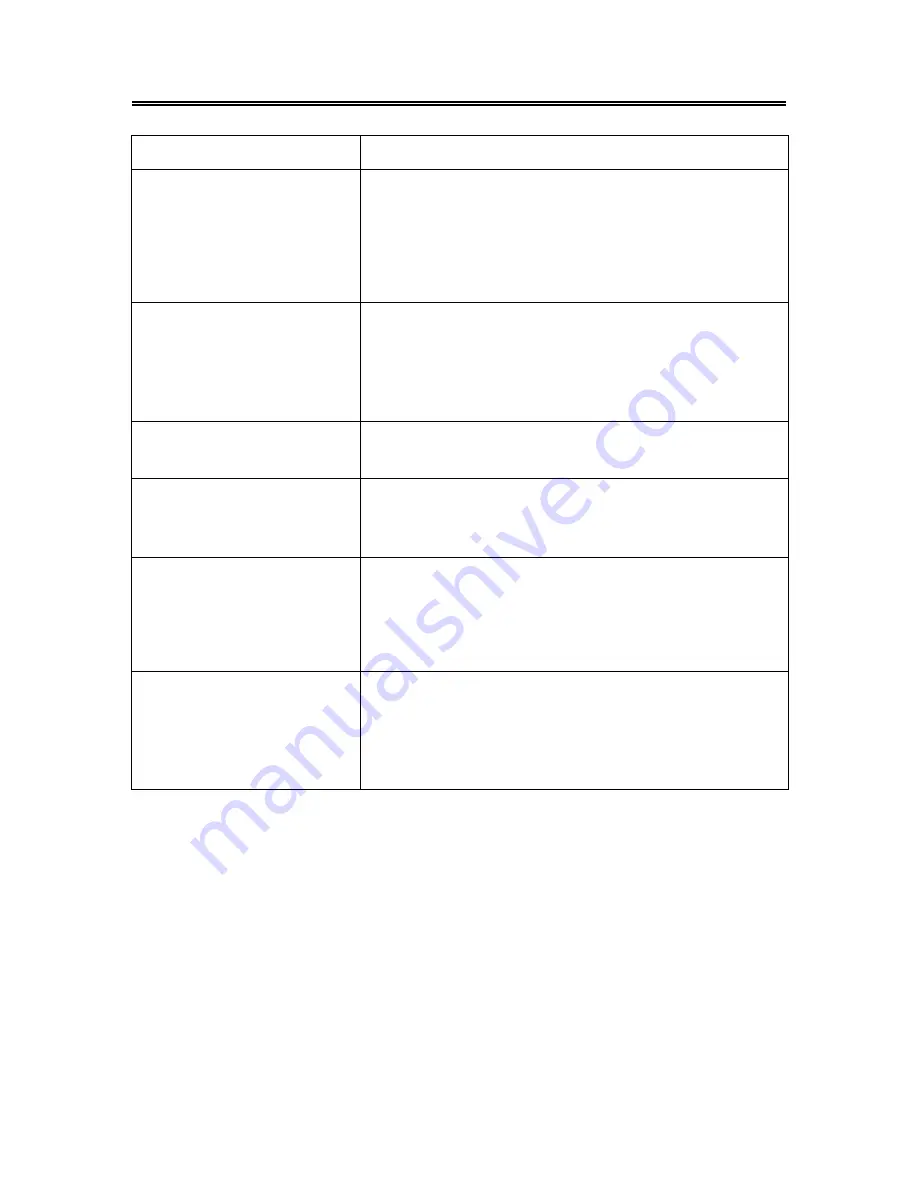
SYMPTOM CHECK 

ITEM 

The player cannot play. 

Make sure disc is loaded in. 
Make sure disc is loaded correctly. 
Make sure disc is not dirty or warped. 
Make sure the player’s region code is the same as region code 
of DVD disc. 
Make sure water condensation has not occurred. If it occurs, 
take out disc and leave the player on for at least one hour. 

There is no sound. 

Make sure system connection is correct. 
Make sure the sound setup of DVD disc is correct. 
Make sure disc is not dirty or warped. 
Clean or replace the disc.   
Make sure the speakers are not muted.   
In the TV mode, set the correct sound mode. 


LCD does not display an image 
or is blank. 

Make sure the unit is turned on and the connections are 
correct.  

Make sure the power adapter is correctly connected.


Cannot continue to play and 
play a section repeatedly. 

 
Make sure is not in A-B or other repeat status. 

  Make sure disc is not dirty or damaged. 
 

There is no picture or the 
picture moves up and down.


Check if the connections with the external AV signal source 
are correct.   
Correctly set the items in the picture menu.   
Check if the video type input signal is not corresponding to the 
unit. 
Make sure the unit is turned on and in correct video type. 


The remote control does not 
work. 

Make sure there are no obstructions between the remote 
control and the player. 
Make sure the remote control is pointing at the player. 
Make sure batteries are inserted and the polarity is correct. 
Make sure battery is not weak.   


Other Notes: 

Static or other external interference may cause the player to behave abnormally. In this occurrence, 

unplug the power-supply cord from the outlet and plug it in again to reset the player. If the problems 

persist, then please disconnect the power and consult a qualified technician. 


Summary of Contents for FXM-1911C

Page 1: ...19 HD Ready LCD TV DVD Combo FXM 1911C 20060331...

Page 2: ...o External AV Device AV Out 14 Connecting to PC 15 Connecting to Earphone 16 Connecting to Power Adapter 16 Connecting to TV Antenna 17 TV Setup and Operation 18 Preparations 18 Image Setting 18 Audio...

Page 3: ...vicing instructions are for use by qualified service personnel only To reduce the risk of electric shock do not perform any servicing other than that contained in the operating instructions unless you...

Page 4: ...oving the cart apparatus combination to avoid injury from tip over 13 Unplug this apparatus during lightning storms or when unused for long periods of time 14 Refer all servicing to qualified service...

Page 5: ...ports sleep time setting V Chip and CCD function Multi audio and Multi video modes Support multi audio and multi video modes provide more selecting USB and CARD PORTS Designed with USB and SD MS MMC c...

Page 6: ...playback of CD R or CD RW discs created on a computer requires proper formatting and finalization of the disc for audio playback Some computers and or software programs may not be capable of creating...

Page 7: ...tton Press to enter or exit setup menu 4 CH button In the TV mode press to select channels In setup menu the same function as direction buttons 5 VOL button In the TV mode press to decrease or increas...

Page 8: ...by mode 10 SD MS MMC Card Port Insert the SD MS or MMC card into the port 11 Disc Tray Slot Used to load disc into the unit 12 Earphone Jack When connected to earphone the internal speakers will autom...

Page 9: ...cks In the S VIDEO mode connected to S VIDEO signal input In the COMPOSITE mode connected to the external video signal input The L R audio input jacks can be used in the both S VIDEO and COMPOSITE mod...

Page 10: ...remote is not in use for a long time Using the Remote control Point the remote control unit from no more than about 7m from the remote control sensor and within about 60 degrees of the front of the un...

Page 11: ...e setup menu press the button to select the desired item and press the button to adjust or set 9 ENTER button Press to confirm your selection 10 INFO button Press to display the information about curr...

Page 12: ...ra angles if the DVD disc contains multiple camera angles 12 A B button Press to mark a segment to repeat between A and B during DVD disc playback 13 AUDIO button Press to select different audio langu...

Page 13: ...the AV input jacks on the rear panel of the unit to the external AV signal source Use the S VIDEO cable to connect the S VIDEO input jack on the rear panel of the unit to the external AV signal sourc...

Page 14: ...udio and video cables to connect the Y Pb Pr input Jacks on the rear panel of the unit to the external AV signal source After connection turn on the power of the unit and external AV signal source and...

Page 15: ...AV Device AV Out The unit supports audio and video signal input function it can be connected to the external audio and video device Use the audio and video cables to connect the AV output Jacks on the...

Page 16: ...VGA input jack on the rear panel of the unit 2 Connect the other end to the PC 3 Connect one end of the audio cable to the PC audio input jack on the rear panel of the unit 4 Connect the other end to...

Page 17: ...See the below figure for details After connecting to the earphone the internal speakers will turn off automatically Connecting to Power Adapter Power is supplied through the provided appropriative po...

Page 18: ...l go to the selected channel Press the number button to select channel then press the 10 to go to the selected channel immediately Press the number buttons to input 00X it will go to the selected chan...

Page 19: ...shown on the right In the setup menu press the button to select Image and then press the ENTER button to enter the item Press the button to select Press the MENU button to return to the previous menu...

Page 20: ...dvanced and press the ENTER button to enter In the menu press the button to select the desired item and then press the ENTER button to confirm Press the MENU button to return to the previous menu Note...

Page 21: ...he MENU button to enter the setup menu Press the button to select Sleep and press the ENTER button to enter the menu shown on the right In the Sleep setup menu press the button to select 15Min 30Min 4...

Page 22: ...he pin The initial pin is 1111 Then press the ENTER button to continue and display the menu as shown on the right Note The Master password is 3308 This password is always effective even after you have...

Page 23: ...Rating Press the button to select TV Rating and press the ENTER button to enter Press the button to select the desired item and then press the ENTER button to confirm your selection Press the MENU but...

Page 24: ...Eng Rating Press the button to select CA Eng Rating and press the ENTER button to enter Press the button to select the desired item and then press the ENTER button to confirm your selection Press the...

Page 25: ...o scan mode Press the MENU button once to enter the setup menu Press the button to select Setup and press the ENTER button to enter the menu shown on the right In the Setup menu press the button to se...

Page 26: ...button to select the Delete Program and press the ENTER button to cancel the skip function which when using the CH button to select channels under normal playback status it will play the channels in...

Page 27: ...the Factory Reset press the ENTER button to resume default status Language Press the button to select the Language press the ENTER button to enter the setup press the button to select item Press the M...

Page 28: ...etup Page Press the SETUP button to enter the General setup menu The screen will display as the following TV Display Angle Mark In the menu Use the direction buttons to select the desired item Press t...

Page 29: ...Press the ENTER button to enter the setup 3 Use the direction buttons to select On or Off 4 Press the ENTER button again to confirm selection and to return 1 Press the direction buttons to select Last...

Page 30: ...er the setup the screen will display as left 3 In the menu use the direction buttons to select items 4 Press the ENTER button to enter the setup Press the button to return 1 Press the direction button...

Page 31: ...ng Video Quality Setup Select Quality press the ENTER button to enter the menu as below 1 In the menu press the ENTER button to enter the setup 2 Use the direction buttons to select items 3 Press the...

Page 32: ...selection and return 1 Press the direction buttons to select Sharpness 2 Press the ENTER button to enter the setup the screen will display as left 3 Use the direction buttons to adjust the level 4 Pr...

Page 33: ...e 2 Press the ENTER button to enter the setup see the left figure 3 Press the direction buttons to select Subtitle language 4 Press the ENTER button again to confirm setting and return 1 Press the dir...

Page 34: ...c into the disc tray 4 As disc is automatically taken in the disc tray fully the player will search a disc and play it automatically in DVD mode Warning Do not play poor quality discs as this may dama...

Page 35: ...Use the REPEAT button repeatedly to repeat a chapter title or all Some discs do not support the repeat function A B Repeat During DVD disc playback press the A B button to select the segment that you...

Page 36: ...scs do not support the search function Various Camera Angles The movies on some DVDs have been recorded from various camera positions This lets you enjoy the same scene from different perspectives In...

Page 37: ...ion Hundreds of pictures can be stored on a disc in this format In order to view JPEG photo albums you can ask your film development company to make a PICTURE CD when they develop your film Normal Pla...

Page 38: ...t the file number Picture Rotation This can be used only when the picture is normally displayed Once another picture is selected rotation will be cancelled automatically Use the buttons to rotate the...

Page 39: ...hift among disc playback USB playback and the SD MS MMC playback The default state is disk playback Please see the below figure 6 Press the button to select the folder and press ENTER button to enter...

Page 40: ...tton to shift to the corresponding mode S VIDEO or Component Then you can go on to set up the menu in a certain mode Computer Screen Function The TFT LCD screen of the unit can be used as the computer...

Page 41: ...tinue to play and play a section repeatedly Make sure is not in A B or other repeat status Make sure disc is not dirty or damaged There is no picture or the picture moves up and down Check if the conn...

Page 42: ...ECT TO CHANGE WITHOUT NOTICE Manufactured under license from Dolby Laboratories Dolby and the double D symbol are trademarks of Dolby Laboratories Confidential unpublished works 1992 1997 Dolby Labora...

Page 43: ...42...
Reviews: