background image

- 14 - 

TV Function                                                     


Preparations 

1. After connection, press the POWER button to turn on the power.   

2. Press the INPUT button to shift to TV mode. You can go on with the following operations:   


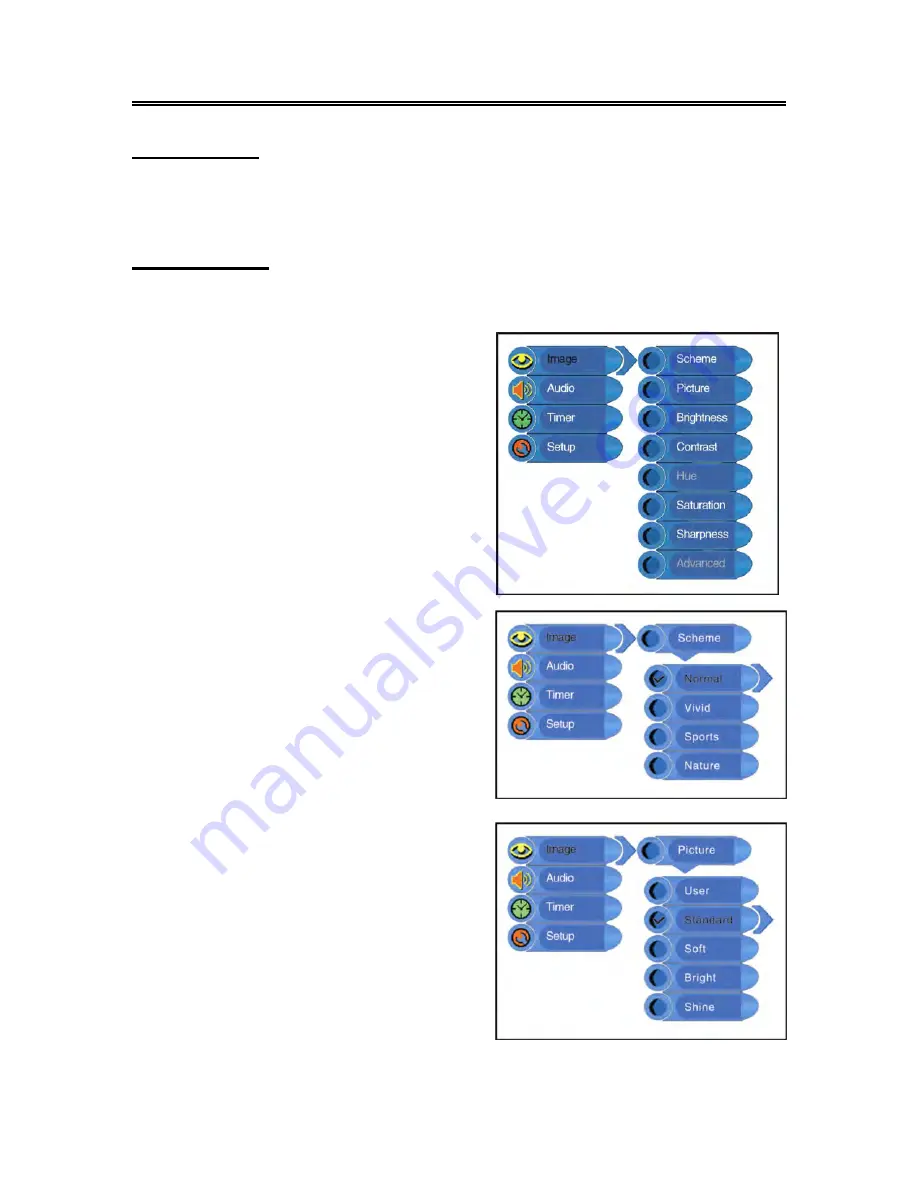
Image Setting


Note: This item is only available when there is a signal input. 


Press the MENU button once to enter the setup menu, 

as shown on the right: 

In the setup menu, press the 

▲▼

 button to select


Image

 and then press the OK button to enter the item. 

Press the 

▲▼

 button to select. Press the MENU 

button to return to the previous menu. 


Scheme Setup 

Press the 

▲▼

 button to select 

Scheme 

and press 

the OK button to enter. Press the 

▲▼

button to select 

the desired item and press the OK button to confirm 

your selection. Press the MENU button to return to 

the previous menu. 


Picture Setup 

Press the 

▲▼

 button to select 

Picture 

and press the 

OK button to enter. Press the 

▲▼

button to select the 

desired item and press the OK button to confirm your 

selection. Press the MENU button to return to the 

previous menu. 


Summary of Contents for FLU-1514SA

Page 1: ...15 LCD FLU 1514SA 20060928...

Page 2: ...cting to External AV Signal Source COMPONENT Connecting to PC Connecting to Power Cable Connecting to TV Signal TV Functions Preparations Image Setting Audio Setting Timer Setting Setup Setting NICAM...

Page 3: ...caused by any substitutions and modifications of the product without authorization from the manufacturer or authorized unit WARNING The apparatus should not be exposed to dripping splashing or any liq...

Page 4: ...convenience receptacles and the point where they exit from the apparatus 13 Only use attachments accessories specified by the manufacturer 14 Use only with the cart stand tripod bracket or table speci...

Page 5: ...and VGA Input Can be connected to external audio video signal sources and a PC Special Function Supports the sleep time setting function Multi audio and Multi video modes Supports multi audio and mult...

Page 6: ...setup menu the same function as direction buttons 4 VOL button In TV mode press to decrease or increase the volume In setup menu the same function as direction buttons 5 POWER button Press to enter o...

Page 7: ...3 VIDEO L R Audio Input Jack Connect to the VIDEO input in COMPOSITE or S VIDEO mode Connect to the L R audio input in COMPOSITE or S VIDEO mode 4 DC 9 5V 12V In Jack Connect to power adapter 5 VGA In...

Page 8: ...u 7 INFO Button Press to display the reference information 8 SLEEP Button Press to select sleep time 9 VOL Button Press to increase or decrease the volume 10 SOUND Button Press to shift sound mode amo...

Page 9: ...ths z Remove the battery when the remote is not in use for a long time Using of Remote control Point the remote control no more than about 7m from the remote control sensor and within about 60 degrees...

Page 10: ...dio and video cables to connect to the AV input jacks on the rear panel of the unit and to the external AV signal source Use the S VIDEO cable to connect the S VIDEO input jack on the rear panel of th...

Page 11: ...NT Use the audio and video cables to connect the Component input jacks on the rear panel of the unit to the external AV signal source After connection turn on the power of the unit and external AV sig...

Page 12: ...able to the VGA input jack on the rear panel of the unit 2 Connect the other end to the PC 3 Connect one end of the audio cable to the PC audio input jack on the rear panel of the unit 4 Connect the o...

Page 13: ...to Power Cable Plug the two prong end of the power cord to an AC100 240V outlet If you have difficulty inserting the plug turn it over and reinsert it If the unit will not be used for a long time dis...

Page 14: ...to shift to TV mode After connecting to the antenna turn on the unit and go on with program searching you can follow the below steps to select channels 1 For 0 9 channel Press the number buttons to s...

Page 15: ...nd then press the OK button to enter the item Press the button to select Press the MENU button to return to the previous menu Scheme Setup Press the button to select Scheme and press the OK button to...

Page 16: ...nu NOTE This feature is only available under NTSC TV signal mode Saturation Setup Press the button to select Saturation and press the button to adjust the value Press the MENU button to return to the...

Page 17: ...eturn to the previous menu Treble Setup Press the button to select Treble and press the button to adjust the level Press the MENU button to return to the previous menu Balance Setup Press the button t...

Page 18: ...Press the MENU button once to enter the setup menu Press the button to select Setup and press the OK button to enter the menu shown on the right In the Setup menu press the button to select the desire...

Page 19: ...to start auto scan The following will display on the screen Auto scan will take a few minutes When the tuning operation completes the unit will exit and memorize the programs by sequence automatically...

Page 20: ...Ch and press the OK button to enter Press the number buttons to select program number Repeat the above operations to Swap To Ch Then Press the button to select Perform Swap and press the OK button to...

Page 21: ...er buttons to enter the channel number Press the MENU button to return to the previous menu Store Press the button to select Store and press the OK button to store the above operations Note The CH NO...

Page 22: ...io signals press the STEREO AUDIO button on the remote control repeatedly to shift the sound tracks between Nicam Mono and Mono and the screen will appear corresponding display as shown below Under A2...

Page 23: ...NPUT button to shift to the corresponding mode COMPOSITE S VIDEO or COMPONENT This allows you to set up the menu in a certain mode Computer Screen Function The TFT LCD screen of the unit can be used a...

Page 24: ...in the picture menu Make sure the video type input signal is corresponding to the unit Make sure the unit is turned on and in correct video type The remote control does not work Make sure there are no...

Page 25: ...tion 40W Dimension 345 84 390mm LXWXD Weight About 5 8 kg Ambient Temperature 10 45 DESIGN AND SPECIFICATIONS ARE SUBJECT TO CHANGE WITHOUT NOTICE Polaroid and Polaroid and Pixel are trademarks of Pol...

Page 26: ...25...

Reviews: