background image


- 22 - 

TV Function                                                                       


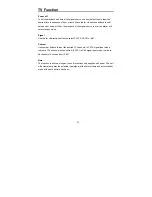
The auto memory will take a few minutes. The unit will search channels from the 

lowest channel to the highest channel in the standard channel list. When tuning 

operations are complete the unit will exit and store the channels by sequence in the 

memory. 

During tuning, press the 

 button to exit the auto memory.   

Use the 

  direction buttons to select the desired channel from those in memory. 


Timer Setup 

Press the SETUP/SET button on the remote control twice to enter TIMER SETUP 

menu, the screen will display as below: 


Use the


  buttons to select the item you want to set. 

Use the 

 buttons to enter the item and to select. 

Press the SETUP/SET button again on the remote control to exit from the setup menu. 


Timer 

Use the 

 direction buttons to select ON or OFF. This function allows you to set 

the start time and end time of the desired signal source. No matter what mode the unit 

is in, this function will automatically start the playback of the desired signal source. 

Select ON to activate the function; select OFF to disable the function. 
 

Power on 

To set the playback start time of the signal source, use number buttons to input the 

desired start time in sequence of hour, minute. Press the 

 direction buttons to 

shift between am and pm.   

TIMER SET


TIMER 


OFF 

POWER ON                        _ _: _ _ am 
POWER OFF                      _ _: _ _ am 
SIGNAL                                          CATV 
CHANNEL                                          002 


EXIT: SET 

SEARCHING


CH

001 

EXIT


089.75MHz 


Summary of Contents for FDM-0715

Page 1: ...7 Under the Cabinet LCD TV with DVD Player FDM 0715 User s Manual 20060302...

Page 2: ...s you are qualified to do so Refer to service manual for servicing instructions CAUTION TO REDUCE THE RISK OF ELECTRIC SHOCK DO NOT REMOVE COVER OR BACK NO USE SERVICEABLE PARTS INSIDE REFER SERVICING...

Page 3: ...cement of the obsolete outlet 10 Protect the power cord from being walked on or pinched particularly at plugs convenience receptacles and the point where they exit from the apparatus 11 Only use attac...

Page 4: ...described on the DVD disc does not correspond to the region number of this product this product cannot play the disc The region code of this unit is 1 IMPORTANT FOR LASER PRODUCTS 1 CLASS 1 LASER PRO...

Page 5: ...ce to radio communications However there is no guarantee that interference will not occur in a particular installation If this equipment does cause harmful interference to radio or television receptio...

Page 6: ...e Control System Connections Connecting To External AV Signal Source Connecting To TV Signal Input Source Connecting To the Antenna Connecting To the Power Adapter Radio Function TV Function AV Functi...

Page 7: ...uilt in 2x5w stereo amplifier with left and right speakers Switching Power Adapter Automatically adapts to the voltage required Special Functions Supports Multi language Advanced Playing Function Comp...

Page 8: ...cifies the operation of some DVD discs Please refer to the instruction manual with the disc Care of Discs Do not touch the playing surface of the disc Do not stick paper or labels on the disc Storage...

Page 9: ...TOP Button Press to stop playback under DVD mode 6 Button Under DVD mode press once to go to beginning of the current track chapter Press twice to go to the previous track chapter 7 Button Press to go...

Page 10: ...ons backward under TV or radio mode Press to adjust the value downward when setting the time on the display panel 16 CH Button Press to select items in the setup menu Press to select channels or radio...

Page 11: ...UDIO input jack Connection for audio input 5 VIDEO input jack Connection for video input 6 Direct current 12V input jack Display Panel Drawing 1 FM radio status indicator 2 AM radio status indicator A...

Page 12: ...ontrol works best at a distance less than 7m and at an angle of up to 60 to the front of the unit No obstacles may stand in the way between remote control and infrared sensor The battery normally last...

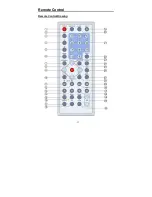
Page 13: ...13 Remote Control Remote Control Drawing...

Page 14: ...10 LAST Button Press to return to the previous channel watched last time 11 SEEK Button Under radio mode press once to fine tune frequency backward Press for about 1 5 seconds to search radio stations...

Page 15: ...n Press to turn the LCD screen display on or off under DVD TV and AV mode 28 TIME Button Press to set the time when the time is displayed on the display panel Use the buttons to select the editing pos...

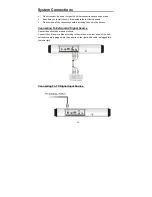
Page 16: ...se make all the connections before installing the unit in the kitchen Connecting To External AV Signal Source Connections should be made as follows Connect the L R audio cables according to the marks...

Page 17: ...ible after connection When connecting the supplied AM loop antenna connect two black cords to AM and ground jacks as shown below If the FM reception is poor use a 75 coaxial cable not supplied to conn...

Page 18: ...See the below figure for details 1 Connect the AC adapter to jack marked with DC 12V IN on the rear panel of the unit 2 Plug the two prong end of the power cord to the grounded electrical socket 3 Wh...

Page 19: ...e buttons to adjust the channel number for your preference and then press the SETUP SET button again the station will be memorized with the coded station number Press the SETUP SET button again the st...

Page 20: ...can be preset Picture Parameter Setup Press the SETUP SET button once on the remote control to enter PICTURE setup menu and screen display as shown Use the buttons to select the item you want to set B...

Page 21: ...you can select channels from 2 to 69 Skip When the button is pressed to turn the function ON it will skip the current channel when using to select channels When the button is used to turn the function...

Page 22: ...se the buttons to enter the item and to select Press the SETUP SET button again on the remote control to exit from the setup menu Timer Use the direction buttons to select ON or OFF This function allo...

Page 23: ...mode Signal Use the direction buttons to select CATV ANT FM or AM Channel Use number buttons to input the desired TV channels In CATV signal input mode there are 124 channels to choose from 2 125 in A...

Page 24: ...t the item you want to set Brightness Contrast Color Use the buttons to adjust the items between 0 and 20 Use the buttons to select the Language press the buttons to select English French or Spanish S...

Page 25: ...enu for DVD discs You can press the MENU button to enter the menu and use the direction buttons to highlight an item you would like to select Press the ENT button to select it Audio DVD discs can cont...

Page 26: ...elop your film Normal Playback Load a JPEG disc in Use the ENT button and direction button to select a submenu with picture and then use the direction button to select the contents Many discs have oth...

Page 27: ...l not operate if the disc is removed from the DVD Player Press the STOP button twice 2x Playback of the disc will stop When the XPLAY button is pressed again playback of the disc will start from the b...

Page 28: ...REPEAT button will display a menu as follows Repeat Chapter Title All You can temporarily select a section of a DVD that you would like to play repeatedly You do this by marking the start and the end...

Page 29: ...ategory new selection will be highlighted Press the ENT button for confirmation Press the left direction button to enter the other setup menu s General Setup TV Display Select Normal PS or Normal LB w...

Page 30: ...he disc contains multiple languages Default Reset Use this function to reset all the settings LCD Setup Under DVD mode press the SETUP SET button on the remote control or front panel there will be men...

Page 31: ...unit under a cabinet The player unit may be installed in the kitchen with or without the spacers The suggested mounting position of the unit is under a wall cabinet See drawings below NOTE The dimens...

Page 32: ...g the installation work z To reduce risk of fire do not place any heating or cooking appliance beneath the unit especially while the LCD screen is open for viewing z Mount the unit so that its AC powe...

Page 33: ...on of the picture is incorrect Make sure the video type of the AV signal source is NTSC Make sure system connection is correct Is your disc dirty or warped Clean or replace it Cannot continue to play...

Page 34: ...on 30W Dimensions 3 1 H X 13 6 W X 11 2 D Weight About 6 4 lbs DESIGN AND SPECIFICATIONS ARE SUBJECT TO CHANGE WITHOUT NOTICE Manufactured under license from Dolby Laboratories Dolby and the double D...

Reviews: