background image

EN-10

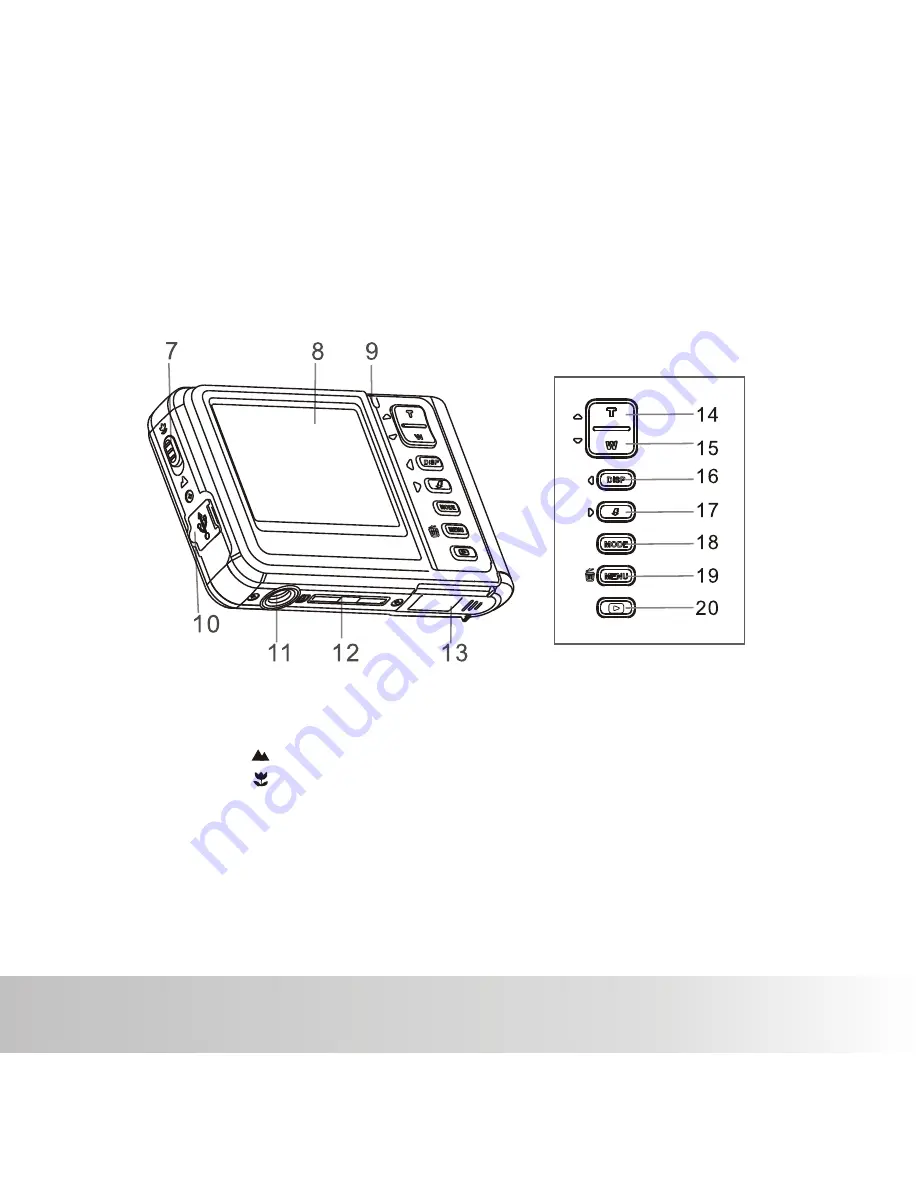
Rear View

  7.

  8.
  9.
10.
11.
12.
13.     

Focus switch
     Normal mode
     Macro mode
LCD Display
LED indicator
USB interface
Tripod socket
SD card slot
Battery door                                  

14.  Up & zoom in button
15.  Down & zoom out button
16.  Left &


Display

17.  Right / flash light button
18.  Mode
19.  Menu / Delete
20.  Playback button


button

Polaroid a932 Digital Camera User Guide                                      

           www.polaroid.com

Summary of Contents for A932

Page 1: ...a932 Digital Camera U S E R S M A N U A L...

Page 2: ...se the separation between the equipment and receiver Connect the equipment into an outlet on a circuit different from that to which the receiver is connected Consult the dealer or an experienced radio...

Page 3: ...al adverse effects on the environment and human health Presence of this label on the product means it should not be disposed of as unsorted waste and must be collected separately As a consumer you are...

Page 4: ...ers especially with accessories such as batteries chargers memory cards cables pouches and language support Occasionally a retailer will specify a unique product color appearance and internal memory c...

Page 5: ...DISSASSEMBLE For repair please call our friendly customer service for assistance Do not use the camera in areas near water Take special care during rain snow on the beach or near the shore Exposing t...

Page 6: ...is a precision instrument Do not drop strike or use excessive force when handling the camera This might cause damage to the camera Do not use the camera in humid steamy smoky or dusty places This migh...

Page 7: ...es on the LCD Screen Excessive use of the flash Remove batteries from your camera when not in use Using the optical viewfinder if your camera has one to frame the subject when taking pictures WARNING...

Page 8: ...Connecting to a PictBridge Compliant Printer INTRODUCTION Overview Package Contents GETTING TO KNOW YOUR CAMERA Front View Rear View LCD Monitor Display GETTING STARTED Preparation Turning the Power...

Page 9: ...ng images with a resolution of up to 2560 x 1920 pixels Package Contents Carefully unpack your camera and ensure that you have the following items Common Product Components Digital Camera Software CD...

Page 10: ...9 GETTING TO KNOW YOUR CAMERA Front View 1 Hand strap retainer 2 Shutter OK 3 Lens Cover Power Slide 4 Flash 5 Self timer indicator 6 Taking lens Polaroid a932 Digital Camera User Guide www polaroid c...

Page 11: ...D Display LED indicator USB interface Tripod socket SD card slot Battery door 14 Up zoom in button 15 Down zoom out button 16 Left Display 17 Right flash light button 18 Mode 19 Menu Delete 20 Playbac...

Page 12: ...ry card 5 Image size resolution FW interpolation 6 Image quality Super Fine Fine 7 Remaining number of shots 8 Main focus area 9 Self timer icon 10S Timer 2S Timer 10 Zoom indicator 11 Focus setting 1...

Page 13: ...orage media 6 Video resolution 7 Exposure compensation 8 White Balance 9 Focus setting 10 Zoom indicator Playback mode Still image playback 1 Playback indicator 2 Battery level 3 Storage media 4 File...

Page 14: ...ts initial usage up to 2GB for SD and up to 8 GB for SDHC To prevent valuable data from being accidentally erased from an SD SDHC memory card you can slide the write protect tab on the side of the SD...

Page 15: ...for the insert with this icon Or visit www polaroid com Press the Lens Cover Power Slide once to turns on To turn the power off press the Lens Cover Power Slide Once to turns off To extend battery li...

Page 16: ...ory card and erases all stored images and data 1 Press the MENU button 2 Select Setup menu with the button 3 Select Format with the buttons and press the SHUTTER button 4 Select Internal Memory or SD...

Page 17: ...CD display so that the main subject is within the focus frame Pressing the T button zooms in on the subject and Enlarges the subject on the LCD display 3 Press the SHUTTER button to capture your image...

Page 18: ...rform the following steps 1 Press the Power button to turn the power on 2 To activate the digital zoom press the button The status of digital magnification is shown on the LCD display 3 Compose your s...

Page 19: ...m 18cm normal mode is 20 Infinity 0 5m Infinity 1 Turn the power on 2 Slide the focus switch to your desired focus mode 3 Compose your scene and press the SHUTTER button Warning Your image s will be u...

Page 20: ...oving subjects Night Select this mode when you want to capture dark scenes such as night Scenes Portrait Select this mode when you want to capture an image that makes the person stand out against a de...

Page 21: ...cks Adjusting the Exposure EV Compensation You can manually adjust the exposure determined by the digital camera Use this mode when the proper exposure cannot be obtained for example when the contrast...

Page 22: ...more time will end the recording of the video clip The recording time depends on the storage size and the subject of the image to be recorded When recording a video clip the flash cannot be used If t...

Page 23: ...ttons 3 Press the SHUTTER button to start video playback Questions Call our toll free customer service number Look for the insert with this icon Or visit www polaroid com Video clips cannot be display...

Page 24: ...image press the button 3 Press the button to adjust the zoom The magnification value is displayed on the LCD display 4 To view different portion of your image Press SHUTTER once and press the button t...

Page 25: ...still images automatically in order one image at a time 1 Press the button 2 Press the MENU button The playback menu is displayed 3 Select Slide Show with the buttons then press the SHUTTER button 4 S...

Page 26: ...played with protected images When All has been selected is displayed with All the images Canceling the Protection To cancel protection for only one image display the image on which you want to remove...

Page 27: ...UTTER button This Image Erases the selected image All Erases all of the images except for the protected images 4 Select OK with the buttons and press the SHUTTER button To not erase select Cancel and...

Page 28: ...item with the buttons and press the SHUTTER button to enter its respective menu 4 Select the desired setting with the buttons and press the SHUTTER button 5 To exit from the menu press the button Reso...

Page 29: ...n incandescent tungsten lights are in your scene Fluorescent Use this settings when flourescent lights are in your scene ISO This sets the sensitivity for capturing images When the sensitivity is rais...

Page 30: ...the desired setting with the buttons and press the SHUTTER button 5 To exit from the menu press the button Resolution This sets the size of the video clip that will be captured VGA 640 x 480 QVGA 320...

Page 31: ...button Delete Refer to the titled section in this manual Copy to Card Allows you to copy your files from the camera s internal memory to an SD SDHC memory card Of course you can only do this if you h...

Page 32: ...further details Beep Sound This sets whether or not to mute the camera sound each time you press the camera s buttons On Off Language Refer to section in this manual titled Choosing the Language for...

Page 33: ...t frequency of environment is 60Hz like the US 50Hz The light frequency of environment is 50Hz like the UK Date Time Date and Time setting YY MM DD DD MM YY MM DD YY Date Stamp Show the date and time...

Page 34: ...lick on the removable disk and locate the DCIM folder 7 Double click on the DCIM folder to open it to find more folders Your recorded images and video clips will be inside these folders 8 Copy Paste o...

Page 35: ...dd creative effects to your photos Create your own movies or photo slide shows complete with soundtrack Upload your files easily to YouTube Or share them through simple email attachments or popular ph...

Page 36: ...osure 0 0 Metering Center White Balance Auto ISO Auto Color Normal Saturation High Sharpness Normal Questions Call our toll free customer service number Look for the insert with this icon Or visit www...

Page 37: ...p to 2GB SD and 8GB SDHC optional Image format JPEG video format AVI F no f 3 0 Focal Length 6 47 mm equivalent to 39mm on a 35mm camera 1 1 1000 sec Off 2S Timer 10S Timer 2 0EV 2 0EV in 0 3EV increm...

Page 38: ...43 5001 1169 1403 1559 1620 1800 2020 1146 2294 2950 1613 2933 3586 3177 4860 5902 6356 8698 10016 2811 3123 3250 3610 4060 2296 4594 5907 3230 5874 7180 6362 9731 11816 12726 17414 20053 EN 37 APPEND...

Page 39: ...n Press the shutter button all the way down The internal memory or memory card does not have any free capacity The flash is charging The memory card is write protected Wait until the status LED turns...

Page 40: ...images When the camera is properly connected to a Pict Bridge compliant printer and set to Pictbridge the Pict Bridge menu is displayed on the monitor 1 Select the item you want to configure with the...

Page 41: ...inting starts The COMPLETE will be displayed temporarily reminding You that the printing procedure is finished If a print error is detected the PRINTERROR will be Displayed The image printing may be f...

Page 42: ...EN 41 Polaroid Polaroid and Pixel and iZone are trademarks of PLR IP Holdings LLC Used under license Polaroid a932 Digital Camera User Guide www polaroid com...

Page 43: ...Part No UMA932US001...

Reviews: