Plustek VS 210A Getting Started Manual Download Page 1

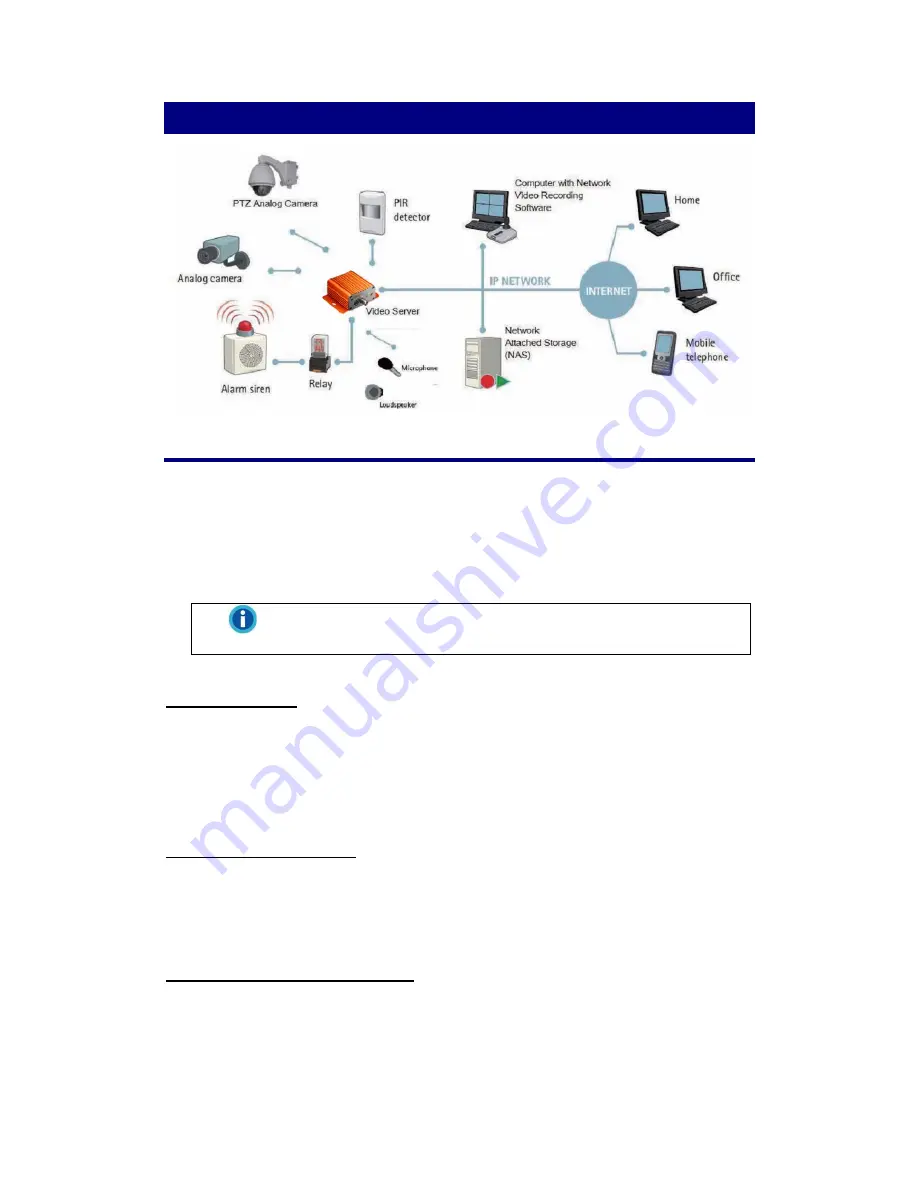
Getting Started with the Video Server 


Initial Requirements 

Software Requirements 

Installation and configuration require the following: 

z


Microsoft Windows 2000 or XP Operating System 

z


Microsoft Internet Explorer version 6 or higher 


Information 

Other browsers (i.e. Mozilla Firefox) are not currently supported.

Execute IP Scan 

IP Scan is a utility used to configure network settings for IP cameras and other 
devices (i.e. NVR). 

Physical IP Camera Connections 

Connect to the Network 

Connect this device to network hub/switch via a standard CAT5 Ethernet cable with 
an RJ-45 connector. Please note that the PC must be on the same network domain 
as the IP camera. 

Connect CCTV to Video Server 

Use the BNC Video In port to connect the camera with this device. 


1

Summary of Contents for VS 210A

Page 1: ...irefox are not currently supported Execute IP Scan IP Scan is a utility used to configure network settings for IP cameras and other devices i e NVR Physical IP Camera Connections Connect to the Network Connect this device to network hub switch via a standard CAT5 Ethernet cable with an RJ 45 connector Please note that the PC must be on the same network domain as the IP camera Connect CCTV to Video...

Page 2: ...ower connector The adapter should be connected to 110V 220V AC socket There is no power button on the camera so connecting disconnecting the power adapter will start shutdown the IP camera Initial Network Configuration To configure the IP camera s network settings use the IP Scan utility Factory IP Address Below are the initial factory IP address settings for the IP camera IP Address 192 168 1 2 S...

Page 3: ...on the IPScan exe icon in the Installation CD to execute IP Scan utility Press the Scan button to list the IP and MAC address list for IP cameras on the network A new IP camera will display the factory IP address 192 168 1 2 However if multiple new devices are present on the network then multiple instances of 192 168 1 2 will be listed 3 ...

Page 4: ... is located on the bottom of the camera Change Network Setting via IP Scan There are two ways to modify the network settings 1 Double click on a specific IP address the setting page will be displayed 2 Click Change Setting button at the bottom of the screen 4 ...

Page 5: ...or the administrator account root is pass Enter the default password and click OK to confirm the changes After applying the new network settings the IP camera will reboot this process takes about few seconds The IP camera s Power LED light will blink during the reboot process the light will become stable once reboot is complete Exit the Setting Page by clicking Close and wait for the reboot to com...

Page 6: ... camera When accessing an IP camera using the web interface for the first time some configuration for ActiveX controls may be required 1 Open the IE browser 2 Type in the IP address of the IP camera 3 Enter the administrator username and password User name root Default password pass Press OK button to access to the Live View web page Information z Usernames and passwords are case sensitive z The a...

Page 7: ... ActiveX controls for the viewer to work Near the top of the browser page is a message regarding an add on to run The request is highlighted below in blue Clicking on the add on message will bring up options choose Install This Add on for All Users on This Computer to add A Security Warning message box will be displayed click OK 7 ...

Page 8: ... and the page to attempt reloading Most likely other ActiveX controls will be required Repeat the above procedure of adding ActiveX controls until no other add on requests are displayed and the Live View page appears without error 8 ...

Reviews: