background image


 13 

to the histogram only when the color balance of your scanned image does not match 
the original picture.  


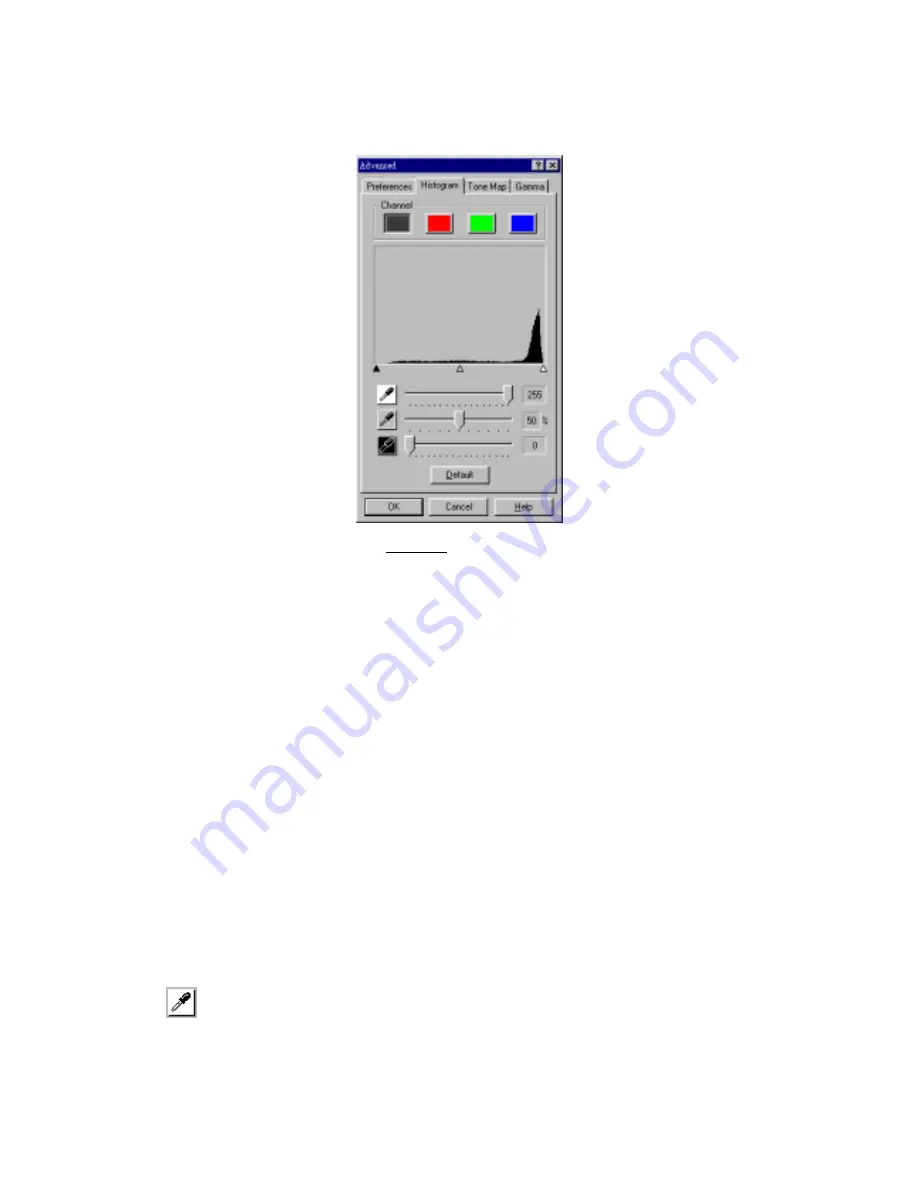
Figure 7. Histogram


However, if the colors in a scanned image appear unclear, the histogram can be 

used to make them more to your liking. A histogram shows how bright or dark colors 
in the image are, and can be used to adjust these levels. 

When using the histogram, it is very helpful to prescan the image. Changes made 

to the histogram will instantly be shown on the image in the Prescan Area, allowing 
you to immediately judge the effects of the changes! 

A histogram is a graphic representation of the tonal distribution (the brightness 

and darkness levels) in an image.  It plots the number of pixels (dots) at each 
brightness level.  The histogram displays these levels in the 4 color channels.  

The x-axis of the histogram graph represents the color values from darkest (0) at 

the far left to the brightest (255) at the far right; the y-axis represents the total number 
of pixels at that value.  A histogram for a dark image shows most of the pixels at the 
left side of the graph. A histogram for a bright image is more heavily weighted to the 
right side. 

You can manipulate colors in the histogram by changing the values in the 

highlight, midtone and shadow slider bars towards the bottom of the window. 


  The highlight represents the high (bright) end of the color spectrum.  If the 

highlight value of the Master channel is lowered to 245, all color values 
between 245 and 254 will be given the value of 255 (white).  Thus, lowering 

Summary of Contents for V1.0

Page 1: ...1 Version 1 0 for Color Flatbed Scanners ...

Page 2: ...2 All trademarks and brand names mentioned in this publication are property of their respective owners 2000 All rights are reserved No portion of this document may be reproduced without permission ...

Page 3: ...ge Gamma 16 SCANNING TIPS 17 CHAPTER II THE SCANNER SOFTWARE 18 OVERVIEW 18 THE FAX UTILITY 19 About the Fax Utility 19 Using Fax Utility 20 Fax Utility Settings 21 THE E MAIL UTILITY 22 About the E mail Utility 22 Using the E mail Utility 22 E mail Utility Settings 23 THE IMAGE EDITOR PICTURE PUBLISHER 24 Opening the Program 24 Acquiring an Image from the Scanner 24 Basic Image Adjustments 25 Usi...

Page 4: ... 28 THE OCR PROGRAM TEXTBRIDGE CLASSIC 29 To Use OCR via Action Manager 32 29 To Use OCR Directly from TextBridge Program 30 To Use OCR Directly from Your Word Processor 32 Some key points about OCR 33 CONTACTING PLUSTEK 35 ...

Page 5: ...scanner and is a useful companion to the help menus found within the software applications themselves Conventions of this Guide 1 Bold Important note or first use of an important term in a chapter 2 ALL CAPS Represents commands or contents on your computer screen A Note About Icons This guide uses the following icons to point out information that deserves special attention Danger A procedure that ...

Page 6: ...justments before scanning For example you can scan in different modes black and white grayscale or color increase or decrease the resolution dots per inch of an image and adjust the brightness and or contrast The Prescan option allows you to adjust the borders of the scan area by increasing or decreasing the size of the crop box located inside the Prescan Area The TWAIN interface also provides you...

Page 7: ...wo items Source and Scan Mode in order to successfully perform a scan All other items are optional and allow you to tailor the characteristics of the scanned image Source This option is available only for scanners built with a transparency adapter There are three possible sources listed Normal Use this setting to scan normal sheets of paper or any non transparent material 35mm Slide Use this mode ...

Page 8: ...w up on the prescanned image but will only affect the final scanned image Flip Vertically This option will only appear when scanning transparencies or negatives if your scanner is built with a transparency adapter It will flip the scanned image around the central horizontal axis This feature will not show up on the prescanned image but will only affect the final scanned image Rotate 90 Clockwise T...

Page 9: ...wards the upper right of the TWAIN window and then clicking on the part of the image you wish to view in detail Figure 2 Prescan Window If you change any settings either in the TWAIN window or in any of the Advanced windows the effects of the changes except for Flip Rotate Filter and Descreen will immediately appear on the prescanned image in the Prescan Area This allows you to instantly judge the...

Page 10: ...op zooming in and out of the image click on the Pointer button just above the Magnifying Glass button Note The magnifying glass only affects the view of the prescanned image in the prescan area and in no way affects the scanning process or the final scanned image Scan Button Accepts all settings and begins scanning Prescan Button By clicking on the Prescan button you can scan the source document i...

Page 11: ...solution See Scanning Tips later in this chapter for detailed information about selecting the proper amount of resolution Reduce the scan area When scanning images that are smaller than a full page make sure you prescan the image and adjust the scan area borders in the Prescan Area window Some file formats such as GIF and JPEG can compress image data greatly reducing the amount of space an image t...

Page 12: ... defines how the colors in an image will be displayed on your monitor not the color data in the image itself The monitor gamma setting allows you to change the gamma values for your monitor The monitor gamma only affects the prescanned image in the prescan area This is because image editing applications have their own monitor gamma settings The settings defined here should be exactly the same as t...

Page 13: ...our programs consistent This ensures that colors will always be displayed in the same way A Au ut to o D De en ns si it ty y Checking this box automatically adjusts the Histogram to make the scanned image clearer It does this by increasing the difference between color tones I In nv ve er rs se e When inverse is checked the colors of an entire image will become reversed A black and white image will...

Page 14: ...ing you to sharpen images as well as remove excessive dots and distortion Figure 5 Filter Menu Average Determines the medium depth of an image and averages adjacent pixels to make images appear softer Blur Lets you dull the edges within an image and decreases the contrast by making dark edges lighter and light edges darker Before After ...

Page 15: ...o settings made in the TWAIN window will immediately be shown on the prescanned image A Au ut to o C Cr ro op p a af ft te er r P Pr re es sc ca an n When this box is checked the TWAIN program will identify the dimensions of the image you scanned and crop around the edges The crop shape will be a square or rectangle and it will not trace the edges of oddly shaped images This command can be useful ...

Page 16: ...ore adjusting the Histogram Tone Map and or Gamma perform a PRESCAN so you can view the changes before you scan C Co ol lo or r C Ch ha an nn ne el ls s Along the top of the Histogram Tone Map and Gamma windows are the color channels Figure 6 This can be useful in comparing color ranges between the color values and in identifying methods when editing specific areas Figure 6 Color Channels The firs...

Page 17: ...els in an image It plots the number of pixels dots at each brightness level The histogram displays these levels in the 4 color channels The x axis of the histogram graph represents the color values from darkest 0 at the far left to the brightest 255 at the far right the y axis represents the total number of pixels at that value A histogram for a dark image shows most of the pixels at the left side...

Page 18: ...ns the entire image and raising the shadow in a specific color channel darkens pixels of that color Raising the shadow also increases the color contrast of darker tones the range between the midtone and the shadow The Default button at the bottom of the window sets the shadow to 0 the highlight to 255 and the midtone to 50 the lowest contrast settings Note Checking the Auto Density box in the Pref...

Page 19: ...fects of the changes you make When you are satisfied with the results and finally click on the Scan button to scan the image the scanned image will contain the color properties you have defined There are two ways to adjust tones on the tone map Clicking with the left mouse button on the graph as mentioned above remaps the color values to the numbers shown in the In and Out boxes All other color to...

Page 20: ... Figure 9 By adjusting the gamma you can change the tonal range of the selected color channel Gamma values are primarily a measure of the brightness of a color The larger the gamma value the brighter the color becomes Adjusting the gamma on the Master channel affects the tonal range for all colors equally And adjusting the gamma for the individual Red Green or Blue channels only affects pixels con...

Page 21: ...tion settings We recommend ranges between 75 300 dpi in general Only use a higher scanning resolution 301 dpi and above for smaller images when detail must be captured in a small area because it will be enlarged later Laser and Commercial Printers When printing an image to a laser printer or commercial printing press it is important to understand the process in terms of line screen a k a LPI Line ...

Page 22: ...r scanner and fax machine like a normal office fax By clicking on this button copies of documents placed in the scanner will be sent to your fax modem The E mail Utility allows you to scan a document or image and automatically include it in an E mail as an attachment When you click on this button the image will be scanned and attached to a blank E mail ready to be addressed and sent The image edit...

Page 23: ...ine help which gives detailed explanations on your computer of the functions and use of the AM program S Sc ca an nn ne er r B Bu ut tt to on ns s The scanner comes equipped with four buttons located on the front panel as shown below The buttons are labeled PC Fax E mail Scan and PC Copy Pressing one of the buttons runs the appropriate Action Manager 32 utility The Fax Utility A Ab bo ou ut t t th...

Page 24: ...he fax software you wish to use is being displayed in the box at the top of the Fax Utility window that will automatically open click on the down arrow to change fax drivers 5 Adjust any settings if needed see below for details about the settings 6 Make sure to choose the appropriate scan mode by clicking on either the B W Photo or Text buttons 7 Click on the large green Start button towards the r...

Page 25: ... of two buttons B W Photo and Text B W Photo Mode The black and white photo mode scans images in black and white and can simulate 4096 shades of gray to give the resulting black and white images shadow and depth This mode is best used when faxing black and white photos or images Using this mode to scan black and white or even color images will result in high quality black and white output the colo...

Page 26: ...been installed on your computer Figure 12 E mail Utility U Us si in ng g t th he e E E m ma ai il l U Ut ti il li it ty y The following describes how to set up and use the E mail Utility 1 Make sure the MAPI based E mail software you wish to use is already installed on your computer If Action Manager doesn t detect a MAPI based E mail program the E mail Utility will not run 2 Load a document or im...

Page 27: ... is compatible with a wide variety of image editing viewing programs SCAN MODE consists of three buttons Color Photo B W Photo and Text This setting tells the scanner what type of document your are scanning Color Photo Mode The color photo mode scans the document in 24 bit RGB color B W Photo Mode The black and white photo mode scans images in black and white and can simulate 4096 shades of gray t...

Page 28: ...g colors paint techniques and special effects O Op pe en ni in ng g t th he e P Pr ro og gr ra am m To open the image editor simply left click on the image editor icon in the Action Manager 32 window Alternatively the image editor is also located in the START menu for Windows A Ac cq qu ui ir ri in ng g a an n I Im ma ag ge e f fr ro om m t th he e S Sc ca an nn ne er r When you left click on the ...

Page 29: ...ile menu 2 Select the file type e g tif eps and location 3 Name your file Note Make sure the file type extension is attached to your file name i e Picture tif 4 Click SAVE at the bottom of the screen C Ch ho oo os si in ng g F Fi il le e T Ty yp pe e E Ex xt te en ns si io on ns s Your image editing software allows you to save images in various formats to allow greater flexibility and use of your ...

Page 30: ...ck PAGE SETUP to adjust size dimensions as needed 2 Select type of output e g color grayscale etc 3 Click PRINT S Sc ca an nn ni in ng g T Ti ip p M Mo on ni it to or r G Ga am mm ma a Adjusting the monitor gamma is a critical step to ensure that you view your images properly To adjust the monitor gamma please perform the following steps 1 Choose the monitor gamma option by selecting SETUP under t...

Page 31: ...piece of paper press a couple of buttons and get a copy Figure 13 Copy Utility U Us si in ng g t th he e C Co op py y U Ut ti il li it ty y As long as your scanner and printer are installed correctly into Windows the Copy Utility should function correctly and seamlessly The Copy Utility interfaces with the Windows Print Manager and is compatible with almost all printers supported by Windows Before...

Page 32: ...that are currently installed in Windows on your computer SETUP PRINTER This option appears in the Printer Setup window Note the scanning resolution for the Copy Utility will always be the same as the printer resolution defined here PAPER SIZE lists all possible paper sizes for your scanner FIT IN PAGE is used to reduce or enlarge the scanned document or image to fit on the printer paper CENTER ON ...

Page 33: ...ors that you may have installed on your computer To scan and covert your text document by using TextBridge OCR program three convenient ways are offered 1 By using the OCR icon on the Action Manager 32 quick menu which is automatically installed as your scanner software 2 From within the TextBridge Classic program directly 3 By using the TextBridge Instant Access button from the toolbar of your wo...

Page 34: ...ll documents that are scanned through the OCR program will automatically appear in the word processing program you have selected Remember to save the new text document that has been created T To o U Us se e O OC CR R D Di ir re ec ct tl ly y f fr ro om m T Te ex xt tB Br ri id dg ge e P Pr ro og gr ra am m 1 From the START menu click PROGRAMS PLUSTEK USB SCANNER and then OCR TEXTBRIDGE CLASSIC 2 C...

Page 35: ...hen click on OK button 6 The TWAIN dialog box will open See Chapter I The TWAIN Interface at page 2 for more information 7 Adjust the scanning resolution to 300 or even 400 dpi 8 Click PRESCAN The scanner will scan and display a preview image 9 Adjust the brightness by sliding the button to the right or to the left 10 After a satisfactory Prescan select SCAN to scan the text document Follow the sa...

Page 36: ...fr ro om m Y Yo ou ur r W Wo or rd d P Pr ro oc ce es ss so or r 1 Within your word processor click NEW to open a blank document 2 Double click on the TextBridge Instant Access button from the tool bar of your word processor The following window will appear Alternatively you may click TEXTBRIDGE in the FILE menu from your word processor which can instantly open this TextBridge window too 3 Click o...

Page 37: ...ccess Control Panel dialog box will appear Click one or more programs in the list Click on the OK button The TextBridge Instant Access button will now be available in the word processor s that you checked if they are installed on your computer Please consult the TextBridge user guide available on the included Setup Application CD ROM S So om me e k ke ey y p po oi in nt ts s a ab bo ou ut t O OC C...

Page 38: ... thin and light set the brightness of the scanner to a darker value before you scan 4 Colored text might not be read properly by the OCR program 5 OCR cannot read handwritten pages 6 Raise the scanning resolution to 300 or even 400 dpi 7 Adjust scanning brightness depending on the quality of the original brightness may need to be increased or reduced 8 Make sure the scan mode is set to Text See th...

Page 39: ...rt engineers 44 0 870 90 16 835 24 hr Automated Support Calls charged at national rates Fax 44 0 870 90 16 832 E mail support digitequk com Plustek USA Inc 169 Pullman Street Livermore CA 94550 U S A Tel 925 453 8911 Fax 925 453 8899 E mail techsupport plustek com Website www plustekusa com Plustek Inc 8th Fl No 48 Sec 3 Nan Kang Road Taipei Taiwan Tel 886 2 2651 5311 Ext 3173 or 3174 Fax 886 2 26...

Reviews: