


7
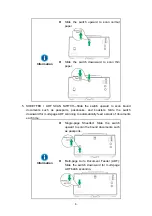
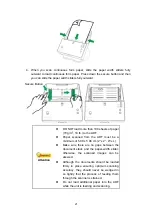
6. PAPERWEIGHT—Force the original to stop moving immediately after the paper is
ejected. Avoid obstructing next original paper ejection.
7. STACKER—Prevent the paper from falling and missing. Help to neatly stack
documents after scanning. Extend it in case of longer paper.
8. PAPER CHUTE EXTENSION—Extend to hold longer paper. Avoid paper feeding
failure.
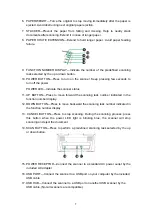
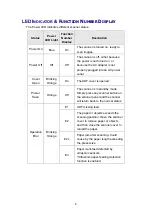
9. FUNCTION NUMBER DISPLAY—Indicate the number of the predefined scanning
task selected by the up or down button.
10. POWER BUTTON—Press to turn on the scanner. Keep pressing few seconds to
turn off the power.
POWER LED—Indicate the scanner status.
11. UP BUTTON—Press to move forward the scanning task number indicated in the
function number display.
12. DOWN BUTTON—Press to move backward the scanning task number indicated in
the function number display.
13. CANCEL BUTTON—Press to stop scanning. During the scanning process, press
this button when the power LED light is blinking blue, the scanner will stop
scanning and eject the document.
14. SCAN BUTTON—Press to perform a predefined scanning task selected by the up
or down button.
15. POWER RECEPTOR—Connect the scanner to a standard AC power outlet by the
included AC adapter.
16. USB PORT—Connect the scanner to a USB port on your computer by the included
USB cable.
17. USB HUB—Connect the scanner to a USB port on another USB scanner by the
USB cable. (Not all scanners are compatible.)


