1
SKILL
LEVEL
Ringo Educational Guide Rev04.1 ~ Plum Geek
Using Ringo’s Light Sensors
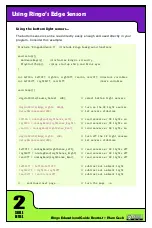
#include “RingoHardware.h” //include Ringo background functions
void setup(){
HardwareBegin(); //initialize Ringo’s circuitry
}
int sensorRight;
//declares variable “sensorRight”
int sensorLeft;
//declares variable “sensorLeft”
int sensorRear;
//declares variable “sensorRear”
void loop(){
digitalWrite(Source_Select, HIGH);
//select top side light sensors
sensorLeft = analogRead(LightSense_Left);
//read left light sensor
sensorRight = analogRead(LightSense_Right);
//read right light sensor
sensorRear = analogRead(LightSense_Rear);
//read rear light sensor
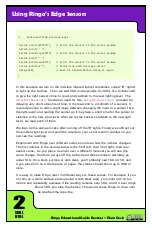
Serial.print(sensorLeft);
//print sensorValue through serial port
Serial.print(“ “);
//print a couple blank spaces
Serial.print(sensorRight);
//print sensorValue through serial port
Serial.print(“ “);
//print a couple blank spaces
Serial.print(sensorRear);
//print sensorValue through serial port
Serial.println();
//print a blank line feed
Serial.println();
//print a blank line feed
delay(250);
//delay 250 milliseconds
}
Three sensors at once...
Reading one sensor is great, but if we read more than one sensor, Ringo can make
better decisions based on what he sees. Let’s try an example where we read and
serial print all three sensors at once. Can you guess how we would do this?
I think you can see what is happening here. We’re using three variables now
instead of just one. We read each sensor value into each variable, then use
Serial.
to send it to your computer screen. Note in this example we’re using
Serial.
print()
rather than
Serial.println()
. The function
Serial.print()
basically prints
information without a carriage return at the end, so all the values end up on the
same line. The two
Serial.println();
functions at the end create a
carriage return at the end of the output data, as well as a blank line
between data sets.
Example Sketch: Ringo_Guide_LightSense_01


