


205 Technology Parkway
Auburn, Alabama 36830 USA
Pliant Technologies, LLC
CrewCom
®
www.plianttechnologies.com
Phone +1.334.321.1160
Toll-Free 1.844.475.4268 or 1.844.4PLIANT
Fax +1.334.321.1162
Notice About Specifications: While Pliant makes every attempt to maintain the accuracy of the information contained in this document, this information is subject
to change without notice. Please check our website for the latest system specifications and certifications. Copyright ©2017 Pliant Technologies, LLC. All rights
reserved. The Pliant
®
, CrewCom
®
, and CrewNet
™
word marks and the Pliant “P” logo are trademarks of Pliant Technologies, LLC. The SmartBoom
®
word mark is a
trademark of CoachComm LLC. All other trademarks are property of their respective owners. Document Reference: D0000220_C
A.
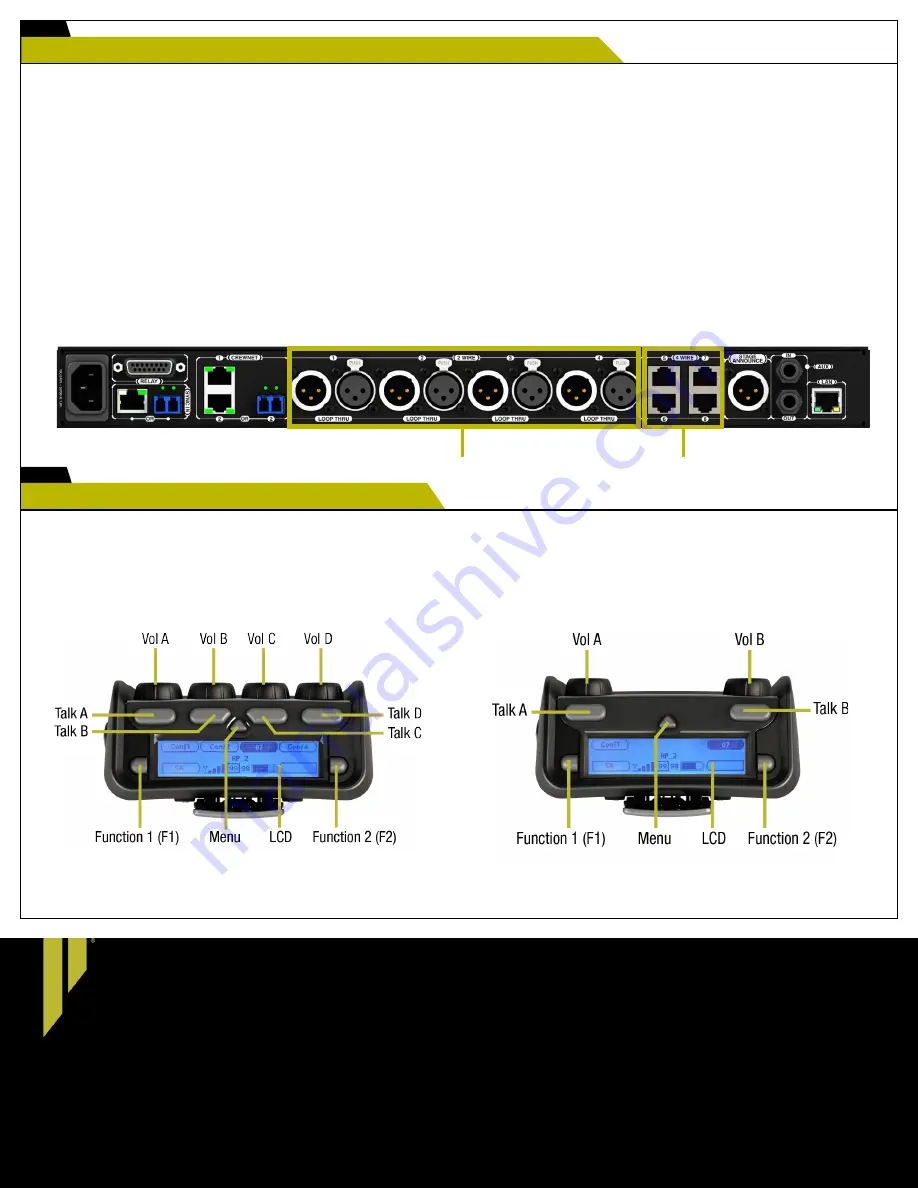
Plug a headset into each RP.
B.
Adjust the headset listening volume by turning each conference’s volume control knob.
C.
Press the Talk button to talk to others on the selected conference; you can listen and talk on multiple conferences at a time.
D.
Confirm the desired conference and talk status by observing the RP’s LCD.
Radio Pack (CRP-44)
Top View
Radio Pack (CRP-22)
Top View
Connect and configure hardwire ports (optional).
7
Start communicating.
8
Always confirm that the non-Pliant intercom system and the CrewCom wireless system are functioning properly separately before connecting them
together.
A.
Press the WIRED button on the front of the CU. The Intercom Settings menu will display. Configure the 2-Wire and 4-Wire settings here, including
Intercom Type, Mic Kill (2-Wire only), Call (2-Wire Only), Echo Cancellation (ECAN), and audio levels.
B.
If you need to adjust the conferences assigned to 2-Wire and 4-Wire ports, you may do so from the CU’s
System Configuration
>
Conferences
>
Assign to Hardwire
menu option.
C.
Connect the 2-Wire intercom system to the 2-WIRE ports on the rear of the CU via 3-pin XLR cables/connectors. Initiate auto-null for the appropriate
2-Wire ports via the
Wired Settings
>
Auto Null
CU menu option.
D.
Connect the 4-Wire intercom system to the 4-WIRE ports on the rear of the CU via ethernet RJ-45 cables/connectors.
Note:
In addition to 2-Wire and 4-Wire, connections such as GPO Relays, Stage Announce, Auxiliary In, and Auxiliary Out can be made to the CU. For more information on
these features, please refer to the documentation provided on Pliant’s website and Online Help.
Note:
You may also configure these hardwire connections and settings via CrewWare. Instructions for connecting to CrewWare are provided on Pliant’s website and
Online Help.
2-Wire Ports
4-Wire Ports
Control Unit Back (CCU-44)


