


Quick Start Guide
3
C r e w C o m
C r e w C o m Q u i c k S t a r t G u i d e
A.
Turn on the power switch on the front of the CU.
B.
Wait for the configuration file (CCF) to load on the system. The CU will display a progress bar during the load process. A “CCF Loaded” message and
a configuration file summary will display when the load is complete. Once the message completes, the home screen will display on the front of the
CU.
i.
In a multi-CU system, only the Master CU requires a CCF. If your Master CU does not have a CCF, you need to load one. You can load a CCF via
USB drive. Refer to Pliant’s additional support documentation for assistance in loading a CCF and removing CCFs from non-Master CUs.
C.
Verify that your RTs and Hubs (if applicable) are receiving power by checking that their Power LEDs are green.
Note:
Once the system is powered on, you can tell that a configuration error has occurred with an RT if its TX LED is not lit. The configuration error may be present in
the RT or other device upstream. You may need to connect to CrewWare to identify the specific configuration errors needing resolution. In addition, if a device does
not have compatible firmware, you will need to update its firmware using CrewWare. Instructions for connecting to CrewWare, updating and loading the system
configuration file, and updating device firmware are provided on Pliant’s website and Online Help.
4
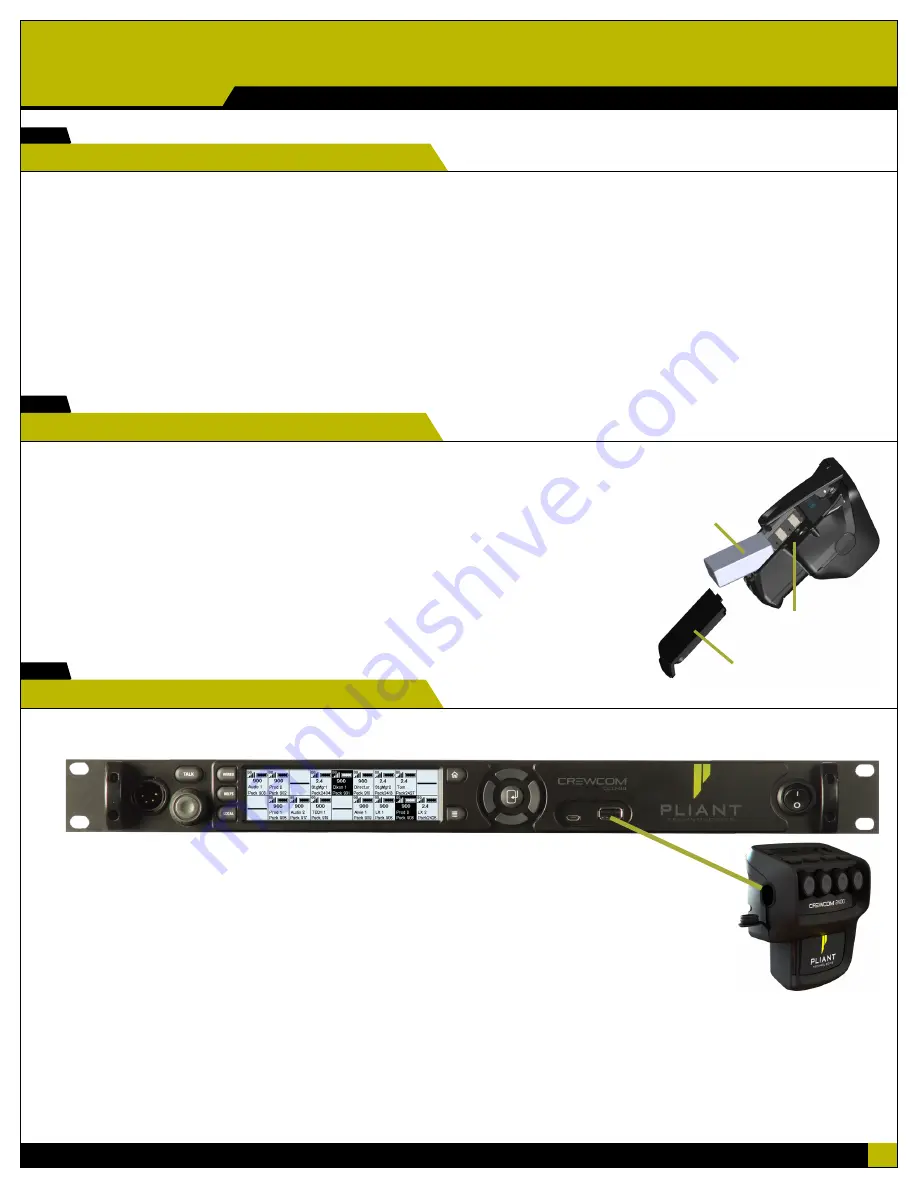
Power on the system.
5
Install Radio Packs’ (RPs’) batteries.
A.
Hold the RP at about a 45-degree angle, pointing the bottom end down. Then, depress and
hold the RP’s belt clip down.
B.
Lift open the battery door and remove it.
C.
While still holding the RP at a 45-degree angle and depressing the belt clip, install a fully-
charged Pliant Lithium-Polymer rechargeable battery or three AA batteries.
D.
Place battery door back on the RP, making sure to align and insert its tab at the top first, and
then secure the door by pressing until it clicks. (Secure a magnetic door by pressing firmly
until the magnet engages.)
Note:
RPs are powered with one Lithium-Polymer rechargeable battery for over 9 hours of operation, or they
may be powered with three AA alkaline batteries for up to 5 hours of operation.
Power Button
Battery Door
Rechargeable Battery
Radio Pack
6
Pair the RPs.
A.
Connect a USB-to-Micro-USB cable from the CU to the device (micro end goes into the RP’s USB port beneath its rubber port cover). The RP will
power on by itself.
B.
The system will check that the RP firmware version is compatible. (If it is not, disconnect
the RP and update its firmware using CrewWare and connection to your PC. If it is, the pairing
process will automatically continue.)
C.
When prompted, use the RP volume knobs and function button to select a Profile from the list
of options that display on the RP LCD. (Only Profiles that are compatible with the connected RP model
will be displayed.)
D.
Wait for the Profile to load. The RP will display a “Pairing Complete” message when finished.
E.
Disconnect the RP; it will power off automatically after a few seconds.
F.
Turn the RP back on and wait for it to log in to the system. When an RP is logged in, a signal indicator is visible on its Home
screen and on the CU’s RP indicator (CU Home screen). The RP is ready for use.
G.
Repeat steps 6A–6F until every RP is paired.
Note:
RP Profiles are created in CrewWare and are stored in the system’s CCF. Your system may have been pre-configured at the factory or other source. Consult the
documentation provided with your system for your specific configuration details.
Radio Pack
(CRP-44-2400)
USB-to-Micro-USB


