Echofish 820 – Installation & Operation manual
13
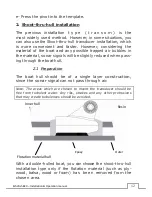
Warning: contact your boat dealer to get the full specifications of
your boat. Never try to remove any material from the inner hull be-
fore you completely know about the its composition
Choose an appropriate position in the inner hull. Remove
the inner fiberglass layer as well as the flotation material.
Epoxy the transducer to the outer layer of fiberglass; press
the transducer with a slight twisting motion to purge any
trapped air from underneath.
After the epoxy cures for 24hours, (make sure the epoxy is
solidified) the remaining space can be filled in with resin.
The installation of the transducer is then finished. With the
shoot-thru-hull installation, the transducer will not be ad-
justed as soon as it is fixed. So, testing before final in-
stallation is necessary.
2.2
Finding a better mounting location
a- Fill the hull with water to submerge the transducer.
b- In the sump of the boat, place the transducer at the iden-
tified mounting position, face down. You can use heavy ob-
jects to keep the transducer in position.
c- Turn the display unit on, run the boat where water depth
is about 20 feet to test whether the sonar display is normal
(if needed, please adjust the sensitivity and depth range). If
not, check the connection between the display unit and the
transducer.
d- Run the boat at various speeds to see ho w t he d i s-
p l ay u n i t b e ha v e s . If one of the following phenomena
appears: sonar strength obviously decreasing, loss of signal,
bottom missing, then note the speed and choose another location
for the transducer. Repeat the operation until you get the best
mounting location.
Summary of Contents for ECHOFISH 820
Page 95: ...Distribu par 3 67 02 RULHQW UDQFH 7HO FRQWDFW SODVWLPR FRP ZZZ SODVWLPR FRP...
Page 149: ...Vertrieben von 3 67 02 RULHQW 5 1 5 7HO FRQWDFW SODVWLPR FRP ZZZ SODVWLPR FRP...
Page 292: ...Distribu do por 3 67 02 RULHQW UDQoD 7HO FRQWDFW SODVWLPR FRP ZZZ SODVWLPR FRP...
Page 339: ...ECHOFISH 820 CD...
Page 342: ...Echofish 820 4 Echofish 820...
Page 343: ...Echofish 820 5 0 06 ms 2...
Page 344: ...Echofish 820 6 Echofish 820 200 50 kHz 12 35...
Page 345: ...Echofish 820 7 A B C D E F G H I 4x15mm J 3x20mm 1 1 1 1 2...
Page 346: ...Echofish 820 8 0 5mm 5 32 1 25 1 1 3 Allen...
Page 347: ...Echofish 820 9 1 4 4 x 15mm 4 x 15mm Allen 12 1 5 1 5 1 4 1 8...
Page 348: ...Echofish 820 10 3 8 10 1 6...
Page 349: ...Echofish 820 11 1 7 5 32 1 25 Allen...
Page 350: ...Echofish 820 12 2 2 1 balsa...
Page 351: ...Echofish 820 13 24 2 2 20...
Page 352: ...Echofish 820 14 2 3 100 20 24...
Page 353: ...Echofish 820 15 1...
Page 354: ...Echofish 820 16 2 3 1 5 m 24 36 volt Echofish 820 12 volt...
Page 355: ...Echofish 820 17 3Amp...
Page 356: ...Echofish 820 18 1...
Page 357: ...Echofish 820 19 2...
Page 358: ...Echofish 820 20 3 Menu Ent Ent Zoom zoom Backlight BACKLIGHT...
Page 359: ...Echofish 820 21 POWER CLEAR POWER CLEAR Exit exit Exit HOLD Exit GPS...
Page 361: ...Echofish 820 23 9 auto 3 5 1 Menu 2 Sonar 3 Sonar 4 Noise Filter 5 6...
Page 364: ...Echofish 820 26 1 Menu 2 Sonar 3 Sonar 4 Fish ID Sens 5 6 7 ENT 8 EXIT 6 Water type...
Page 372: ...Echofish 820 34 1 Menu 2 System 3 System 4 Beeper 5 6 7 ENT 15 Simulator...
Page 378: ...Echofish 820 40 23 Battery 1 Menu 2 Alarm 3 Alarm 4 Battery 5 6 7 ENT 8 EXIT 2 1...
Page 379: ...Echofish 820 41 1 2 10v 3 1 2 3 4 5 6...
Page 380: ...Echofish 820 42 7 1 2 1 2 3 1 2 3...
Page 381: ...Echofish 820 43 8...
Page 383: ...PLASTIMO Lorient France Tel 33 0 297 87 36 36 contact plastimo com www plastimo com...

