background image

- 5 -

609-T

2

3

4

x8

5

6

x5

7

8

x5

9

10

x3

D

F

GB

S

E

NL

5 Coupling sleeves

5 Connecting stops

5 Verbindungsstücke

5 koppelstukken

5 piezas de uniones

5 Skarvstycken

5 Pezzi di giunzione

1 base spar

1 profil aluminium bas 

1 unteres Profil

1 basisprofiel

1 perfil bajo

1 Bottenprofil

1 profilato basso

3 Intermediate spars

3 profils aluminium

intermédiaires

3 Zwischenprofile

3 standaardprofielen  3 Perfiles intermedios

3 Standard profiler

3 Profilati intermedi

1 drum unit

1 ensemble tambour

1 Trommel

1 roltrommel 

1 conjunto tambor

1 Trumma med 

revlinematare

1 insieme tamburo

1 top end stop

1 embout profil

1 Profilansatzstück

1 top eind stuk 

1 terminal tope

1 Toppdel

1 Terminale profilato

Ø4.8x12.7

(top end stop)

screw 

1 vis tôle TF Ø4.8x12.7

fixation embout profil

 1 

Ø4.8x12.7

(Profilansatzstück)

Schraube 

 1 schroef Ø4.8x12.7

(top eind stuk )

 1 tornillo Ø4.8x12.7

(terminal tope)

 1 spårskruv Ø4.8x127.

(Toppdel)

 1 vite lamiera Ø4.8x12.7

(terminale profilato)

M5x12

(base spar)

screw 

1 vis Chc M5x12

fixation profil bas

M5x12

(unteres Profil)

Schraube 

M5x12

(basisprofiel)

schroef 

1 tornillo M5x12

(perfil bajo)

1 insex M5x12

(Bottenprofil)

1 vite a brugola M5x12

(profilato basso)

(spar connections)

screws Ø3.9x12.7

8 vis tôle 

 liaison profils

Ø3.9x12.7 8 Schraube 

(Verbindung der Profile)

Ø3.9x12.7 8 bouten 

(koppelstukken )

Ø3.9x12.7 8 Tornillos 

(unión perfiles)

Ø3.9x12.7

(profilkopplingarna)

insex Ø3.9x12.7

8 vite 

(collegamento profilati)

Ø3.9x12.7

1 halyard swivel

1 émerillon

1 Fallwirbel

1 valwartel 

1 giratorio

1 Fallsvirvel

5 pièces de jonction

5 guides étai

5 Vorstagführung

5 Verbingsstopper

5 Guía estay

5 Låsplattor 

till skarvstycken

5 Guide di strallo

1 mulinello

I

2

3

4

5

6

7

8

9

10

11a

1

11b

1 screw+nut M12x35

=>chainplate

1 vis+écrou M12x35

modèle lattes

1 Schraube M12x35

Terminalmontage

1 bunten M12x35

stevenplaatuitvoering

1 tornillo M12x35

(placas)

M12x35

insex 

1 Vite M12x35

Modello Landre

1 Shoudered clevis pin

Ø12 (=>turnbuckle)

1 axe épaulé Ø12

modèle ridoir

1 Bolzen, dick Ø12

Stagspannermontage

1 pen Ø12

spanschroefuitvoering

1 Bulón Ø12

(tensor)

1 Riggbult Ø12

1 Asse a testa Ø12

 Modello arridatoi

PANTONE Black

Offset 80g

58224_01 - Page 5/68

Summary of Contents for 406-T

Page 1: ...ANDLEIDING RULLFOCKSYSTEM INSTRUKTIONER OCH HANDHAVANDE ENROLLADOR GUIA DE UTILIZACION 406 T 609 T 811 T JIB REEFING OWNER S MANUAL AVVOLGITORE MANUALE D USO ENROULEUR DE FOC NOTICE D UTILISATION GB D...

Page 2: ......

Page 3: ...e 811 T 406 T 609 T H 8 5mm 8 5mm 8 5mm 8 5mm 8 5mm 8 5mm 8 5mm 12 5mm 12 5mm 12 5mm 12 5mm 12 5mm 12 5mm 12 5mm 14 3mm 14 3mm 14 3mm 14 3mm 14 3mm 14 3mm 14 3mm J 811 T 406 T 609 T jonctions Delrin v...

Page 4: ...med revlinematare 1 insieme tamburo 1 top end stop 1 embout profil 1 Profilansatzst ck 1 top eind stuk 1 terminal tope 1 Toppdel 1 Terminale profilato 1 4 8x12 7 top end stop screw 1 vis t le TF 4 8x1...

Page 5: ...filato 1 M5x12 base spar screw 1 vis Chc M5x12 fixation profil bas 1 M5x12 unteres Profil Schraube 1 M5x12 basisprofiel schroef 1 tornillo M5x12 perfil bajo 1 insex M5x12 Bottenprofil 1 vite a brugola...

Page 6: ...ck Schraube 1 schroef 4 8x12 7 top eind stuk 1 tornillo 4 8x12 7 terminal tope 1 sp rskruv 4 8x127 Toppdel 1 vite lamiera 4 8x12 7 terminale profilato 1 M5x12 base spar screw 1 vis Chc M5x12 fixation...

Page 7: ...5 Assembling the base spar 11 5 6 Assembling the drum unit 12 5 7 Adjusting the reefing line feeders 12 6 RECOMMANDATIONS 13 7 OPTIONAL EXTRAS 14 8 SPARE PARTS 8 1 406 T 64 8 2 609 T 65 8 3 811 T 66 G...

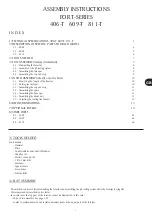
Page 8: ...4 1 2 Upper part Send a person to the masthead equipped with hammer and pliers Dismount the upper part of the forestay Bring the person and the forestay down from the masthead halyard to secure the ma...

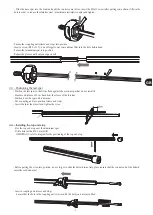
Page 9: ...ar then insert and tighten the screw 5cm Slide the base spar into the drum unit until the two holes are in line insert the M5x12 screw after putting some silicone filler in the hole in order to reduce...

Page 10: ...lies flush against the sleeve Slacken the backstay Secure the mast with a halyard Dismount the lower part of the forestay Assemble the drum unit Reassemble the lower part of the forestay Undo the hal...

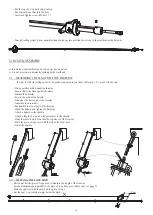
Page 11: ...he halyard swivel in order to support the spars as they are assembled Insert a coupling unit sleeve and stop Put some silicone filler into the holes before tightening the screws in order to reduce the...

Page 12: ...d mounting plate Lower the halyard swivel Tighten the backstay 5 7 ADJUSTING THE REEFING LINE FEEDERS 5 7 1 406 T model The reefing line feeder on the 406 T model is assembled either on the right or l...

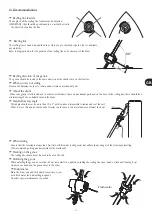
Page 13: ...e reefing line there should be a minimum length of one halyard turn on the drum A Halyard forestay angle This angle should never be more than 20 25 as this makes it impossible to tauten and reef the s...

Page 14: ...ands Change the halyard Reefing line fouls Wrong angle on reefing line First sheave too far from drum unit Genoa unfurled too quickly Change position of first sheave Slow down the unfurling of the gen...

Reviews: