Plasma Screenland Instruction Manual Download Page 15

External connections 


Plasma Screenland 

04/07 

15 

En 

External connections 

External connections 

PC connection (VGA, DVI) 

You can use the VGA or DVI connection on the plasma dis-
play to connect a personal computer.  The cable required for 
this is available at specialised dealers. Set the signal source on 
the plasma display to VGA or DVI, see page 11. 

RS-232C

VGA IN

DVI IN

DVD COMPONENT IN

SPECIAL SIGNAL IN

Cr

Cb

Y


Resolution in VGA mode: 
Pixels Frequency


640x480  

60 Hz 

800x600  

60 Hz 

1024x768  

60 Hz 

1280x768  

60 Hz 

1280x960  

60 Hz 

1280x1024  

60 Hz 

Resolution in DVI mode: 
Pixels Frequency


640x480  

60 Hz 

800x600  

60 Hz 

1024x768  

60 Hz 

1280x768  

available at 56 HZ  


Some resolutions may not be supported, depend-
ing on the graphics card being used. 


Signal configuration of the VGA interface 

15

14

13

12

9

11

10

8

7

6

5

4

3

2

1


(Front) 

+ 5 V 

10 

GND (ground) 

11 

No assignment 

No assignment 

12 

SDA 

No assignment 

13 

HD 

GND (ground) 

14 

VD 

GND (ground) 

15 

SCL 

GND (ground) 


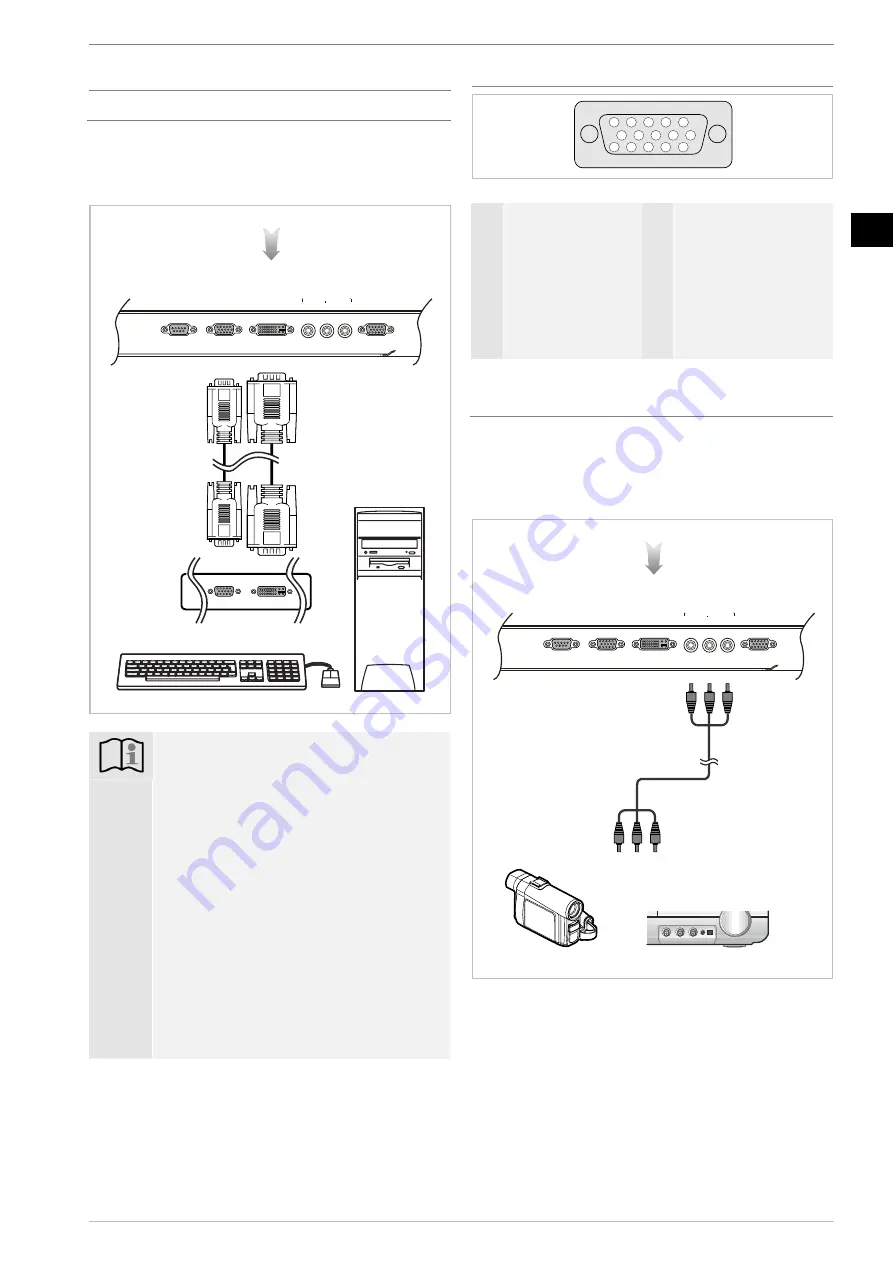
Connection for a DVD component signal 
(YCbCr) 

You can use the component connection on the plasma display 
to connect e.g. a DVD player or a video camera with a com-
ponent output signal. You will require an RCA cable for this, 
which is available at specialist dealers. Set the signal source on 
the plasma display to YCbCr, see page 11. 

RS-232C

VGA IN

DVI IN

DVD COMPONENT IN

SPECIAL SIGNAL IN

Cr

Cb

Y


All rights reserved for technical modifications. 


Summary of Contents for Screenland

Page 1: ...f Before first use read the instruction manual carefully and keep them for future reference Antes de utilizarla por primera vez lea detenidamente las instrucciones para el manejo y gu rdelas para futu...

Page 2: ...e control10 Inserting the batteries 10 Operating in TV mode 11 Operation 11 General notes 11 Switching on off 11 Selecting the signal source 11 Operating without the remote control 11 Menu navigation...

Page 3: ...mendationswillensurethat the display delivers satisfactory results inthe long term Avoidfrequentplaybackof the same imageandmoving imageswith staticareas e g fixedfade ins inthe imageor videogameswith...

Page 4: ...m2 Colours 16 7 million True Colour Contrast ratio 1000 1 Reactiontime 20 s Sockets RS 232C Control input forexternal devices VGA IN 15 PinD Sub PC connection VGA SVGA XGA DVI I IN 29 pin digital VGA...

Page 5: ...wedtoescape freely Avoiddirectthermaleffectsfrom radia tors or sunlight If in doubt consult a specialist dealer Heat build up may causeelectroniccomponentstofail 500 mm The ventilationslitsmust always...

Page 6: ...ine thread screws x 4 supplied Checkthat the screwsare seated correctly Attaching the speakers Fix the speakers supplied to the housing using the screws pro vided 6 foreach speaker Note Make surethatt...

Page 7: ...y resolution seepage 15 9 DVDCOMPONENTIN Component input signalvia RCA video cable YCbCr 10 SPECIALSIGNALIN Socketfor connecting to SCINEMA BOXIIwithac companyingcable 11 AC POWER IN Mainsconnectionso...

Page 8: ...connect to the power supply Only connect the unit to a grounded mains socket The socket should be as close to the unit as pos sible For mains connection insert the mains plug into the mains socket co...

Page 9: ...eremote control indicator lightsupgreen Setting the remote control If the equipment is operated with the remote control observe the following The RC 902 remote control can control up to five different...

Page 10: ...be selected 31 Arrowbuttonsfor menuguide Changethe settings increase decrease the setvalues 33 Picture button Selectthepicture mode IMAGE 34 List Menu button Open the main menu 36 Numericalbuttons 0 S...

Page 11: ...entand saveenergy TheTV shouldalwaysbe switchedoffviathe POWER 1powerswitch if it isto remain unused fora long period e g overnight orwhenyouare on holiday Thiswill helptoprotecttheenvironment andredu...

Page 12: ...buttonsfor menu settings Changethe settings increase decreasethe setvalues 33 Picture button Selectthepicture mode IMAGE standard bright mild 34 List Menu button Open the main menu 36 Numericalbuttons...

Page 13: ...0 BRIGHT 40 1 2 3 4 5 6 Menu Settings 1 Brightness 2 Contrast 3 Colour 4 Tone 5 Hue 6 Temperature Warm coldcoloursettingtomatch colour reproduction Modify values by pressing the arrow buttons 31 on th...

Page 14: ...tion The buttons21 22 23 onthe remote controlonly function oncethe PiPfunction hasbeenactivated by pressingbutton24 Menu Settings 1 PiP Activation Deactivation ofthe PiP function The PiPfunction canal...

Page 15: ...0 60 Hz 1024x768 60 Hz 1280x768 available at56HZ Some resolutions may not be supported depend ing on the graphicscard being used Signal configuration of the VGA interface 15 14 13 12 9 11 10 8 7 6 5 4...

Page 16: ...ing orscouring Troubleshooting Before you contact our service personnel you should check the followingtypicalfault sources Problem Cause Solution Mainsplugnotconnected correctly Connectcorrectlytothem...

Page 17: ...m cold Adjustwithbutton31 Vol Vol 34 System Standard Auto PAL NTSC3 58 NTSC4 43 SECAM Country specificstandardTV setting Soundmode Nofunction Language OSD languagesetting Clock Time in hh mm format Ti...

Page 18: ...thbutton31 Vol Vol V Center Adjustwithbutton31 Vol Vol H size Adjustwithbutton31 Vol Vol Phase Adjustwithbutton31 Vol Vol Auto Automaticpictureadjustment withbutton31 Vol Vol 34 PiP On Off Source TV Y...

Page 19: ...g Clock Time in hh mm format Time on Switch on time Time off Time off 34 PiP On Off Source TV YCbCr PiP sourceselection Size 1 2 3 4 Size setting Picture position 1 2 3 4 5 Picturepositionsetting Topl...

Page 20: ...gs 13 Menu navigation 11 Opening the plasma display menu 11 Menu overview 17 DVI mode 19 TV mode 17 VGA mode 18 YCbCr mode 17 Menu picture settings 13 Menu system settings 13 menus 13 Navigation 13 Ov...

Reviews: