background image

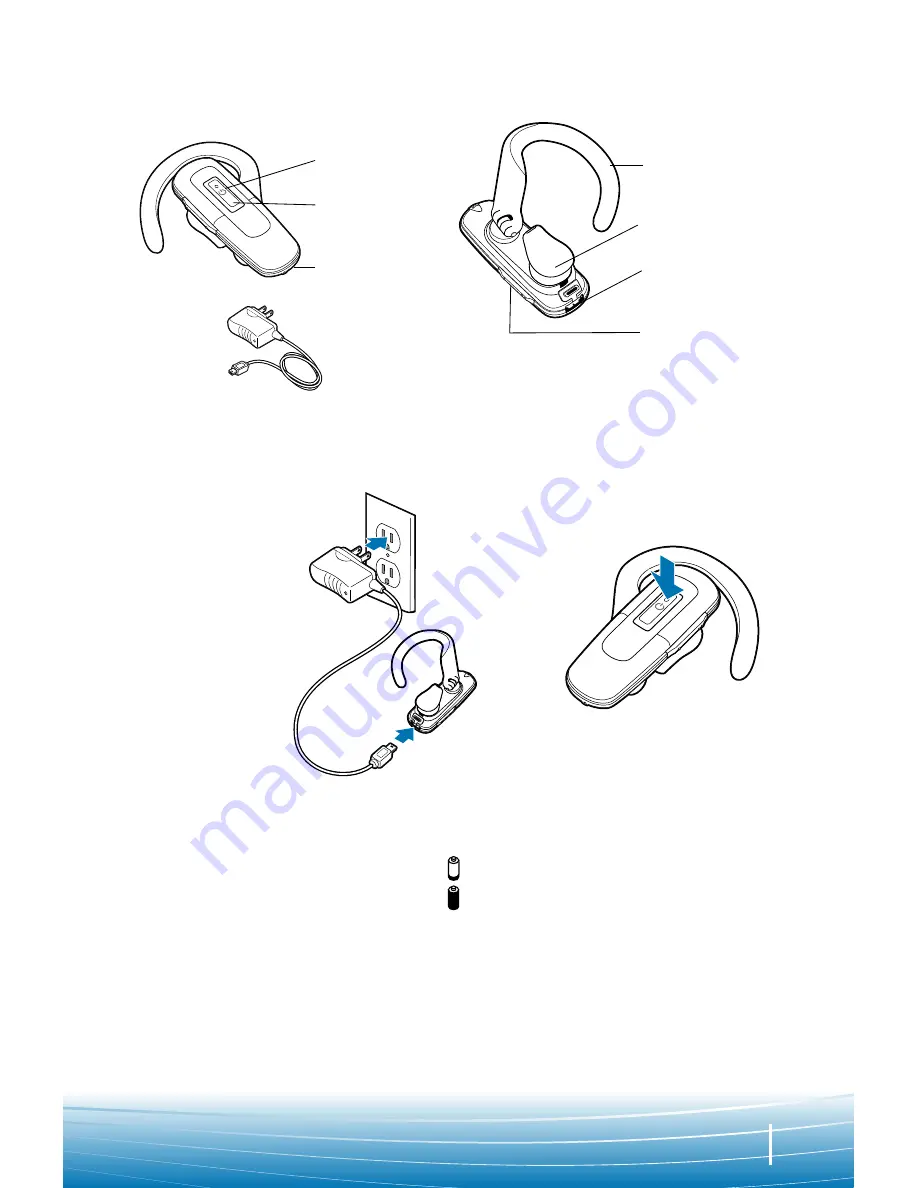
PACKAGE CONTENTS & FEATURES

Indicator light

Call control 

button

Microphone

Adjustable ear 

loop

Ear tip

Charging jack

AC power adapter

Volume control

POWERING

2

1

Before using, you must first charge your 

headset.
  20 minutes = minimum charge
  2 hours = full charge
Light is solid red when battery is charging.

NOTE

 For the best user experience, keep 

your headset fully charged.

CAUTION

 Do not use headset while 

charging and do not connect the charger 

while the headset is in use.

Press the control 
button for 2 
seconds to power 
on. Press the 
control button 
for 3 seconds to 
power off.

CHARGING & POWERING

CHARGING

Summary of Contents for EXPLORER 220

Page 1: ...Plantronics EXPLORER 220 BLUETOOTH HEADSET USER GUIDE 75656 01 12 06 ...

Page 2: ...eparate Safety Instructions booklet for important product safety information prior to installation or use of the product REGISTER YOUR PRODUCT ONLINE Visit www plantronics com productregistration to register your product online so we can provide you with the best possible service and technical support TABLE OF CONTENTS Package Contents Features 3 Charging Powering 3 Pairing 4 Adjusting Fit 6 Using...

Page 3: ...our headset 20 minutes minimum charge 2 hours full charge Light is solid red when battery is charging NOTE For the best user experience keep your headset fully charged CAUTION Do not use headset while charging and do not connect the charger while the headset is in use Press the control button for 2 seconds to power on Press the control button for 3 seconds to power off CHARGING POWERING CHARGING ...

Page 4: ...r phone with your headset for the first time Step Two Prepare Headset Pairing Mode Begin with headset turned off Turn headset on hold call control button for four seconds until the light flashes blue and it will automatically go into pairing mode flashing red and blue Step Three Pairing Add Headset to Phone For most phones go to Settings Tools Bluetooth Search or Add a Device then Select 220Plantr...

Page 5: ...urned off 1 Press and hold down the call control button for 8 seconds until the headset status indicator begins to flash blue then red The headset is now in pairing mode for the next 120 seconds 1 2 3 PAIRING 2 While the headset is flashing use the phone menu to search for Bluetooth devices and select 220Plantronics 3 When prompted for a passkey enter 0000 Headset will flash blue when paired succe...

Page 6: ... ear loop Right Ear Left Ear Swivel ear loop to the right or left for right or left ear wearing Place ear loop behind ear Pivot headset to place speaker into ear Position speaker and align microphone with mouth 1 2 3 4 5 ...

Page 7: ...tomatically transferred to headset no need to press call control button ADJUSTING THE VOLUME Briefly push up or down on the volume button for incremental volume steps You will hear two tones high tone followed by low tone at the volume limit WARNING Do not use headphones headsets at high volumes for an extended period of time Doing so can cause hearing loss Always listen at moderate levels See www...

Page 8: ...e call Switching a Call From Phone to Headset To switch an active call from your phone to your headset press the call control button for 3 seconds Switching a Call From Headset to Phone To switch an active call from your headset to your phone press the call control button for 2 seconds USING YOUR HEADSET INDICATOR LIGHTS Headset Status Headset Indicator Light Powering on Blue flashes Repeat Poweri...

Page 9: ...t menu selections were made on your mobile phone Repeat the pairing process on page 4 The headset is not turned on Press the call control button for 2 seconds until you hear a beep or see the indicator light glow blue to turn headset on Your headset is out of range Move the headset closer to the phone or Bluetooth device Your headset battery is drained Charge your battery using the AC power adapte...

Page 10: ... were purchased and used in the United States The warranty lasts for one year from the date of purchase of the products This warranty extends to you only if you are the end user with the original purchase receipt We will at our option repair or replace the products that do not conform to the warranty We may use functionally equivalent reconditioned refurbished remanufactured pre owned or new produ...

Page 11: ...tection against harmful interference in a residential installation This equipment generates uses and can radiate radio frequency energy and if not installed and used in accordance with the instructions may cause harmful interference to radio communications However there is no guarantee that interference will not occur in a particular installation If this equipment does cause harmful interference t...

Page 12: ...nder license All other trademarks are the property of their respective owners Patents U S 5 210 791 and Patents Pending Plantronics Inc 345 Encinal Street Santa Cruz CA 95060 USA Tel 800 544 4660 www plantronics com TECHNICAL ASSISTANCE Visit our Web site at www plantronics com support for technical support including frequently asked questions compatibility and accessibility information The Plantr...

Page 13: ...adas son propiedad de sus respectivos propietarios Patentes de EE UU 5 210 791 y pendiente de otras patentes Plantronics Inc 345 Encinal Street Santa Cruz California EE UU Teléfono 800 544 4660 www plantronics com ASISTENCIA TÉCNICA Si desea obtener asistencia técnica y consultar el archivo de las preguntas más frecuentes e información sobre compatibilidad y accesibilidad visite nuestro sitio Web ...

Page 14: ...sas en instalaciones residenciales Este equipo genera utiliza y puede radiar energía de radiofrecuencia y si no se instala y utiliza según las instrucciones puede causar interferencias peligrosas en las comunicaciones por radio Sin embargo no se garantiza que no se puedan producir interferencias en una instalación concreta En el caso de que este equipo produjera interferencias peligrosas en la rec...

Page 15: ...arantía tiene un periodo de validez de un año a partir de la fecha de compra del producto Esta garantía sólo es válida para el usuario final en posesión de la factura de compra original Los productos que no cumplan esta garantía podrán según nuestro propio criterio repararse o sustituirse Para ello podrán utilizarse piezas o productos que funcionen de forma equivalente Estas piezas o productos pod...

Page 16: ...a página 4 Las opciones seleccionadas del menú del teléfono móvil no son correctas Repita el proceso de emparejamiento de la página 4 EEl auricular no está encendido Para encender el auricular pulse el botón de control de llamada durante dos segundos hasta que oiga un sonido o vea que el indicador de estado del auricular se ilumina en azul El auricular está fuera de alcance Acérquese más al teléfo...

Page 17: ...cia de una llamada del teléfono al auricular Para pasar una llamada activa del teléfono al auricular pulse el botón de control de llamada durante tres segundos Transferencia de una llamada del auricular al teléfono Para transferir una llamada activa del auricular al teléfono pulse el botón de control de llamada durante dos segundos USO DEL AURICULAR LUCES INDICADORAS Estado del auricular Luz indic...

Page 18: ...irá automáticamente al auricular sin necesidad de pulsar el botón de control de llamada AJUSTE DEL VOLUMEN Pulse el botón de volumen hacia arriba o hacia abajo brevemente para aumentar el volumen de forma paulatina Oirá dos tonos uno alto seguido de uno bajo cuando llegue al límite del volumen ADVERTENCIA no utilice los auriculares a un volumen muy alto durante un largo período de tiempo ya que po...

Page 19: ...girar el gancho hacia la derecha o izquierda para adaptarlo a la oreja en la que irá colocado el auricular Coloque el gancho detrás de la oreja Gire el auricular e introduzca el altavoz en la oreja Ajuste el altavoz y alinee el micrófono con la boca 1 2 3 4 5 6 ...

Page 20: ...tón de control de llamada durante ocho segundos hasta que el indicador de estado del auricular parpadee en azul y después en rojo El auricular permanecerá en el modo de emparejamiento durante 120 segundos 1 2 3 2 Mientras el auricular esté parpadeando busque en el menú del teléfono los dispositivos Bluetooth y seleccione 220Plantronics 3 Cuando se le solicite que especifique la contraseña introduz...

Page 21: ...ejamiento Antes de empezar asegúrese de que el auricular esté apagado Encienda el auricular mantenga pulsado el botón de control de llamada durante cuatro segundos hasta que la luz parpadee en azul y pasará automáticamente al modo de emparejamiento y parpadeará en rojo y en azul Paso tres Emparejamiento Añada un auricular al teléfono Para la mayoría de los teléfonos vaya a Settings Tools Bluetooth...

Page 22: ... es de 20 minutos El tiempo de carga total es de dos horas Mientras se carga la batería se enciende una luz en rojo NOTA para conseguir el rendimiento óptimo el auricular debe estar totalmente cargado PRECAUCIÓN no utilice el auricular mientras se carga ni conecte el cargador mientras utiliza el auricular Pulse el botón de control durante dos segundos para encender el auricular Pulse el mismo botó...

Page 23: ...iones sobre seguridad que se suministra por separado para obtener información sobre seguridad del producto antes de su instalación o uso REGISTRO DEL PRODUCTO EN LINEA Para registrar el producto en línea visite www plantronics com productregistration De esta manera podremos proporcionarle el mejor servicio y asistencia técnica ÍNDICE Contenido del paquete y características 3 Carga y alimentación 3...

Page 24: ...Plantronics EXPLORER 220 AURICULAR BLUETOOTH Guía del usuario 75656 01 12 06 ...

Reviews: