background image

7

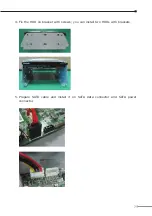
4. Fix the HDD on bracket with screws; you can install two HDDs with brackets.


5. Prepare SATA cable and install it on SATA data connector and SATA power 

connector.


Summary of Contents for NVR-1620

Page 1: ...8 16 32 Ch Network Video Recorder NVR Series Quick Installation Guide...

Page 2: ...ation 6 2 2 NVR 3210 32 Ch Network Video Recorder 8 2 2 1 Package Contents 8 2 2 2 Physical Details 9 2 2 3 HDD Installation 10 2 3 NVR 3250 32 Ch Rack mount Network Video Recorder 12 2 3 1 Package Co...

Page 3: ...d it is possible to record their camera pictures It is possible to perform the settings or operate the NVR using a web browser installed on a PC connected to a network or remote controller Recorded vi...

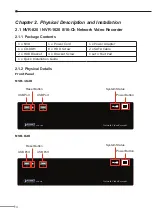
Page 4: ...8 x HDD Screw 2 x SATA Cable 2 x HDD Bracket 4 x Bracket Screw 1 set x Feet Pad 1 x Quick Installation Guide 2 1 2 Physical Details Front Panel NVR 1620 Reset Status Power NVR 1620 Network Video Recor...

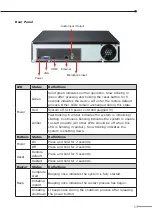
Page 5: ...g starting Continuous blinking indicates the system is unable to start properly All other LEDs should be off when this LED is blinking in amber Slow blinking indicates the system is shutting down Butt...

Page 6: ...6 2 1 3 HDD Installation 1 Remove the screws on back side 2 Remove the top case by pulling it toward you 3 Prepare HDD brackets...

Page 7: ...7 4 Fix the HDD on bracket with screws you can install two HDDs with brackets 5 Prepare SATA cable and install it on SATA data connector and SATA power connector...

Page 8: ...the HDD 7 Fix HDD brackets on system with screws 2 2 NVR 3210 32 Ch Network Video Recorder 2 2 1 Package Contents 1 x NVR 1 x Power Cord 1 x RJ45 Cable 1 x CD ROM 12 x HDD Screw 1 x Quick Installatio...

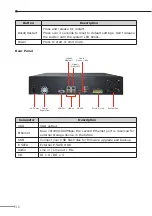
Page 9: ...nking System failure AP failed off System normal solid Event Amber Event recording solid No event off Power Blue Power on Restart Reset to default OS failed solid Button Description Reset Restart Pres...

Page 10: ...escription USB Connect your USB flash disk for firmware upgrade and backup VGA VGA output E SATA External E SATA HDD Ethernet 10 100 1000Mbps network Audio Line in Line out Mic 2 2 3 HDD Installation...

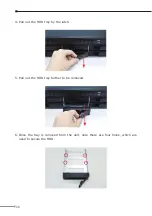
Page 11: ...11 2 Pull the HDD tray out of the case 3 Place the HDD on the bottom of the tray 4 Put the HDD tray back to the case...

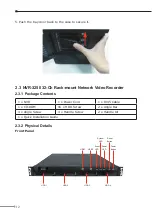
Page 12: ...r 2 3 1 Package Contents 1 x NVR 1 x Power Cord 1 x RJ45 Cable 1 x CD ROM 16 x HDD Screw 2 x Angle Bar 4 x Angle Screw 4 x Handle Screw 2 x Handle Kit 1 x Quick Installation Guide 2 3 2 Physical Detai...

Page 13: ...nt Amber During event recording solid No event Off Rear Panel AC Power Power Supply Fan System Fan VGA Output Gigabit Ethernet Line in Line out Mic USB x 2 E SATA DI x 8 DO x 4 System Fan Connector De...

Page 14: ...rn the tool less screws on both sides counter clock wise to loosen it from the unit Please note the screws will still be attached to the front plate even after the screws are completely loosened from...

Page 15: ...15 4 Pull out the HDD tray by the latch 5 Pull out the HDD tray further to be removed 6 Once the tray is removed from the unit note there are four holes which are used to secure the HDD...

Page 16: ...HDD is placed in the tray flip it over and secure the HDD with the screws 8 Push the tray back into the unit and push it all the way in 9 Secure the tray by pushing in the latch which locks the tray...

Page 17: ...rew 2 x Handle Kit 1 x Quick Installation Guide 2 4 2 Physical Details Front Panel USB1 HDD1 HDD5 HDD2 HDD6 HDD3 HDD7 HDD4 HDD8 USB2 System LED Power LED Event LED Power Button Reset Button LEDs Color...

Page 18: ...igabit Ethernet 1 Line in Line out Mic Gigabit Ethernet 2 AC Power Power Supply Fan VGA Port E SATA USB x 4 System Fan DI x 8 DO x 4 Connector Description VGA VGA output Ethernet Dual 10 100 1000Mbps...

Page 19: ...urn the tool less screws on both sides counter clockwise to loosen it from the unit Please note the screws will still be attached to the front plate even after the screws are completely loosened from...

Page 20: ...20 4 Pull out the HDD tray by the latch 5 Pull out the HDD tray further to be removed 6 Once the tray is removed from the unit note there are four holes which are used to secure the HDD...

Page 21: ...HDD is placed in the tray flip it over and secure the HDD with the screws 8 Push the tray back into the unit and push it all the way in 9 Secure the tray by pushing in the latch which locks the tray...

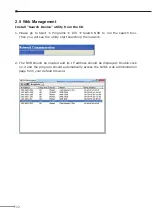
Page 22: ...ams IVS Search NVR to run the search tool Then you will see the utility start searching the network 2 The NVR should be located and its IP address should be displayed Double click on it and the progra...

Page 23: ...rder easily Launch the Web browser and then enter the IP address The default IP address is 192 168 0 20 And fill out the User Name and Password to login the Web management The default User Name and Pa...

Page 24: ......

Reviews: