


4-Bay SATA NAS RAID Server with iSCSI
NAS-7410
81
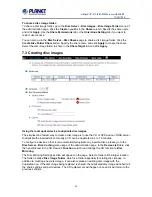
3. Select a folder as the Home Directory of FTP clients and Set ACL for file base security
management.
a. Home Directory:
Select a folder under NAS-7410; it will be easier for you to manage all of FTP
clients and to know how many data under the folder. You have to create a folder first
※
and then
click Select Path button to select main Home Directory.
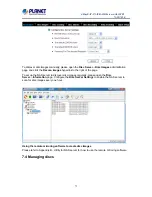
b. Set ACL for the home directory:
User can set ACL node on the home directory. It has various
permissions (N/A, RO, WO, RW, MO and FC) for each FTP client. You can set the ACL node to the
home directory for determining different users with different permissions separately.
8.6 Accessing from NFS clients
The security control of the NAS server for NFS clients follows the traditional UNIX-style trust-host
mechanism and UID/GID checking. Follow the steps below to enable NFS support and export the
volume for NFS clients to mount.
1. Enable the UNIX/Linux Network support (the NFS protocol).
Open the administration page and enter the
Network
→
UNIX/Linux
menu. Check the
Enable
UNIX/Linux Network
check-box and click
Apply
.
2. Go to the
Security
→
Account
→
UNIX/Linux Host
page and add the hosts that might be trusted
to access the NAS server.
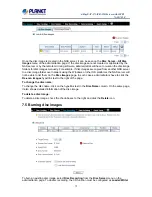
3. Export the volume to NFS clients.
Go to the
Security
→
File/Folder
menu. Find the
volume01
entry and click
Create
in the
Sharing
column (or
Modify
if the volume has been shared). On the
Property
page, check the
UNIX/Linux
Network (NFS)
check-box and click
Apply
.
4. Enter the
UNIX/Linux Setting
tab. Add NFS clients to the privileged host list. And assign UID,
GID and permission octets to the exported volume.
After the volume is exported, use one of the NFS clients in the privileged host list to mount the
volume. Please login as the root and use the following command to mount
volume01
under the
/
mnt
directory. Mount 192.168.0.100:/volume01 /mnt
Once mounted, the
/mnt
directory will link to
volume01
and inherit the same UID, GID and


