15
DISPLAY SETUP
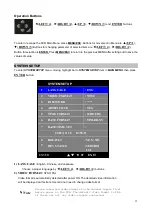
To access
DISPLAY SETUP
, press
ENTER
button after moving highlight bar to this item in MAIN MENU.
Below menu will appear on monitor.
1) ADJUST CHANNEL:
CH1 / CH2 / CH3 /CH4
Select the camera channel to adjust brightness, contrast or PTZ type.
BRIGHTNESS:
1 to 99 %
BRIGHTNESS can be changed using
LEFT
or
RIGHT
button
CONTRAST:
1 to 99 %
CONTRAST can be changed using
LEFT
or
RIGHT
button.
PTZ TYPE (Pan, Tilt and Zoom protocol selection)
Each camera has its own control protocol to control panning, tilting and zooming, according to PTZ
camera manufacturer. In order to control PTZ camera from remote area by DVR utility, proper PTZ
TYPE should be selected here.
2) SEQ DEWLL TIME:
NONE/ 1 to 60 seconds.
It is the period of sequential display mode.
3) TIME/DATE OSD:
ON/ OFF
When it is set as OFF, time and date will disappear on monitor. But time and date information still are added
into recording files.
ON/ OFF
POP-UP DISPLAY
6
ON/ OFF
VIDEO LOSS OSD
5
ON/ OFF
CAM NUMBER OSD
4
ON/ OFF
TIME/ DATE OSD
3
NONE, 1-60 SEC
SEQ DWELL TIME
2
1-99 %
BRIGHTNESS
1-99 %
CH1
ADJUST CHANNEL
1
POSITION
7
PTZ TYPE
CONTRAST
DISPLAY SETUP
▲
▼
◀
▶
EXIT
ENTER
ë
Note
Higher percentage shows brighter image.
ë
Note
Currently support PTZ camera Panasonic/ Pelco-D/ PelcoP/
Techwin/ Niko/ DRX502A_DSC230s /KRE_301_302/ GC_755_NP/
TOA_CC554/ RAS716LS / LPT-100 / KD.
Summary of Contents for DVR-450
Page 1: ...1 Triplex Digital Video Recorder DVR 450 User s manual...
Page 41: ...38 3 When the following dialog box appears click Next...
Page 43: ...40 6 Please click Next 7 Installation is finished...
Page 52: ...49 5 The saved file can be opened in any computer using any graph editing software...


