background image


Installation 


Unpacking  

Before unpacking the LCD Monitor, prepare a suitable workspace for your Monitor and computer. You need a 
stable and clean surface near a wall power outlet. Make sure that LCD Monitor has enough space around it for 
sufficient airflow. Though the LCD Monitor uses very little power, some ventilation is needed to ensure that the 
Monitor does not become too hot.   
 
After you unpack the LCD Monitor, make sure that the following items were included in the box: 
 

*  LCD Monitor  

*  User's Guide  


*  Base 

*  Monitor-to-PC VGA Cable 

*  Monitor-to-PC DVI-D Cable 

*  Power Cord 

*    Monitor-to-PC "Up to Down" USB cable 

If you find that any of these items is missing or appears damaged, contact your dealer immediately. 


Register Your Planar Products Today 

Thank you for choosing Planar. To assure you receive all the benefits of your Planar product and services,   
register your Planar product today. Visit our website to register your product at 
http ://www.planar.com/support/product_registration.html 


Cables, Replacement Lamps and Accessories 

To find cables, replacement lamps and accessories for your Planar projector, LCD monitor, touchscreen or other 
Planar products visit our online store at www.PlanarOnline.com or find other stores who carry Planar products at 
http ://www.planar.com/howtobuy 
 

Summary of Contents for PX2611

Page 1: ......

Page 2: ......

Page 3: ...the Display 5 Connecting the AC Power 6 Connecting the USB Hub 6 Setting Up the LCD Monitor 6 Power Management System 6 Display Controls 7 User Controls 7 Adjusting the Monitor s Display 8 Function De...

Page 4: ...thatinterferencewillnotoccurinaparticular installation Ifthisequipmentdoescauseharmfulinterferencetoradioortelevisionreception whichcanbedeterminedbyturning theequipmentoffandon theuserisencouragedtot...

Page 5: ...or 4 140 F Storing the LCD Monitor outside this range could result in permanent damage 6 If any of the following occurs immediately unplug your monitor and call an authorized technician Monitor to PC...

Page 6: ...or to PC DVI D Cable Power Cord Monitor to PC Up to Down USB cable If you find that any of these items is missing or appears damaged contact your dealer immediately Register Your Planar Products Today...

Page 7: ...ure within the monitor Before tilting the screen back to 180 degree for packing lower the screen down to the lowest position to prevent the monitor from falling over and being damaged Do not push the...

Page 8: ...d is connected to the LCD Monitor 2 Press the power button located on the bezel of the monitor 3 Once a signal is received the monitor should automatically adjust If not push the AUTO button located o...

Page 9: ...nually auto adjusting the display LED 6 Green when the monitor is on Amber when in power saving mode and Dark when off 4D 1 7 A four direction key plus enter exit button Allows you to move up down lef...

Page 10: ...Use the 4D 1 key to navigate through the function you want to adjust Push the 4D 1 key to enter a sub menu and adjust the value Push the 4D 1 key again to exit the sub menu Pressing the Exit buttons a...

Page 11: ...l automatically AUTO ADJUST Analog Input Only Adjust the H POSITION V POSITION H SIZE and FINE to the optimal value automatically EXPANSION MODE This function allows you to choose from different displ...

Page 12: ...ol certain settings of the monitor via computer Default is ON SIDE COLOR When Full is not selected in the Expansion Mode and the resolution is under the LCD panel s native resolution the picture does...

Page 13: ...ome inactive this warning appears No signal OSD shall be shown after around 0 5sec from video mode detection This OSD shall be turned off after 5 seconds automatically or by EXIT key Then change to po...

Page 14: ...me and the resolution is 800x600 and above the monitor will auto adjust itself To manually execute the Auto Adjust function press the Auto button Target color coordinates Color Temp 9300K 7500K sRGB u...

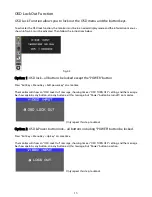
Page 15: ...at same time The monitor will show an OSD Lock Out message showing time as OSD TURN OFF setting and the message be show again by any button also any button exit this message but Power button be turn...

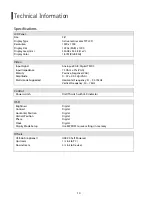
Page 16: ...de Supported Analogue RGB Digital TMDS 75 Ohm 2 VGA Positive Negative VGA 0 0 7 0 05 Vp VGA Horizontal Frequency 31 93 75kHz Vertical Frequency 50 76 Hz Control Power switch On Off switch with LED ind...

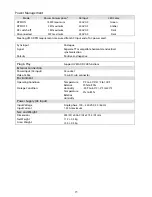
Page 17: ...synchronization Polarity Positive and negative Plug Play Supports VESA DDC2B functions External Connection Power Input AC input AC socket Video Cable 15 pin D sub connector Environment Operating Condi...

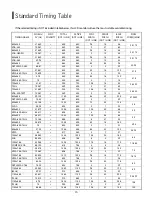
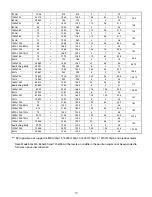
Page 18: ...2 35 28 322 832x624 49 725 1152 832 64 32 224 APPLE MAC 800 74 55 667 624 3 1 39 57 2832 800x600 35 156 1024 800 72 24 128 SVGA 56 25 625 600 2 1 22 36 800x600 37 879 1056 800 128 40 88 VESA 600 60Hz...

Page 19: ...75Hz 74 984 942 900 6 3 33 136 75 1680x1050 64 674 1840 1680 32 48 80 Red BLKing 60Hz 59 883 1080 1050 6 3 21 119 1680x1050 65 29 2240 1680 176 104 280 60Hz 59 954 1089 1050 6 3 30 146 25 1680x1050 82...

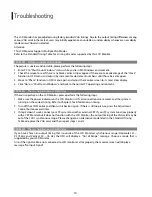
Page 20: ...s no picture on LCD Monitor If there s no picture on the LCD Monitor please perform the following steps 1 Make sure the power indicator on the LCD Monitor is ON all connections are secured and the sys...

Page 21: ......

Reviews: