background image

13

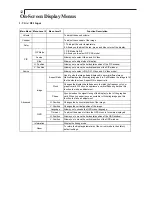
2. Video Input

Main Menu  Menu Level 2

Menu Level 3

Function Description

Volume

To adjust the sound volume.

Contrast

To adjust the contrast of the image

Color

Allows you to adjust the Saturation, Tint, Flesh Tone and Black Level of
the display.

PIP Mode

1. PIP Mode On/Off.
2. Allows you to select PIP, PAP model.

Source

Allows you to select Video, and S-Video

Size

Allows you to adjust size of display.

H. Position

Allows you to move the horizontal position of the PIP window.

V. Position

Allows you to move the vertical position of the PIP window.

Source

Allows you to select VGA, DVI, Video, and S-Video model.

Sharpness

Adjusts the sharpness of the image.

Aspect Ratio

Used to size the image being displayed in several different ways.
Native:Displays the incoming image as it is.
Full:Resizes the image to fill the the whole screen.
Aspect:Fill to aspect ratio.
Panorama:Non-linear scaling is available for aspect ratio conversion.

Noise Reduction Noise reduction is implemented noise reduction filters to the video data.

Language

Allows you to choose the OSD menu language.

Time-out

To adjust the amount of time the OSD menu is to remain displayed.

PIP

Image

OSD

Advanced

H. Position

Allows you to move the horizontal position of the OSD window.

V. Position

Allows you to move the vertical position of the OSD window.

Information

Display the timing mode.

Reset

To return the display parameters of the current mode to their fatory
default settings.

OSD

Summary of Contents for PX2320MW

Page 1: ......

Page 2: ......

Page 3: ...ng or otherwise without prior written permission Windows is a registered trademark of Microsoft Inc Other brand or product names are trademarks of their respective holders Important Recycle Instructio...

Page 4: ......

Page 5: ...rview 4 Installation Product Overview 5 Start Your Installation 8 User Controls Front Panel Controls 10 How to Use the OSD Menus 11 On Screen Display Menus 12 Appendices Troubleshooting 14 Warning Sig...

Page 6: ...y screen surface q Use a soft cloth moistened with mild detergent to clean the display housing q Use only a high quality and safety approved AC DC power adapter q Disconnect the power plug from the AC...

Page 7: ...ility q q VESA DPMS power saving q q Kensington lock capability 3 Having a 23 1 LCD dsiplay with an active matrix thin film transistor TFT Analog and Digital dual signal input Auto Adjustment capabili...

Page 8: ...Power Cord Package Overview VGA Signal Cable DVI D Cable Video Cable S Video Cable LCDDisplay Audio In Cable 4 User s Guide Landing Strip Family Product CD USB Upstream Cable...

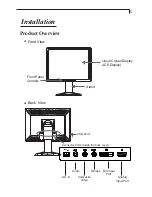
Page 9: ...uct Overview u Front View Stand Controls u Back View Connector Ports Inside the back cover DVI Input Port Analog Input Port Composite Video S Video Liquid Crystal Display LCDDisplay Audio 5 Front Pane...

Page 10: ...n be secured to your desk or any other fixed object with Kensington lock security products Kensington lock is not included Kensington Security Slot u Tilt Grasp the LCD Display with both hands and adj...

Page 11: ...ms The VESA mounting interface is located on the back of your monitor The VESA Mounting slots of this model are located inside the rear cover shown in the following figure To mount the monitor on a sw...

Page 12: ...the other side to the DVI D input port of your display Tighten the screws 5 If your video source uses a round four prong S Video connector please use the S Video cable 6 If your video source uses a r...

Page 13: ...Figure 10 1 9...

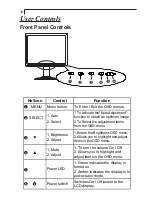
Page 14: ...r LED 1 Green indicates the display is turned on 2 Amber indicates the display is in power save mode Power switch Switches On Off power to the LCD display function to obtain an optimum image 2 To Sele...

Page 15: ...ing the SELECT button 3 Adjust the value of the adjustment items by pressing the 3 or 4 button 11 1 Press the MENU button to pop up the on screen menu and to select among the six Main Menus 4 After a...

Page 16: ...is Full Resizes the image to fill the the whole screen Aspect Fill to aspect ratio Clock Changes the displays data frequency to match the frequency of your graphics card When you experience a vertica...

Page 17: ...s the sharpness of the image Aspect Ratio Used to size the image being displayed in several different ways Native Displays the incoming image as it is Full Resizes the image to fill the the whole scre...

Page 18: ...gure the resolution of your computer to make it less than or equal Problem Image has vertical flickering line bars 4 4 Check and reconfigure the display mode of the vertical refresh rate of your graph...

Page 19: ...age means that the signal of the computer graphics card is not compatible with the LCD Display When the signal is not included in the compatibility mode we have listed in the Appendices of this manual...

Page 20: ...Product Dimensions 16 Front View Side View Top View...

Page 21: ...00 85 06 53 67 VESA DMT 1024 x 768 60 00 48 36 VESA DMT 1024 x 768 75 02 60 02 VESA DMT 1024 x 768 84 99 68 67 VESA DMT 1152 x 864 75 00 67 50 VESA GTF 1152 x 864 85 00 77 09 VESA DMT 1280 x 1024 60 0...

Page 22: ......

Page 23: ......
Page 24: ...1 1 886 752 6271 Hours M F 8am 8pm Eastern Time 5am 5pm Pacific Time 2006 Planar Systems Inc Planar is a registered trademark of Planar Systems Inc Other brands and names are the property of their res...

Reviews: