background image

2001132375T

2012

020-1123-00B

Summary of Contents for PLL1920M

Page 1: ...www planar com USER S GUIDE LED LCD Monitor PLL1920M...

Page 2: ...up 3 Front View of the Product 4 Rear View of the Product 5 Installation 6 Basic Operation 8 Advanced Operation OSD Menu 10 Supporting Timing Modes 14 Technical Information 15 Wall mount instruction 1...

Page 3: ...LCD Monitor may determine it Moreover users are encouraged to correct interference by doing one or more of the following Reorient or relocate the receiving antenna Move the LED LCD Monitor and the re...

Page 4: ...inet There is high voltage parts inside that may cause electric shock to human bodies even when the power cord is disconnected Stop using the LED LCD Monitor if the cabinet is damaged Have it checked...

Page 5: ...base 3 Slide the stand upward until you hear a click which indicates that the stand is attached and installed 4 Stand the LED LCD Monitor up Uninstall the stand base 1 Lay the LED LCD Monitor flat on...

Page 6: ...rn On Off Volume Down Scroll Down Adjust Decrease Volume Up Scroll UP Adjust Increase Input select Confirm Selection Power On Off and LED Indicator Note button will be performed as volume down up cont...

Page 7: ...Product AC Power Switch AC Power Input VGA Input D Sub 15 pin Composite 1 Video Input BNC Composite 2 Video Input BNC Composite 1 Video Output BNC Composite 2 Video Output BNC VGA AV Signal Audio Inp...

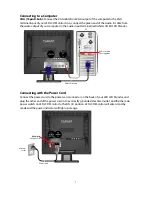
Page 8: ...cables from compatible devices into the back panel of LED LCD Monitor BNC Coaxial Cable not supplied BNC Coaxial Cable not supplied Audio in Cable not supplied Channel Digital Video Recorder Camera C...

Page 9: ...LED LCD Monitor PC Audio In Cable not supplied VGA 15Pin Cable Connecting with the Power Cord Connect the power cord to the power cord connector on the back of your LED LCD Monitor and plug the other...

Page 10: ...menu button on the front of the LED LCD Monitor The basic operation is as following Press 1 to display OSD menu Use 2 to select OSD menu page Press to enter the OSD menu page Use to select the optiona...

Page 11: ...g the POWER button are locked Press and hold the button and then the button for 3 seconds to lock all 5 buttons The LED LCD Monitor will show an Lock Out message for 5 10 seconds and the message will...

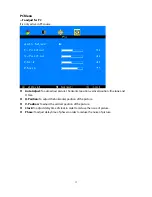
Page 12: ...can use the OSD menu to adjust various settings for your LED LCD Monitor Press the 1 button to display the OSD Menu and use to select the desired OSD menu Picture Menu To adjust the picture quality In...

Page 13: ...s To adjust picture sharpness ColorTemp To select ColorTemperature from Normal Cool and Warm with 2 Sound Menu To set the audio quality and status Note The PC menu icons are only enabled in PC source...

Page 14: ...ch Set the timer to 15 30 45 or 60 seconds will swtich from AV1 source to AV2 source or vice versa Sleep Set to automatically turn off the monitor Once it is set to ON the monitor will be automaticall...

Page 15: ...vertical position fine tune and H Size H Position To adjust the horizontal position of the picture V Position To adjust the vertical position of the picture Clock To adjust delay time of clock in ord...

Page 16: ...4 75Hz VESA 1280x960 60Hz VESA 1280x1024 60Hz VESA 1280x1024 75Hz MAC 640x480 67Hz MAC 832x624 75Hz MAC 1152x870 75Hz Note Simultaneously press 1 and 2 keys on monitor panel to switch between similar...

Page 17: ...ode 0 5 Watt Off 0 5 Watt Displayable Resolution SXGA 1280 x 1024 max Vertical Frequency 75Hz max Pixel Dimension 0 294 x 0 294 mm Display Color 16 7M Tilt 1 1 20 2 Active Display Area 376 32 mm x 301...

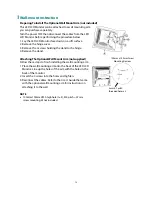
Page 18: ...Remove the stand AttachingThe OptionalWall Mount Arm not supplied 100mm x 100mm Screw Mounting Options Follow these steps to finish installing the wall mounting arm 1 Place the wall mounting arm onto...

Page 19: ...the power cord immediately and call your service center Never remove the rear cover of your LED LCD Monitor cabinet The display unit inside contains high voltage parts and may cause electric shock to...

Page 20: ...planar com howtobuy Technical Support Visit Planar at http www planar com support for product registration operations manuals touch screen drivers warranty information and access to Planar s Technical...

Page 21: ...2001132375T 2012 020 1123 00B...

Reviews: