background image

Advanced Operation—OSD Menu


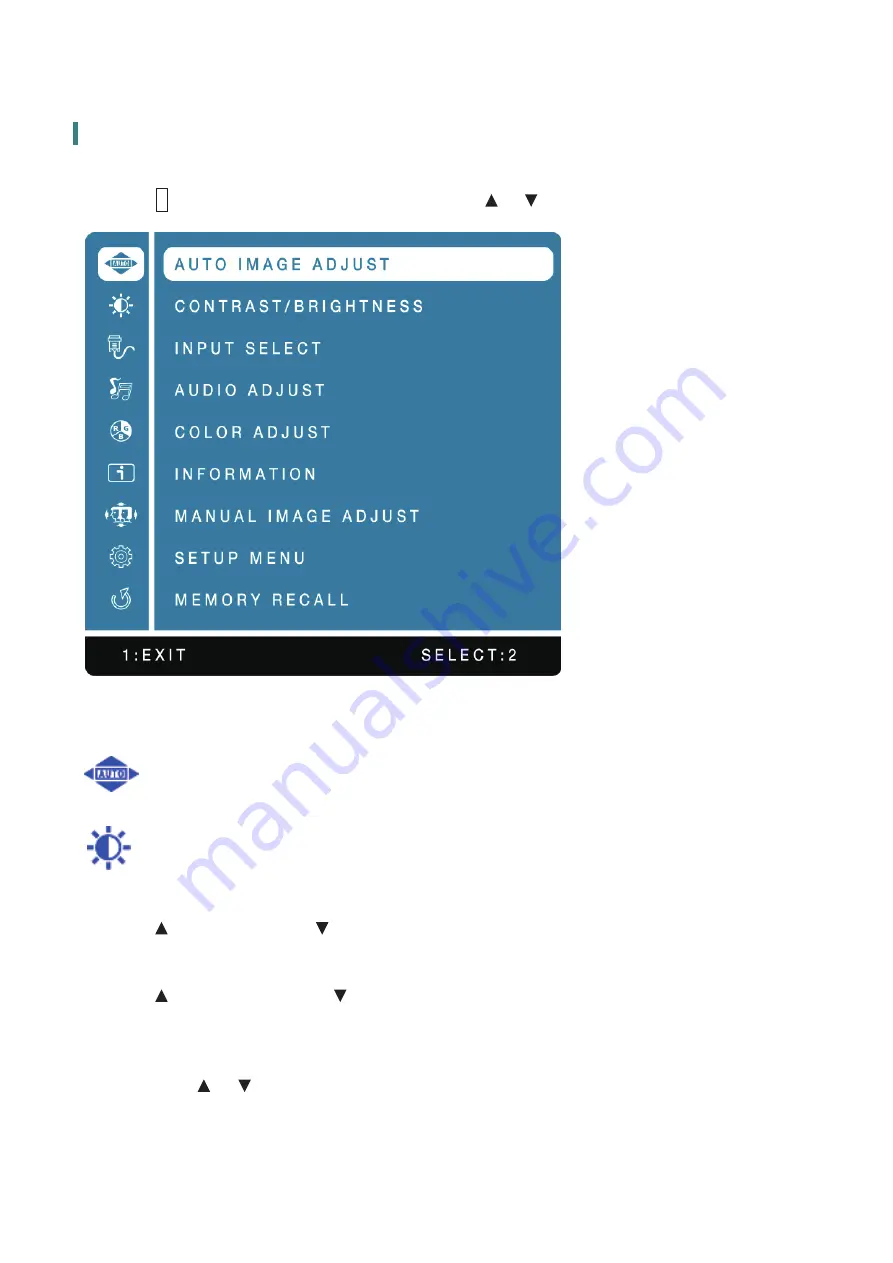
You can use the OSD menu to adjust various settings for your Touch LED LCD Monitor. 
Press the 

1

 button to display the OSD Menu, and use 


or


 to select the desired OSD menu. 


Short Cuts Function from the button(s) 


AUTO IMAGE ADJUST: 

To auto adjust Horizontal Position, Vertical Position, Phase (Fine 

Tune) and Clock (H. Size) of the screen. 


CONTRAST/BRIGHTNESS: 

To manually adjust the Contrast, Brightness, ECO Mode and 

Over Drive of screen image. 


CONTRAST: 

To adjust the foreground white level of screen image. 

increase contrast, 

:

 decrease contrast. 


BRIGHTNESS:


To adjust the luminance of the video. 

increase brightness, 

:

 decrease brightness. 


ECO MODE:

 Allows the user to change the ECO mode. Contrast and Brightness 

adjustment will be disabled when ECO is active. 
Press 


or


 key to adjust the ECO Mode in three levels. 

(Mode 1: Backlight 75%, Mode 2: Backlight 50%, Mode 3: Backlight 15%) 


11

Summary of Contents for Helium PCT2235

Page 1: ...www planar com USER S GUIDE Touch LED LCD Monitor PCT2235 ...

Page 2: ...ackage Overview 5 Front View of the Product 6 Rear View of the Product 7 Quick Installation 8 Basic Operation and Calibration Reset Instructions 9 Advanced Operation OSD Menu 11 Supporting Timing Modes 14 Technical Information 15 Wall Mount Installation Instructions 16 Troubleshooting 17 Planar Support 18 ...

Page 3: ...ver users are encouraged to reduce interference by doing one or more of the following Reorient or relocate the receiving antenna Move the Touch LED LCD Monitor and the receiver further away from each other Connect the Touch LED LCD Monitor into an outlet on a circuit different from that to which the receiver is connected Consult your local dealer or a qualified technician FCC Warning To assure a c...

Page 4: ...tion de signaux radios ou télévisées une possibilité est de réinitialiser le moniteur Les usagers sont aussi encouragés à corriger les interférences en appliquant une ou plusieurs des démarches suivantes Réorientez ou déplacez l antenne de réception Placez le moniteur et le récepteur plus loin l un de l autre Connectez le moniteur à une prise différente de celle à laquelle le récepteur est connect...

Page 5: ...period of time Don t Do not touch the LED Display screen surface with sharp or hard objects Do not use abrasive cleaners waxes or solvents for your cleaning Do not operate the product under the following conditions o Over 16 hours per day o Extremely hot cold or humid environment o Areas susceptible to excessive dust and dirt o Near any appliance generating a strong magnetic field o In direct sunl...

Page 6: ...fs de la cire ou des solvants pour le nettoyage N utilisez pas le produit dans les conditions suivantes o Plus de 16 heures par jour o Environnement extrêmement chaud froid ou humide o Endroits poussiéreux ou sales o Près d appareils générant un fort champ magnétique o Sous la lumière directe du soleil Si de la fumée un bruit anormal ou une odeur s échappait de votre moniteur LCD LED débranchez im...

Page 7: ...Package Overview Touch LED LCD Monitor Power Cord VGA Signal Cable Audio in Cable USB Cable A to B DisplayPort Cable Cable Wrap Cleaning Cloth User s Guide 5 ...

Page 8: ...ct OSD Turn On Off Scroll Down Adjust Decrease Audio Adjust Auto Scroll UP Adjust Increase Picture Mode Input select Confirm Selection Power On Off LED Indicator Hot keys Instructions please see Using the OSD Menu on page 8 6 ...

Page 9: ...Rear View of the Product Power Input Up stream USB port to PC DisplayPort Input DisplayPort 20 pin HDMI input HDMI 19 pin VGA Input D Sub 15 pin Audio Input 7 ...

Page 10: ...ier 2 Connect the audio cable from audio output of computer to the audio input of the monitor 3 Connect the USB cable from the computer to the monitor 4 Connect power cord to a properly grounded AC outlet and then to the monitor 5 Power ON computer and then POWER ON the monitor 6 Set the timing mode on your computer Recommended resolution and refresh rate is 1920 x 1080 60Hz Figure 1 PC VGA cable ...

Page 11: ...lects between VGA HDMI DISPLAYPORT or AUTO mode Select the desired item when in OSD menu When not in OSD menu directly enters AUDIO ADJUST Menu press 3 seconds enters AUTO IMAGE ADJUST Select the desired item when in OSD menu When not in OSD menu directly enters PICTURE MODE Menu Recalls both Contrast and Brightness when not in OSD menu OSD Lock Out Function When Touch LED LCD Monitor is in normal...

Page 12: ...bration Reset Instructions The PCT2235 is available with USB connection It is Microsoft Windows 7 8 10 HID Human Interface Device compatible if you use the USB touch screen interface No additional software driver is required Calibration is a simple process and can be invoked by running Tablet PC Settings from Control Panel and clicking the Calibrate button Click the Reset button to reset the touch...

Page 13: ...e of the screen CONTRAST BRIGHTNESS To manually adjust the Contrast Brightness ECO Mode and Over Drive of screen image CONTRAST To adjust the foreground white level of screen image increase contrast decrease contrast BRIGHTNESS To adjust the luminance of the video increase brightness decrease brightness ECO MODE Allows the user to change the ECO mode Contrast and Brightness adjustment will be disa...

Page 14: ... on the contents displayed It contains 5 user selectable presets STANDARD is for general windows environment and monitor default setting GAME optimized for PC game environment CINEMA optimized for movie and video environment SCENERY optimized for displaying outdoor scenery images TEXT optimized for text editing and viewing in a word processing environment BLUE LIGHT REDUCER To decrease the blue li...

Page 15: ...de from FULL SCREEN or ASPECT RATIO SETUP MENU To set up Language Select OSD Position OSD Time Out and OSD Background LANGUAGE SELECT To allow users to choose from available languages OSD POSITION Press or button to select between horizontal and vertical OSD Position adjustment HORIZONTAL POSITION To horizontally adjust the OSD position move OSD to the right move OSD to the left VERTICAL POSITION ...

Page 16: ...er to exceed these maximum refresh rates Doing so may result in permanent damage to your Touch LED LCD Monitor 14 STANDARD RESOLUTION VGA 720 x 400 70Hz VGA 640 x 480 60Hz MAC 640 x 480 67Hz VESA 640 x 480 72Hz VESA 640 x 480 75Hz VESA 800 x 600 56Hz VESA 800 x 600 60Hz VESA 800 x 600 72Hz VESA 800 x 600 75Hz MAC MAC 832 x 624 75Hz VESA 1024 x 768 60Hz VESA 1024 x 768 70Hz VESA 1024 x 768 75Hz 115...

Page 17: ...y 60Hz max Pixel Dimension 0 24825 x 0 24825 mm Display Color 16 7M Tilt 15 to 70 Active Display Area 476 64 mm x 268 11 mm Temperature Operating 0 C 40 C Storage 20 C 60 C Compliance FCC B CE UL cUL Power Input Voltage AC100 240 V Amplifier spec 2W x 2 Touch Technology Multi Touch Projective Capacitive USB interface Accuracy Comply to WIN10 logo requirement Glass Coating Non coating OS Microsoft ...

Page 18: ...ower OFF then disconnect the cables from the Touch LED LCD Monitor before performing the procedure below 1 Lay the Touch LED LCD Monitor face down on a soft surface 2 Follow instructions included with the Wall Mount kit NOTE 100mmx100mm VESA hole pattern n 4 M4 pitch 0 7 mm 16 ...

Page 19: ...video cable supplied with the Touch LED LCD Monitor is tightly secured to the video output port on back of the computer If not tightly secure it Adjust brightness Wrong or abnormal colors If any colors red green blue are missing check the video cable to make sure it is securely connected Loose or broken pins in the cable connector could cause an improper connection Connect the Touch LED LCD Monito...

Page 20: ...t Planar at http www planar com support for operations manuals warranty information and access to Planar s Technical Library for online trouble shooting To speak with Planar Customer Support please have your model and serial number available and dial Planar Support Tel 1 866 PLANAR1 866 752 6271 or 1 503 748 5799 outside the US Hours 24 hours a day 7 days a week Toll or long distance charges may a...

Page 21: ...perty of their respective owners Technical information in this document is subject to change without notice Customer Service 24x7 Online Technical Support http www planar com support Planar Systems Inc 1195 NE Compton Drive Hillsboro OR 97006 Tel 1 866 PLANAR1 866 752 6271 or 1 503 748 5799 outside the United States Hours 24 hours a day 7 days a week 90101 24450 ...

Reviews: