background image

Unpacking and Checking Accessories

Clarity Matrix Video Wall Quick Start Guide

21

LCD Module Box

The following items are included in the LCD module box.

Part

Description

Picture

LCD module

1 or 2 per box 
depending on your 
order.

LCD mount

1 or 2 per box 
depending on your 
order.

Summary of Contents for Clarity MX46HD

Page 1: ...Clarity MX46HD and MX55 LCD Video Wall Quick Start Guide ...

Page 2: ......

Page 3: ...e liable for errors or omissions contained herein or for incidental or consequential damages in connection with the furnishing performance or use of this material Warranty and Service Plans Planar warranty and service plans will help you maximize your investment by providing great support display uptime and performance optimization From post sale technical support to a full suite of depot services...

Page 4: ...iv Clarity Matrix Video Wall Installation Guide ...

Page 5: ...cription 8 Matrix Video Wall 9 LCD Modules 9 LCD Mounting Structure 10 Off Board Equipment and Components 12 Quad Controller Module 12 Power Supply Module 13 Installing a Clarity Matrix LCD Video Wall 15 Before You Begin 15 Tools Equipment List 15 Other Things You May Need 15 Plan Your Installation 16 Prepare Your Installation Location 18 Installation Checklist 19 Unpacking and Checking Accessorie...

Page 6: ...Table of Contents ii Clarity Matrix Video Wall Quick Start Guide ...

Page 7: ... Each LCD module is an HDTV format with a 1920 x 1080 resolution Each LCD module has a 3 6 installed depth and has an aspect ratio of 1 77 16 9 It accepts a wide range of input DVI signals from VGA to UXGA The EasyAxisTM mounting system supports landscape and portrait orientation free standing wall deployment and flying wall applications Because the panels are self supporting Clarity Matrix can su...

Page 8: ...aner or LCD wipes 7 Do not install near any heat sources such as radiators heat registers stoves or other apparatus including amplifiers that produce heat 8 Do not defeat the safety purpose of the polarized or grounding type plug A polarized plug has two blades with one wider than the other A grounding type plug has two blades and a third grounding prong The wide blade or the third prong is provid...

Page 9: ...and cables Each MX46HD weighs about 39lbs 17 7kg and each MX55 LCD module weighs about 50lbs 23kg With protective optically bonded glass the MX46HD LCD module weighs about 49lbs 22 2kg and the MX55 LCD module weighs about 65lbs 29kg 16 Slight pressure on the LCD will cause distortion of the image Heavier pressure will cause permanent damage Clarity Matrix Video Walls should be mounted where viewer...

Page 10: ...s entstehen können zu vermeiden und entsorgen Sie dieses Produkt ordnungsgemäß Recycling hilft natürliche Rohstoffe einzusparen Dieses Symbol ist nur innerhalb der europäischen Gemeinschaft gültig Wenn Sie dieses Produkt entsorgen möchten wenden Sie sich bitte an Ihre örtliche Behörde und fragen Sie nach der ordnungsgemäßen Entsorgungsmethode Nederlands Verwijderen van oude elektrische en elektron...

Page 11: ...ses a negative color video image color inverted and brightness inverted version of the previous image to be retained when a new image is displayed This behavior is true for any LCD device from any LCD manufacturer TIR is not covered under warranty See standard warranty terms and conditions for details Here are some guidelines to help you avoid TIR Use the LCD module to show a screen saver moving i...

Page 12: ...ure for the LCD module cannot be above 35º C nor below the minimum ambient operating temperature of 0º C For the Quad controller module and power supply module the maximum ambient operating temperature cannot be above 45º C nor below the minimum ambient operating temperature of 0º C If one of these conditions exists it is up to the installer to ensure that module placement is changed thermal shiel...

Page 13: ...troller modules Using external modules produces less heat and allows for reduced and or easier service of the LCD module itself Some basic points to keep in mind Each Quad controller module controls up to four LCDs Modules are linked together by RS485 cables The first processor in the A Quad controller module A1 is the master processor The master processor takes in the input from the IR remote sen...

Page 14: ...instructions carefully Keep in mind the following general installation guidelines Prior to installation make sure you know where all of the mounting points are located Follow all safety precautions outlined in this manual Verify the parts received with the list shown in this manual B3 B4 B2 A4 A2 A1 A3 B1 Quad Controller Dual Link In Digital 1 Digital 4 Digital 3 Digital 2 Loop Out Quad Controller...

Page 15: ...ting The LCD module incorporates a simple interface board designed to distribute off board power video and control signals to the LCD module keeping depth weight heat and points of potential failure to a minimum The LCD blade style module incorporates a bracket that is perfectly paired with the EasyAxis mount The LCD module includes EasyAxis adjustment cams that facilitate precise six axis alignme...

Page 16: ...in wall service EasyAxis is designed to be attached to a wall used with optional free standing bases or secured overhead in a flying configuration When assembled horizontal and vertical connection brackets ensure that each mount is perfectly spaced from its neighbor in the video wall The mount system also incorporates a service mode to accommodate front and rear in wall repair of any LCD module in...

Page 17: ...rawings of the MX55 and the MX46HD EasyAxis mounts are designed to facilitate the thinnest profile LCD video wall The combination of the mount plus the Matrix LCD module s blade design results in video walls that measure 3 6 inches in depth screen to wall 120 1 3 120 1 3 63 287 1 6 9 57 10 17 5 76 86 0 87721 6 5 6 25 217 10 17 5 76 86 0 87721 6 5 6 67 1 25 6 59 02 17 5 1 127 ...

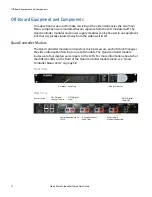
Page 18: ...l itself Quad Controller Module The Quad controller module contains four microprocessors each of which manages the video information flowing to one LCD module The Quad controller module routes up to four digital source inputs to the LCDs For more information about what the different LEDs on the front of the Quad controller module mean see Quad Controller Status LEDs on page 58 Front View Rear View...

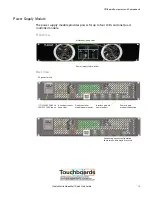
Page 19: ... LCDs and one Quad controller module Front View Rear View Air intakes keep clear Power supply test switches Interface module power outlets AC power switch 115 230 VAC 50 60Hz 20A IEC C20 AC input Air exhaust vents keep clear Quad controller module power outlet Power supply monitor connection Depending on your configuration these two outlets may be covered ...

Page 20: ...Off Board Equipment and Components 14 Clarity Matrix Video Wall Quick Start Guide ...

Page 21: ...nstalling your Clarity Matrix Video Wall s Tools Equipment List Depending on your installation you may need one or more of the following items Drill and bits Nut drivers Pencil 3mm hex key M6 1 4 20 wrench String string level Digital laser level Ladders lift Back brace Stud finder if hanging LCD modules on a wall Quad controller module address adjustment tool included in your accessory kit Other T...

Page 22: ...nd cooling requirements Although most of the heating elements are not in the LCD itself it is still important that you have proper cooling and ventilation for the entire Clarity Matrix Video Wall and its off board components Power consumption of each individual component and the power consumption of the overall wall To calculate the overall power consumption of the wall add the wattage of the powe...

Page 23: ...Note You can use cable extenders to a maximum of 500 feet using four extender boxes When using cable extenders all increments should be 100 feet or less SupportedMatrix Cable Lengths Confidential 201 0 Planar System s Inc Slide 10 Matrix Video Extender LX MX46 Supported Lengths Cable Sets M atrix Video Extender Every 100 ft Matrix Quad Controller Module Bulk Cables and Connectors Available to Supp...

Page 24: ...ld have prepared the area where you will install the Clarity Matrix Video Wall The mounting structures must be fully designed to accommodate the installation of the LCD modules You must also make sure there is enough room for the off board components and any equipment racks that might house these components ...

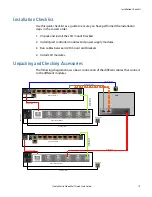
Page 25: ...dules 3 Run cables between LCD mount and brackets 4 Install LCD modules Unpacking and Checking Accessories The following diagram shows a basic connection of the different cables that connect to the different modules Wall outlet Power supply monitor cable Power supply monitor cable Wall outlet Quad Controller A Quad Controller B Power Supply Module Power Supply Module Video Cat 6 cable Data Cat 6 c...

Page 26: ...lled Part Description Per Quad Power Supply Picture Quad controller module Routes up to four digital source images to the LCDs 1 Power supply module Supplies power for up to four LCDs and one Quad controller module 1 Power cable 4ft Connects the power supply module to the Quad controller module 1 RJ45 to RJ45patch cable 1m One cable connects the Quad controller module to the power supply module Th...

Page 27: ...arity Matrix Video Wall Quick Start Guide 21 LCD Module Box The following items are included in the LCD module box Part Description Picture LCD module 1 or 2 per box depending on your order LCD mount 1 or 2 per box depending on your order ...

Page 28: ...ture Vertical bracket Secures the LCD mount Depends on configuration requirements Horizontal bracket landscape Secures the landscape LCD mount Depends on configuration requirements Horizontal bracket portrait Secures the portrait LCD mount Depends on configuration requirements AC power cable 3m Depending on your order the cable will be for use in North America or Europe 1 per power supply module F...

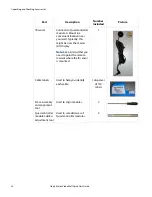
Page 29: ... larger accessory box Part Description Number Included Picture Gloves Used to handle LCDs 2 pairs Remote control Used to control your on screen menus 2 Remote control stand Used to hold your remote control 2 Installation manual Provides detailed setup and configuration information 1 ON PICTURE WALL SOURCE BALANCE MISC MONITOR MENU PREV ENTER OFF SAVE Clarity Matrix TOP ...

Page 30: ...ht be near the master A1 display Note Keep in mind that you need to point the remote towards where the IR sensor is mounted 1 Cable labels Used to help you identify each cable 1 dispenser of 150 labels 3mm assembly and alignment tool Used to align modules 2 Quad controller moduleaddress adjustment tool Used to set addresses of Quad controller modules 2 Part Description Number Included Picture ...

Page 31: ...e Cat 6 STP video and data cables Length varies per wall depending on configuration requirements and your sales order Power cable 20ft 100ft Connects the power supply module to the LCD Length varies per wall depending on configuration requirements and your sales order IR sensor extender cable 3m Used to extend from the wall to the Quad controller module Matrix Video Extender Box The video extender...

Page 32: ...Unpacking and Checking Accessories 26 Clarity Matrix Video Wall Quick Start Guide ...

Page 33: ...uired by this Directive is maintained at the corporate headquarters of Planar Systems Inc 1195 NW Compton Drive Beaverton OR 97006 Note This equipment has been tested and found to comply with the limits for a Class A digital device pursuant to part 15 of the FCC Rules These limits are designed to provide reasonable protection against harmful interference when the equipment is operated in a commerc...

Page 34: ...28 Clarity Matrix Video Wall Quick Start Guide ...

Page 35: ...AC power 22 labels for identifying 24 power 20 power supply monitor 20 certifications 27 Clarity Matrix Video Wall 1 system architecture 7 cleaning the LCD screen 15 conformity information 27 cooling requirements 16 customer supplied accessories 25 D disposal information 4 E EasyAxis 1 21 description of mounts 8 mounting structure 9 10 equipment list 15 rack 7 european union disposal information 4...

Page 36: ... monitor cable 20 preparing your installation location 18 Q Quad controller module 7 12 20 address adjustment tool 24 R recommended usage 5 regulatory information 27 remote control 23 S safety information 2 instructions 2 service plans iii space requirements for installation 16 system architecture 7 T temperature requirements for normal use 6 temporary image retention avoiding 5 definition 5 therm...

Reviews: