


Before You Begin
16
Clarity Matrix Video Wall Quick Start Guide
Plan Your Installation
You should have a detailed plan of how the Clarity Matrix Video Wall is to be
configured. The plan should include calculations for the following:
• Floor/wall load. Make sure the floor/wall is strong enough to support the
weight of the whole Matrix system.
• To determine the total power consumption, you will need to calculate the size
of the wall first.
• The minimum space above the top LCD row for installation and servicing
clearance is 5”. For passive cooling, it is recommended that a minimum of 8-10”
of top clearance is provided. This can be reduced if the LCD array is actively
cooled or open in the back and may need to be increased for very high walls.
• Access to both sides of the Quad controller modules and the power supply
modules.
• Ventilation and cooling requirements. Although most of the heating elements
are not in the LCD itself, it is still important that you have proper cooling and
ventilation for the entire Clarity Matrix Video Wall and its off-board
components.
• Power consumption of each individual component and the power
consumption of the overall wall.
To calculate the overall power consumption of the wall, add the wattage of the
power supply module, plus the Quad controller module, plus four LCDs per power
supply module. For example, using the table above for a 2 x 2 video wall, you would
have the following calculation:
• 60W (Power supply module) +
• 55W (Quad controller module) +
• 460W (115W x 4 MX46HD LCD modules) =
575W total power consumption
Note:
The above example assumes a typical installation with the backlight set at the default
setting.
Component
Typical
Maximum
BTU Calculation
Power supply module
60W
60W x 3.42 = 205.2 BTU
Quad controller module
55W
55W x 3.42 = 188.1 BTU
MX46HD LCD module
115W
150W
115W x 3.42 = 393.3 BTU
MX55 LCD module
156W
212W
156W x 3.42 = 533.5 BTU
Summary of Contents for Clarity MX46HD
Page 1: ...Clarity MX46HD and MX55 LCD Video Wall Quick Start Guide ...
Page 2: ......
Page 4: ...iv Clarity Matrix Video Wall Installation Guide ...
Page 6: ...Table of Contents ii Clarity Matrix Video Wall Quick Start Guide ...
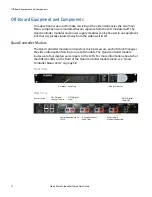
Page 20: ...Off Board Equipment and Components 14 Clarity Matrix Video Wall Quick Start Guide ...
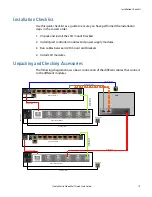
Page 32: ...Unpacking and Checking Accessories 26 Clarity Matrix Video Wall Quick Start Guide ...
Page 34: ...28 Clarity Matrix Video Wall Quick Start Guide ...