background image

37


3. 

If gas is set free in your home:


a) 

Open all windows.


b) 

Do not

 unplug the appliance and 

do not

 use the control panel 

or thermostat.


c) 

Do not

 touch the appliance until all the gas has gone.


d) 

Otherwise sparks can be generated which will ignite the gas.


4. 

Keep  all  components  of  the  appliance  away  from  fire  and  other 
sources  of  ignition  when  you  dispose  of  or  decommission  the 
appliance.


5. 

EXPLOSION  HAZARD!

  Do  not  store  any  explosive  materials  or 

sprays,  which  contain  flammable  propellants,  in  your  appliance. 
Explosive mixtures can explode there.


6. While unpacking, the packaging materials (polythene bags, 

polystyrene pieces, etc.) should be kept away from children. 
CHOKING HAZARD. 

7. Do not connect the appliance to the electric supply unless all 

packaging and transit protectors have been removed. 

8. 

Operate the appliance with 220~240V/50Hz/AC only. All connections 
and energy-leading components must be replaced by an authorized 
professional. 


9. Do not use a socket board or a multi socket when connecting the 

appliance to the mains. 

10. A dedicated and properly grounded socket meeting the data of the 

plug is required to minimize any kind of hazard. The appliance must 
be grounded properly. 

11. Check that the power cord is not placed under the appliance or 

damaged when moving the appliance. 

12. The technical data of your energy supplier must meet the data on 

the model plate of the appliance. 

13. 

Your  domestic  circuit  must  be  equipped  with  an  automatic  circuit 

breaker.


14. Do  not  modify  the  appliance. 
15. Turn off the power before you install the appliance and before you 

connect it to the mains. RISK OF FATAL ELECTRIC SHOCK! 

16. Disconnect the appliance from the mains before you clean or 

maintain it. 

17. 

Do  not  use  any  electric  appliances  inside  the  food  storage 

compartments of your appliance unless they are recommended by 
the manufacturer of your refrigerator.


18. 

Do not put any heat-radiating appliances onto your appliance.


19. Do not install the appliance in a place where it may come in contact 

with water/rain; otherwise the insulation of the electrical system will 
be damaged. 

Summary of Contents for KS 120.4A+ EB

Page 1: ...STIC USE 28 06 2019 Bedienungsanleitung Instruction Manual Mode d emploi Gebruiksaanwijzing EINBAUKÜHLSCHRANK BUILT IN FRIDGE RÉFRIGÉRATEUR INTÉGRÉ INGEBOUWDE KOELKAST KS 120 4A EB Deutsch Seite 2 English Page 33 Français Page 63 Nederlands Pagina 93 ...

Page 2: ...sanleitung ebenfalls mit übergeben Inhalt 1 Sicherheitshinweise 4 1 1 Signalwörter 5 1 2 Sicherheitsanweisungen 5 2 Klimaklassen 9 3 Installation 9 3 1 Wahl des Standorts 9 3 2 Einbau 10 3 3 Wechsel des Türanschlags 15 4 Bedienung 16 4 1 Temperaturregelung 16 4 2 Betriebsparameter 17 4 3 Hilfreiche Tipps Energie sparen 17 4 3 1 Bedeutung der Kennzeichnung von Gefrierbereichen 18 4 3 2 Lagerung von...

Page 3: ...ial entsprechend den örtlichen Vorschriften Ihres Wohnorts Das von Ihnen gekaufte Gerät wurde möglicherweise inzwischen verbessert und weist somit vielleicht Unterschiede zur Bedienungsanleitung auf Dennoch sind die Funktionen und Betriebsbedingungen identisch sodass Sie die Bedienungsanleitung im vollen Umfang nutzen können Technische Änderungen bzw Druckfehler bleiben vorbehalten EG KONFORMITÄTS...

Page 4: ...twendig sind dürfen nur von einer qualifizierten Fachkraft Elektrotechniker in durchgeführt werden Das Gerät ist ausschließlich zur privaten Nutzung bestimmt Das Gerät ist ausschließlich zum Kühlen von Lebensmitteln in einem Privathaushalt bestimmt Das Gerät ist ausschließlich zum Betrieb innerhalb geschlossener Räume bestimmt Dieses Gerät darf nicht für gewerbliche Zwecke beim Camping und in öffe...

Page 5: ...dheit des Gerätebetreibers und oder kann das Gerät beschädigen 2 Schließen Sie das Gerät keinesfalls an die Stromversorgung an wenn das Gerät das Netzkabel oder der Netzstecker sichtbare Beschädigungen aufweisen 3 Versuchen Sie niemals selbst das Gerät zu reparieren Falls Ihr Gerät nicht ordnungsgemäß funktioniert kontaktieren Sie das Geschäft in dem Sie das Gerät erworben haben Lassen Sie nur Ori...

Page 6: ... Gas entflammen 4 Halten Sie alle Teile des Gerätes fern von Feuer und sonstigen Zündquellen wenn Sie das Gerät entsorgen oder außer Betrieb nehmen 5 EXPLOSIONSGEFAHR Lagern Sie keine explosiven Stoffe oder Sprühdosen mit brennbaren Treibmitteln in dem Gerät da ansonsten zündfähige Gemische zur Explosion gebracht werden können 6 Achten Sie beim Entpacken unbedingt darauf dass die Bestandteile der ...

Page 7: ...Geräte auf Ihr Gerät 18 Stellen Sie das Gerät nicht an einem Ort auf an dem es mit Wasser Regen in Kontakt kommt damit die Isolierungen der Elektrik keinen Schaden nehmen 19 Stellen Sie keinen Wasserkocher und keine Vasen auf das Gerät Die Isolierung der Elektrik Ihres Gerätes kann ansonsten durch verschüttetes oder überkochendes Wasser nachhaltig beschädigt werden 20 Benutzen Sie kein Dampfreinig...

Page 8: ... nicht über einen Winkel von 450 hinaus 3 Falls das Gerät in einer horizontalen Position transportiert wird kann Öl aus dem Kompressor in den Kühlkreislauf gelangen 4 Lassen Sie das Gerät für mindestens 4 6 Stunden aufrecht stehen bevor Sie es an die Stromversorgung anschließen damit das Öl in den Kompressor zurückfließen kann 5 Benutzen Sie niemals die Tür selbst zum Transport des Gerätes da Sie ...

Page 9: ...PERATUR SN 100 320 C z B ungeheizter Keller N 160 320 C Wohntemperaturbereich ST 160 380 C Wohntemperaturbereich T 160 430 C Wohntemperaturbereich 3 Installation 3 1 Wahl des Standorts 1 Packen Sie das Gerät vorsichtig aus Beachten Sie unbedingt die Hinweise zur Entsorgung des Gerätes im Kapitel ENTSORGUNG 2 Das Zubehör Ihres Gerätes ist möglicherweise gegen Beschädigungen durch den Transport gesi...

Page 10: ...rechend der Art Ihres Befestigungszubehörs entweder nach Möglichkeit A oder B vor Die Abmessungen ihres Gerätes finden Sie im Kapitel TECHNISCHE DATEN WARNUNG Schalten Sie das Gerät vor dem Einbau aus und ziehen Sie den Netzstecker aus der Steckdose STROMSCHLAGGEFAHR VORSICHT Führen Sie den Einbau mit mindestens zwei Personen durch weil Sie ansonsten das Gerät beschädigen oder der Person die an de...

Page 11: ...G ZUM ÖFFNEN BZW SCHLIEßEN DER TÜR ZU MONTIEREN GEHEN SIE BITTE SCHRITTWEISE WIE FOLGT VOR 1 Befestigen Sie die zwei kleinen Scharniere mit den im Lieferumfang enthaltenen Schrauben Je nach Türanschlag entscheiden Sie sich bitte für eine Links bzw Rechtsmontage 2 Montieren Sie nun das lange Scharnier an der Innenseite der Möbeltüre Nehmen Sie wie in der folgenden Zeichnung aufgeführt das richtige ...

Page 12: ... Außenseite der Möbeltüre aufweist Fixieren Sie nun das Scharnier mit den beigefügten Schrauben 2 cm Abstand Schwarzer Balken stellt 2 cm Abstand dar Sie können das lange Scharnier am besten anbringen und ausrichten sowie mit dem kurzen Scharnier verbinden wenn Sie beide Türen weit geöffnet haben EINBAU B 1 Verpackungsbeutel ...

Page 13: ...13 1 Scharnierteil an Kühlschranktür 2 Scharnierteil an Schranktür ...

Page 14: ...14 Abmessungen A B 1 Luftaustritt 200 cm2 2 Lufteintritt im Sockel 200 cm2 ...

Page 15: ...te obere Scharnier 2 Ziehen Sie die Tür nun nach oben bis diese aus dem unteren Scharnier ausgehebelt ist Stellen Sie die Tür behutsam und sicher ab 3 Lösen und entfernen Sie nun die Schrauben 3 4 von dem unteren Scharnier und entfernen Sie es ebenfalls vom Gerät 4 Montieren Sie nun das ehemals obere Scharnier an der unteren Position und befestigen Sie es wieder mit den 2 Montageschrauben und führ...

Page 16: ...3 auf 2 oder falls gewünscht noch tiefer 3 Bei sehr hohen sommerlichen Temperaturen verstellen Sie den Thermostat Schalter von Stufe 3 auf 4 oder bei Bedarf höher um die Kühltemperatur weiter abzusenken 4 Sollte sich bei einer hohen Thermostat Einstellung Reif auf der Rückseite bilden so ist es empfehlenswert die Einstellung auf eine niedrigere Position zurück zu stellen 5 Die Einstellung 0 OFF AU...

Page 17: ...h gehalten werden Lassen Sie es dazu vorher auf Zimmertemperatur abkühlen Verwenden Sie zum Verpacken farblose geruchslose luftundurchlässige und widerstandsfähige Materialien Andere Lebensmittel wie Fleisch Fisch usw neigen dazu trocken zu werden und Gerüche frei zusetzen Um dies zu verhindern können sie diese Lebensmittel in Aluminiumfolie einwickeln in geeignete Frischhaltebeutel geben oder luf...

Page 18: ...hen 2 Sterne und 3 Sterne Gefrierbereiche eignen sich zur Lagerung von Tiefkühlkost vorgefroren und Eis oder zur Herstellung von Eis und Eiswürfeln 1 2 und 3 Sterne Gefrierbereiche eignen sich nicht zum Einfrieren frischer Lebensmittel BEREICHE STERNE ZIELSPEICHER TEMPERATUR GEEIGNETE LEBENSMITTEL Tiefkühlbereich 18 0 C Geeignet für Meeresfrüchte Fisch Garnelen Schalentiere Süßwasser und Fleischpr...

Page 19: ...dukte Schwein Rind Huhn etc und verarbeitete Lebensmittel die innerhalb desselben Tages oder höchstens innerhalb der nächsten 3 Tage nach Einlagerung verzehrt oder verarbeitet werden Nicht geeignet zum Einfrieren oder Tiefkühlen von Lebensmitteln oder zum Lagern von gefrorenen Lebensmitteln WARNUNG Essen Sie keine Lebensmittel die noch gefroren sind und geben Sie Kindern kein Eis direkt aus dem Ge...

Page 20: ... frisch und es wird verhindert dass die Lebensmittel austrocknen sich verfärben oder den Geschmack verlieren Außerdem wird eine Geruchsübertragung verhindert Gemüse und Obst müssen bei der Lagerung nicht verpackt werden wenn sie in der Gemüseschublade des Kühlraums aufbewahrt werden Stellen Sie sicher dass stark riechende Lebensmittel bei der Lagerung eingewickelt oder abgedeckt sind und von Nahru...

Page 21: ...m Tag des Kaufs verwendet werden Bis zu ihrer endgültigen Verwendung sollten sie im Kühlbereich auf einem Teller aufbewahrt werden der locker mit Plastikfolie Wachspapier oder Folie bedeckt ist Wenn Sie Fisch oder Meeresfrüchte über Nacht oder länger lagern möchten achten Sie besonders darauf sehr frischen Fisch zu kaufen Ganze Fische sollten mit kaltem Wasser gespült werden um lose Schuppen und S...

Page 22: ...Tiefkühlkost Eiswürfel herstellen Lebensmittel einfrieren HINWEIS Stellen Sie sicher dass die Tür des Gefrierfachs ordnungsgemäß geschlossen wurde TIEFKÜHLKOST KAUFEN Die Verpackung darf nicht beschädigt sein Achten Sie auf das Mindesthaltbarkeitsdatum oder das zu verwenden bis Datum Tiefkühlkost möglichst in einem isolierten Beutel transportieren und schnell in das Gefrierfach legen TIEFKÜHLKOST ...

Page 23: ...UM EINFRIEREN NICHT GEEIGNET Gemüsesorten die normalerweise roh verzehrt werden z B Salat oder Radieschen Eier mit Schale Trauben ganze Äpfel Birnen und Pfirsiche Hartgekochte Eier Joghurt Milch saure Sahne und Mayonnaise TIEFKÜHLKOST VERPACKEN Um zu verhindern dass Lebensmittel ihren Geschmack verlieren oder austrocknen verpacken Sie sie in eine luftdichte Verpackung 1 Lebensmittel in eine Verpac...

Page 24: ...inder und Lammkoteletts Geflügelstücke 4 Monate Butter Gemüse blanchiert Eier und Eigelb gekochte Flusskrebse Hackfleisch roh Schweinefleisch roh 6 Monate Obst trocken oder in Sirup Eiweiß Rindfleisch roh ganzes Huhn Lammfleisch roh Obstkuchen 12 Monate WICHTIGE HINWEISE Wenn Sie frische Lebensmittel mit einem Mindesthaltbarkeitsdatum oder einem zu verwenden bis Datum einfrieren müssen Sie sie ein...

Page 25: ...es Geschirrspülmittel verwenden 2 Verwenden Sie niemals Scheuermittel stark parfümierte bleichende oder alkoholhaltige Reinigungsprodukte Wachspolituren Lösungsmittel Verwenden Sie keine organischen Reinigungsmittel 3 und keine ätherischen Öle AUßEN 1 Reinigen Sie das Geräteäußere mit warmem Wasser Anschließend sorgfältig abtrocknen INNEN 1 Reinigen Sie den Geräteinnenraum mit lauwarmem Wasser und...

Page 26: ...Zeitlang offen bleiben damit das Gerät durchlüftet AUTOMATISCHES ABTAUEN KÜHLBEREICH 1 Das Abtauen des Kühlbereichs erfolgt automatisch Das dadurch entstehende Wasser fließt in einen Behälter der sich an der Rückseite des Gerätes befindet 2 Falls die Abtauautomatik den Anforderungen nicht genügen sollte wie z B bei hohen Umgebungstemperaturen und Luftfeuchtegraden nehmen Sie den oben beschriebenen...

Page 27: ...LÄUFT ZU LANGE Gerät war kürzlich ausgeschaltet Zu viele oder zu heiße Lebensmittel im Gerät Türen zu häufig zu lange geöffnet Das Gerät benötigt einige Zeit zum Erreichen der Kühltemperatur Heiße Lebensmittel entfernen Türen selten kurz öffnen INEFFIZIENTE KÜHLLEISTUNG Tür wurde zu häufig geöffnet Tür ist nicht richtig geschlossen Eisablagerungen im Gerät Ungenügende Abstände an der Rückwand und ...

Page 28: ...kte der Liste überprüft haben das Problem aber nicht behoben werden konnte kontaktieren Sie den Kundendienst DIE FOLGENDEN BETRIEBSVORGÄNGE SIND NORMAL UND KEIN ANZEICHEN EINER FEHLFUNKTION Die Kühlflüssigkeit erzeugt ein Geräusch ähnlich fließenden Wassers Gelegentlich sind Geräusche zu hören die durch den Einspritzvorgang in das Kühlsystem verursacht werden Es ist normal dass die Seitenwände des...

Page 29: ...URCHSCHNITTLICHEN URLAUB 14 21 TAGE 1 Verfahren Sie entweder wie im Abschnitt oben oder 2 lassen Sie das Gerät in Betrieb und a entfernen Sie alle verderblichen Lebensmittel aus dem Kühlbereich b reinigen Sie den Kühlbereich c lagern Sie alle dafür geeigneten Lebensmittel im Gefrierbereich WENN SIE DAS GERÄT BEWEGEN WOLLEN 1 Sichern Sie alle herausnehmbaren Teile und den Inhalt des Gerätes Verpack...

Page 30: ...Störung 10 00 h Geräuschemmission 41 dB A Regelbarer Thermostat ja Kompressor 1 Kühlmittel R600a Wechselbarer Türanschlag ja Schleppscharniere ja Abtauverfahren Kühlen Gefrieren automatisch manuell Gefrierfachklappen 1 Glasablagen Türablagen Flaschenfach 1 2 1 Gemüseschublade 1 Abmessungen Gerät H B T in cm 88 00 54 00 54 00 Abmessungen Verpackung H B T in cm 94 00 57 00 56 00 Gewicht netto brutto...

Page 31: ...n und danach das Stromanschlusskabel am Gerät abschneiden und direkt mit dem Netzstecker entfernen und entsorgen Demontieren Sie immer die komplette Tür damit sich keine Kinder einsperren und in Lebensgefahr geraten können 5 Entsorgen Sie Papier und Kartonagen in den dafür vorgesehenen Behältern 6 Entsorgen Sie Kunststoffe in den dafür vorgesehenen Behältern 7 Falls es in Ihrem Wohnumfeld keine ge...

Page 32: ...Beschaffenheit die auf den Gebrauchswert des Produkts keinen Einfluss haben 3 Schäden infolge Betriebs und Bedienungsfehler 4 Schäden durch aggressive Umgebungseinflüsse Chemikalien Reinigungsmittel 5 Schäden am Produkt die durch nicht fachgerechte Installation oder Transport verursacht wurden 6 Schäden infolge nicht haushaltsüblicher Nutzung 7 Schäden die außerhalb des Gerätes durch ein PKM Produ...

Page 33: ...fety information 35 1 1 Signal words 36 1 2 Safety instructions 36 2 Climatic classes 39 3 Installation guide 40 3 1 Installation site 40 3 2 Installation 40 3 3 Changing of the hinge position 45 4 Operation 46 4 1 Temperature setting 46 4 2 Operation parameters 47 4 3 Helpful hints energy saving 47 4 3 1 Meaning of the labelling of freezers 48 4 3 2 Storage of food 50 5 Cleaning and maintenance 5...

Page 34: ...ase dispose of the packing with respect to your current local and municipal regulations The appliance you have purchased may be an enhanced version of the unit this manual was printed for Nevertheless the functions and operating conditions are identical This manual is therefore still valid Technical modifications as well as misprints shall remain reserved EU DECLARATION OF CONFORMITY The products ...

Page 35: ...ed professional The appliance is intended for private use only as well as to be used 1 in staff kitchen areas of shops offices and other working environments 2 by clients in hotels motels B B and other residential type environments 3 for catering and similar non retail applications The appliance is intended for cooling food only The appliance is intended for indoor use only The appliance is not in...

Page 36: ...e properly please contact the shop you purchased the appliance at Original spare parts should be used only 4 When the power cord is damaged it must be replaced by the manufacturer or an authorized aftersales service or a qualified professional only 5 Never pull the power supply cable to unplug the appliance Always use the power plug itself to unplug the appliance RISK OF ELECTRIC SHOCK 6 Never tou...

Page 37: ... 9 Do not use a socket board or a multi socket when connecting the appliance to the mains 10 A dedicated and properly grounded socket meeting the data of the plug is required to minimize any kind of hazard The appliance must be grounded properly 11 Check that the power cord is not placed under the appliance or damaged when moving the appliance 12 The technical data of your energy supplier must mee...

Page 38: ...into the appliance because their containers could explode 2 The condenser and the compressor located at the rear of the appliance can reach high temperatures during ordinary operation Carry out the installation according to this manual An insufficient ventilation of the appliance will impair its operation and will damage the appliance Do not cover or block the ventilation slats at any time 3 Do no...

Page 39: ...t in must be completely open unblocked and free of any kind of dirt 12 The rating plate must not be removed or made illegible otherwise all terms of the warranty become invalid SAVE THESE INSTRUCTIONS The manufacturer and distributor are not responsible for any damage or injury in the event of failure to comply with these instructions 2 Climatic classes Look at chap TECHNICAL DATA for information ...

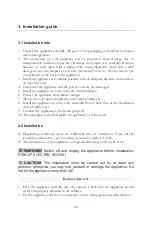
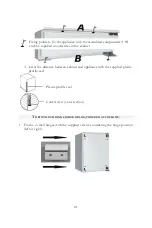
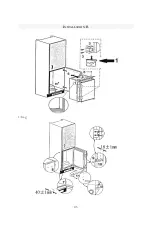
Page 40: ...t open completely and without hindrance 8 Install the appliance on a level dry and solid floor Check the correct installation with a bubble level 9 Connect the appliance to the mains properly 10 The nameplate is situated inside the appliance or at the back 3 2 Installation Depending on delivery there are 2 different ways of installation Carry out the installation relevant to your mounting accessor...

Page 41: ...s in the cabinet 3 Level the distance between cabinet and appliance with the supplied plastic profile seal Plastic profile seal Lateral view cross section TO FIX THE SLIDING FRIDGE HINGE PROCEED AS FOLLOWS 1 Fix the 2 small hinges with the supplied screws considering the hinge position left or right ...

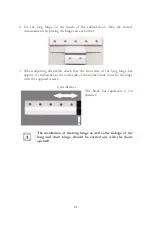
Page 42: ...afterwards check that the front side of the long hinge has approx 2 cm distance to the outer side of the cabinet door Now fix the hinge with the supplied screws 2 cm distance The black bar represents 2 cm distance The installation of the long hinge as well as the linkage of the long and short hinge should be carried out with the doors opened ...

Page 43: ...43 INSTALLATION B 1 bag ...

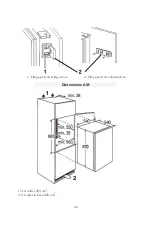
Page 44: ...44 1 Hinge part on fridge door 2 Hinge part on cabinet door Dimensions A B 1 Air outlet 200 cm2 2 Air inlet in base 200 cm2 ...

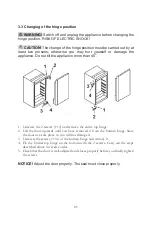
Page 45: ...50 1 Unscrew the 2 screws 1 2 and remove the entire top hinge 2 Lift the door upwards until you have removed it from the bottom hinge Store the door in a safe place so you will not damage it 3 Unscrew the screws 3 4 of the bottom hinge and remove it 4 Fix the former top hinge on the bottom with the 2 screws Carry out the steps described above in reverse order 5 Check that the door is well adjusted...

Page 46: ...et the thermostat from position 3 to position 2 or lower 3 If the ambient temperatures are high e g hot summer days set the thermostat to position 4 or higher to decrease the temperature inside the appliance 4 If you have set a lower colder setting some ice may occur on the back of the appliance In such a case set the thermostat to a higher warmer position 5 The setting 0 OFF switches off the comp...

Page 47: ...t cool down to room temperature before you put it into your appliance Store your food in colourless airtight and tasteless materials Some food like meat fish etc may become dry and release strong odours You can avoid these by wrapping them into aluminium foil or plastic wrap or putting them into an airtight bag or container Allow ample storage place for your food Do not overfill your appliance Wra...

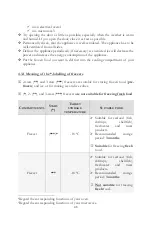
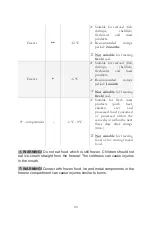
Page 48: ...appliance 4 3 1 Meaning of the labelling of freezers 2 stars and 3 stars freezers are suitable for storing frozen food pre frozen and ice or for making ice and ice cubes 2 and 3 stars freezers are not suitable for freezing fresh food COMPARTMENTS STARS TARGET STORAGE TEMPERATURE SUITABLE FOOD Freezer 18 0 C Suitable for seafood fish shrimps shellfish freshwater and meat products Recommended storag...

Page 49: ...od 0 compartment 6 0 C 0 0 C Suitable for fresh meat products pork beef chicken etc and processed food consumed or processed within the same day or within the next three days after storage max Not suitable for freezing food or for storing frozen food WARNING Do not eat food which is still frozen Children should not eat ice cream straight from the freezer The coldness can cause injuries in the mout...

Page 50: ... freshness of food and prevent it from dehydrating deteriorating in colour or losing taste It will also prevent odour transfer Vegetables and fruit need not be wrapped if they are stored in the crisper of the fridge compartment Make sure that strong smelling food is wrapped or covered in storage and kept away from foods such as butter milk and cream as they can be spoiled by strong odours Cool hot...

Page 51: ...o select very fresh fish Whole fish should be rinsed in cold water to remove loose scales and dirt and then patted dry with paper towels Place whole fish or fillets in a sealed plastic bag Keep shellfish chilled at all times Use within 1 2 days PRECOOKED FOOD AND LEFTOVERS These should be stored in suitable covered containers so that the food will not dry out Keep for 1 2 days only Reheat leftover...

Page 52: ...t 18 C or colder Avoid opening the freezer compartment door unnecessarily FREEZING OF FRESH FOOD Freeze fresh and undamaged food only To retain the best possible nutritional value flavour and colour vegetables should be blanched before freezing Aubergines peppers zucchini and asparagus do not require blanching NOTICE Keep food to be frozen away from food which is already frozen THE FOLLOWING FOOD ...

Page 53: ...e food in packaging 2 Remove air 3 Seal the wrapping 4 Label packaging with contents and dates of freezing SUITABLE PACKAGING Plastic film tubular film made of polyethylene aluminium foil These products are available from specialist outlets RECOMMENDED STORAGE TIMES OF FROZEN FOOD IN THE FREEZER COMPARTMENT These times vary depending on the type of food The food that you freeze can be preserved fr...

Page 54: ...or maintain it 2 Always keep the appliance clean so that unpleasant odours do not occur 3 Dust deposits on the condenser will increase the energy consumption Clean the condenser twice a year with a vacuum cleaner or a soft brush 4 Take off all rings and bracelets before cleaning or maintaining the appliance otherwise you will damage the surface of the appliance DETERGENT Do not use any harsh abras...

Page 55: ...s to remove the encrusted ice RISK OF ELECTRICAL SHOCK 1 Remove the content from the freezing compartment and put it into a cooling box 2 Switch off the appliance by turning the thermostat to position 0 AUS OFF and disconnect it from the mains 3 When the encrusted ice melts put some dry cloths into the freezer compartment to hold the water back 4 Remove the big pieces of ice first Afterwards remov...

Page 56: ...use Measure THE APPLIANCE DOES NOT WORK AT ALL The plug of the appliance is not connected to the socket The plug has become loose The socket is not supplied with energy The fuse is switched off The voltage is too low Check the corresponding socket by connecting it with another appliance Check the fuse box Compare the data on the model plate with the data of your energy supplier THE COMPRESSOR DOES...

Page 57: ...D THE SETTING Normal operating condition The compressor will start after a while UNUSUAL NOISE The appliance is not installed on a flat and level ground The appliance touches a wall or another object Frozen food is stored improperly Items have dropped behind the appliance Install the appliance properly Store food properly Remove the items If the appliance shows a malfunction not noted on the sched...

Page 58: ...e generated inside or outside the appliance by high humidity or very warm ambient temperatures CLICKING You will hear the compressor click if it is activated or deactivated HUM is caused by the compressor while running KNOCKING SNAPPING may be generated by sequential expansion and shrinkage of the components of the cooling system It is caused by variation of temperature before and after the compre...

Page 59: ...ompartment c freeze all food which is suitable to be frozen IF YOU WANT TO MOVE THE APPLIANCE 1 Secure all removable parts and the contents of the appliance Pack them separately if necessary 2 Transport the appliance in an upright position only All other positions can cause damage to the compressor 3 Do not damage the feet of the appliance DECOMMISSIONING ULTIMATE 1 Disconnect the appliance from t...

Page 60: ...le hinge position yes Sliding hinges yes Defrosting cooling compartment freezer automatically manually Freezer flaps 1 Glass shelves door trays bottle pocket 1 2 1 Crisper 1 Dimensions appliance H W D in cm 88 00 54 00 54 00 Dimensions packaging H W D in cm 94 00 57 00 56 00 Weight net gross in kg 29 00 31 00 Technical modifications reserved According to regulation EU No 1060 2010 On a scale from ...

Page 61: ...ower cord and the plug immediately Remove the door completely so children are not able to get into the appliance as this endangers their lives 5 Dispose of any paper and cardboard into the corresponding containers 6 Dispose of any plastics into the corresponding containers 7 If suitable containers are not available at your residential area dispose of these materials at a suitable municipal collect...

Page 62: ...eir authorized condition if they do not influence the utility value of the product 3 damage caused by handling errors or false operation 4 damage caused by aggressive environmental conditions chemicals detergents 5 damage caused by non professional installation and haulage 6 damage caused by non common household use 7 damages which have been caused outside the appliance by a PKM product unless a l...

Page 63: ...6 1 2 Instructions de sécurité 66 2 Catégories climatique 70 3 Installation 70 3 1 Choix du site 70 3 2 Montage 70 3 3 Changement de la butée de porte 75 4 Utilisation 76 4 1 Régulation de température 76 4 2 Paramètres de fonctionnement 77 4 3 Consignes aidantes économies d énergie 77 4 3 1 Signification des étoiles de marquage des zones de congélation 78 4 3 2 Stockage des aliments 80 5 Nettoyage...

Page 64: ...onsignes sur les déchets des services administratifs de votre mairie Il se peut que l appareil acheté de votre part puisse être amélioré entre temps et puisse avoir des différences dans la notice d utilisation cependant le mode ainsi que les conditions de fonctionnement sont identiques et vous pouvez utiliser l ensemble de la notice Sous réserve d erreurs d impression et de modifications technique...

Page 65: ... réfrigérateur Tous les travaux qui sont nécessaires pour l installation doivent être faits par du personnel qualifié Ce produit est destiné à un usage domestique Ce produit est destiné à réfrigérer des aliments Ce produit a été conçu pour une utilisation en intérieur et dans des zones fermées telles que les maisons Ce produit n est pas destiné à un usage commercial au camping et aux transports pu...

Page 66: ... utilisateur de l équipement en danger et ou risque d endommager l appareil 2 N installez pas l appareil à l alimentation si l appareil le cordon d alimentation ou la prise de courant montrent des dommages visibles 3 N essayez pas de réparer l appareil Consultez le magasin dans lequel vous avez acheté l appareil concernant tous problèmes relatifs au réfrigérateur Faites monter uniquement des pièce...

Page 67: ...ice éloignez toute flamme nue ou source d inflammation 5 RISQUE D EXPLOSION Ne conservez pas des substances explosives ou aérosols contenant des substances inflammables dans l appareil Risque d explosion avec des mélanges inflammables 6 Veillez à ce que les éléments de l emballage des sacs de polyéthylène des pièces de polystyrène ne se trouvent pas près des enfants RISQUE D ÉTOUFFEMENT 7 N instal...

Page 68: ...indre des pièces électriques et de provoquer un court circuit RISQUES D ÉLECTROCUTION 21 N utilisez pas d outils mécaniques ou autres objets pointus ou coupants pour racler le givre ou la glace Vous risqueriez d endommager l intérieur de l appareil RISQUES D ÉLECTROCUTION 22 L appareil n est pas un jouet éloignez des enfants 23 En cas de non utilisation de l appareil pendant une période temporaire...

Page 69: ...nché à l alimentation de min deux personnes 7 Souvenez vous les positions de toutes les pièces de l appareil quand vous les déballez lorsque vous emballez et transportez à nouveau votre produit 8 N utilisez pas l appareil avant vérifié si toutes les parties correspondantes se trouvent à la place prévue 9 N utilisez jamais le fond les tiroirs les portes etc de l appareil comme surface ou support 10...

Page 70: ...ent N utilisez pas des détergents agressifs pour enlever le reste de ces matériaux d emballage 2 Placez l appareil dans une pièce sèche et bien aérée 3 Protégez l appareil contre du rayonnement de soleil direct 4 Les portes doivent se faire ouvrir complètement et sans encombre 5 Placez l appareil sur une surface plane sèche et stable Contrôlez le avec un niveau à bulle d air 6 Branchez votre appar...

Page 71: ...areil dans la niche d intégration et vérifiez si l appareil se trouve correctement aligné dans la niche 2 Après fixez l appareil avec 4 vis à bois voir les points de fixation mentionnés dans le dessin figurant ci dessous Des points de fixation pour fixer l appareil avec les éléments A B déjà montés complètement et les vis à bois inclus pour la niche intégrée 3 L espace causé par le montage entre l...

Page 72: ... la porte côté intérieure Regardez le dessin suivant et prenez les mesures correctes et insérez les charnières 3 Ajustez la porte et veillez à ce que l extérieur de la charnière ait une distance d env 2 cm à l extérieur de la porte de meuble Fixez la charnière avec les vis fournies Distance de 2 cm La barre noire représente la distance de 2 cm La meilleure façon de fixer ajuster et raccorder la ch...

Page 73: ...73 MONTAGE B 1 Sachet d emballage ...

Page 74: ...74 1 charnière à la porte du réfrigérateur 2 charnière à la porte de meuble Dimensions A B 1 sortie d air 200 cm2 2 entrée d air au socle 200 cm2 ...

Page 75: ... toute la charnière supérieure 2 Tirez vers le haut la porte jusqu au relevage de la charnière inférieure Posez la porte en douceur 3 Desserrez et enlevez les deux vis 3 4 de la charnière inférieure et enlevez la également de l appareil 4 Montez la charnière autrefois supérieure à la position inférieure et fixez la de nouveau avec les 2 vis de montage Ensuite exécutez les procédures d installation...

Page 76: ...de thermostat de position 3 à position 2 ou si désiré encore plus bas 3 En cas des températures élevées estivales tournez le bouton de thermostat de position 3 à position 4 ou au besoin plus élevé pour baisser la température de refroidissement 4 Si se forme givre au verso en cas du réglage du thermostat élevé il est recommandé de tourner le bouton de thermostat sur une position plus basse 5 La fon...

Page 77: ... pourrait en conséquence ne plus fonctionner efficacement Les repas déjà cuits peuvent être gardés au frais dans l appareil Pour ce faire laissez les d abord refroidir jusqu à ce qu ils atteignent une température ambiante Pour emballer des aliments n utilisez que des matériaux incolores inodores étanche à l air et résistants Des aliments comme le poisson la viande etc ont tendance de devenir secs ...

Page 78: ...rigérateur pour la décongélation et utilisez ainsi l émission froideur 4 3 1 Signification des étoiles de marquage des zones de congélation Les zones de congélation à 2 étoiles et 3 étoiles conviennent à la conservation d aliments congelés pré congelés et de la glace ou à la fabrication de glace et de glaçons Les zones de congélation à 1 2 et 3 étoiles ne sont pas appropriées à la congélation d al...

Page 79: ...ns crevettes crustacés viandes et produits carnés Durée de conservation recommandée 1 mois Ne convient pas à la congélation d aliments frais Zone 0 6 0 C 0 0 C Convient aux produits carnés frais porc bœuf volaille etc et aliments préparés à consommer ou à transformer le même jour ou au plus tard dans les 3 jours suivant leur entreposage Ne convient pas à la congélation ou à la surgélation d alimen...

Page 80: ...iments très frais et de bonne qualité Assurez vous que les aliments sont bien emballés ou couverts avant de les stocker Leur emballage ou couverture permet de conserver la fraîcheur des aliments et d éviter qu ils se dessèchent se décolorent ou perdent leur saveur sans oublier qu une protection prévient aussi la transmission des odeurs Un emballage des légumes et fruits stockés dans le bac à légum...

Page 81: ... éventuelles intoxications alimentaires POISSONS ET FRUITS DE MER Utilisez les poissons et filets de poisson le jour de l achat Jusqu à leur utilisation finale placez les dans la zone de réfrigération sur une assiette recouverte de film étirable ou de papier sulfurisé Si vous voulez stocker le poisson ou des fruits de mer toute la nuit ou plus longtemps veillez à acheter des produits très frais Ri...

Page 82: ...laçons Congélation de produits alimentaires OBSERVATION Assurez vous que la porte de la zone de congélation est bien fermée ACHAT DE PRODUITS SURGELÉS L emballage ne doit pas être endommagé Vérifiez la date limite de conservation ou la date À consommer de préférence avant fin Transportez les produits surgelés de préférence dans un sac isotherm et placez les aussi rapidement que possible dans la zo...

Page 83: ...ANTS NE SONT PAS APPROPRIÉS À LA SURGÉLATION Les légumes normalement destinés à une consommation crue p ex les salades ou radis Les œufs avec la coquille Les raisins les pommes poires et pêches entières Les œufs durs le yogourt le lait la crème épaisse et la mayonnaise EMBALLAGE DES PRODUITS SURGELÉS Emballez les aliments hermétiquement afin d éviter qu ils perdent leur saveur ou se dessèchent 1 P...

Page 84: ... de bœuf et d agneau morceaux de volailles 4 mois Beurre légumes blanchis œufs et jaune d œuf écrevisses cuites viande hachée crue viande de porc crue 6 mois Fruits secs ou au sirop blanc d œuf viande de bœuf crue volailles entières viande d agneau crue pâtisseries aux fruits 12 mois OBSERVATIONS IMPORTANTES Si vous surgelez des aliments frais avec une date limite de conservation ou une date À con...

Page 85: ...as de produit à récurer N utilisez pas de détergent organique 9 N utilisez pas d huiles essentielles Ces instructions sont valables pour toutes les surfaces de votre appareil EXTÉRIEUR 1 Utilisez un chiffon humide et imprégné de détergent doux Utilisez un détergent adéquat pour les saletés tenaces 2 Rincez ensuite à l eau claire 3 Essuyez les surfaces nettoyées INTÉRIEUR 1 Nettoyez les accessoires...

Page 86: ... afin que l appareil puisse aérer DÉGIVRAGE AUTOMATIQUE COMPARTIMENT RÉFRIGÉRATEUR 1 Le compartiment réfrigérateur dégivre automatiquement L eau de dégivrage s écoule dans la voie d écoulement et se déverse dans le bac de récupération situé à l arrière de l appareil 2 Si le dégivrage automatique ne répond pas aux exigences par ex en cas de température ambiante et humidité de l air haute dégivrez m...

Page 87: ...EUR FONCTIONNE PENDANT DE LONGUES PÉRIODES L appareil était éteint récemment Trop de produits ou des produits trop chauds dans l appareil La porte reste ouverte trop longtemps fréquemment L appareil prend plus de temps pour atteindre la température réglée Éloignez des plats chauds Évitez d ouvrir la porte souvent RENDEMENT DE L APPAREIL PEU EFFICIENT La porte a été ouverte trop souvent La porte n ...

Page 88: ... sont pas bien posés Des objets sont tombés derrière l appareil Repositionnez l appareil Repositionnez les aliments Retirez les objets Si l appareil ne fonctionne toujours pas après avoir effectué toutes les vérifications mentionnées et vous ne pouvez pas vous remédier vous même à l aide des instructions mentionnées contactez le magasin dans lequel vous avez acheté le produit REMARQUES CONCERNANT ...

Page 89: ...PPAREIL Peut se développer lors d une humidité de l air haute des températures extérieures très chaudes CLIQUETIS Le compresseur s allume ou s éteint BOURDONNEMENTS Proviennent du moteur compresseur lorsqu il se met en marche BATTEMENTS CLAQUEMENTS Peuvent se développer par extension et tassement des parties du système de refroidissement par le compresseur avant et après la mise en marche du compr...

Page 90: ...e compartiment réfrigérateur c conservez tous les aliments appropriés dans le compartiment de congélation SI VOUS VOULEZ BOUGER L APPAREIL 1 Fixez toutes les pièces d équipement à enlever et le contenu de l appareil Emballez les séparément si nécessaire 2 Transportez l appareil en position débout Dans des autres positions vous risquez d endommager le compresseur 3 N endommagez pas les pieds DÉCLAS...

Page 91: ...rnières coulissantes 9 Dégivrage refroidissement congélation automatiquement manuellement Trappe du compartiment congélateur 1 Etagère en verre balconnets de porte balconnet pour bouteilles 1 2 1 Compartiment à légumes 1 Dimensions appareil H L P in cm 88 00 54 00 54 00 Dimensions emballage H L P en cm 94 00 57 00 56 00 Poids net brut en kg 29 00 31 00 Modifications techniques réservées Conforme a...

Page 92: ...lectrique Désassemblez toujours la porte complète afin que des enfants ne se puissent pas enfermer et ne se puissent pas mettre en danger de mort 5 Débarrassez vous des emballages sacs et autres produits dans le respect de l environnement 6 Débarrassez vous des produits en plastique dans le respect de l environnement 7 S il n y a pas des points de collecte des matériaux d emballage chez vous adres...

Page 93: ...nger Index 1 Veiligheidsinformatie 95 1 1 Signaalwoorden 96 1 2 Veiligheidsvoorschriften 96 2 Klimaatklassen 100 3 Installatie 100 3 1 Omgeving 100 3 2 Installatie 101 3 3 Het veranderen van het scharnier positie 105 4 Bediening 106 4 1 Temperatuurregeling 107 4 2 Bedieningsparameters 107 4 3 Handige tips energiebesparing 108 4 3 1 Betekenis van de labels van diepvriezers 108 4 3 2 Opslag van voed...

Page 94: ...nstemming met de geldende lokale en gemeentelijke regelgeving Het apparaat dat u heeft gekocht kan een verbeterde versie zijn van het toestel waarvoor deze handleiding werd gedrukt Niettemin zijn de functies en de bediening identiek Deze handleiding blijft dan ook nog steeds geldig Technische wijzigingen en drukfouten blijven onder voorbehoud EU VERKLARING VAN CONFORMITEIT De producten die worden ...

Page 95: ...l Alle aanpassingen aan het elektriciteitsnet om de installatie van het apparaat in staat te stellen moet worden uitgevoerd door een gekwalificeerde professional Het apparaat is uitsluitend bestemd voor prive gebruik Het apparaat is bedoeld voor het koelen en invriezen van levensmiddelen alleen in een particulier huishouden Het apparaat is alleen bedoeld voor gebruik binnenshuis Het apparaat is ni...

Page 96: ... aan het apparaat veroorzaken 2 Sluit het apparaat niet aan indien het stopcontact het apparaat zelf de netsnoer of de stekker zichtbaar beschadigd zijn 3 Probeer het apparaat nooit zelf te repareren Als het apparaat niet goed werkt neem dan contact op met de winkel waar u het apparaat hebt gekocht Alleen originele onderdelen mogen worden gebruikt 4 Wanneer het netsnoer beschadigd is dient het all...

Page 97: ...oien ontmantelen 5 EXPLOSIEGEVAAR Geen explosieve stoffen of spuitbussen die ontvlambare drijfgassen bevatten in het apparaat opslaan Explosief mengsel kan daar exploderen 6 Tijdens het uitpakken moet het verpakkingsmateriaal plastic zakken stukken piepschuim etc uit de buurt van kinderen worden gehouden VERSTIKKINGSGEVAAR 7 Sluit het apparaat niet aan op de elektrische voeding tenzij alle verpakk...

Page 98: ...t schoonmaken of ontdooien van het apparaat De stoom kan in contact komen met de elektrische onderdelen en een kortsluiting veroorzaken KANS OP ELEKTRISCHE SCHOK 21 Gebruik nooit mechanische apparaten messen of andere scherpe voorwerpen om ijs ingelegd in het apparaat te verwijderen KANS OP ELEKTRISCHE SCHOK veroorzaakt door schade aan de binnenkant van het apparaat 22 Kinderen mogen nooit met het...

Page 99: ... moet vervoerd en geïnstalleerd worden door ten minste twee personen 7 Wanneer u het apparaat uitpakt dient u kennis te nemen van de positie van elk deel van de accessoires voor het geval dat u het op een latere tijdstip moet inpakken en vervoeren 8 Gebruik het apparaat alleen indien alle onderdelen goed zijn geïnstalleerd 9 Sta of leun niet op de basis de laden de deuren etc van het toestel 10 Ze...

Page 100: ...ort beveiliging volledig te verwijderen Wees erg voorzichtig en geen agressieve of schurende reinigingsmiddelen gebruiken om resten van de transport beveiliging te verwijderen 3 Installeer het apparaat op een geschikte plaats met voldoende afstand van bronnen van warmte en kou 4 Controleer of het apparaat en het netsnoer niet zijn beschadigd 5 Plaats het apparaat in een droge en goed geventileerde...

Page 101: ...s twee personen worden uitgevoerd anders kunt u zich verwonden of het apparaat beschadigen Het apparaat niet meer dan 450 kantelen INSTALLATIE A 1 Schuif het toestel voorzichtig in de kast Controleer of het toestel veilig en goed staat afgesteld in de kast 2 Bevestig het apparaat met de 4 houtschroeven op de vaststellingspunten zoals hieronder beschreven Bevestigingspunten aan het apparaat met de ...

Page 102: ...s of rechts 2 Bevestig het lange scharnier aan de binnenkant van de kastdeur Neem de correcte metingen door het plaatsen van de scharnieren van elkaar 3 Indien achteraf aanpassen controleer dat de voorzijde van de lange scharnier ca 2 cm afstand heeft tot de buitenkant van de kastdeur Bevestig nu het scharnier met de bijgeleverde schroeven 2 cm afstand De zwarte balk vertegenwoordigt 2 cm afstand ...

Page 103: ...103 De installatie van de lange scharnier en de koppeling van het lange en korte scharnier dient met de geopende deuren te worden uitgevoerd INSTALLATIE B 1 bag ...

Page 104: ...104 1 Scharnier deel op koelkastdeur 2 Scharnier deel op de kastdeur ...

Page 105: ...ANS OP ELEKTRISCHE SCHOK VOORZICHTIG Het veranderen van de positie van het scharnier moet door minstens twee personen worden uitgevoerd anders kunt u zich verwonden of het apparaat beschadigen Kantel het apparaat niet meer dan 45 graden 1 Draai de 2 schroeven 1 2 en verwijder de gehele bovenste scharnier 2 Til de deur omhoog totdat u het hebt verwijderd uit het onderste scharnier Bewaar de deur op...

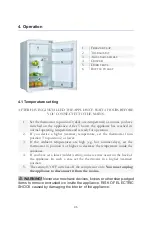
Page 106: ...2 schroeven Voer de hierboven beschreven stappen in omgekeerde volgorde uit 5 Controleer dat de deur goed afgestelde is en dat het goed sluit voordat je eindelijk de schroeven dicht draait LET OP Stel de deur goed af De afdichting moet goed sluiten 4 Bediening 1 VRIEZER KLEPJE 2 THERMOSTAAT 3 VERSTELBARE LEGPLANK 4 FRISSER 5 DEUR BAKJES 6 FLES VAK ...

Page 107: ...aten messen of andere scherpe voorwerpen om ijs ingelegd in het apparaat te verwijderen KANS OP ELEKTRISCHE SCHOK veroorzaakt door schade aan de binnenkant van het apparaat 4 2 Bedieningsparameters 1 Het apparaat kan alleen de relevante temperaturen bereiken wanneer a de omgevingstemperatuur voldoet aan de klimaatklasse b de deuren goed sluiten c u de deuren niet te lang of te vaak opent d de deur...

Page 108: ... het energieverbruik verhogen en ingelegde ijs genereren Als je bevroren voedsel koopt mag de verpakking niet beschadigd zijn en het product dient adequaat te worden opgeslagen sales container 180 C of lager Hoe bevroren voedsel te ontdooien is afhankelijk van uw keukenapparatuur en het doel waarvoor u de diepvriesproducten wilt gebruiken 9 kamertemperatuur 9 in de koeling compartiment van het app...

Page 109: ... garnalen schaaldieren water en vleesproducten Aanbevolen opslagperiode 3 maanden Niet geschikt voor het invriezen van vers voedsel Diepvriezer 12 0 C Geschikt voor zeevruchten vis garnalen schaaldieren water en vleesproducten Aanbevolen bewaarperiode 2 maanden Niet geschikt voor het invriezen van vers voedsel Diepvriezer 6 0 C Geschikt voor zeevruchten vis garnalen schaaldieren water en vleesprod...

Page 110: ...n voedsel De werking van uw apparaat wordt in het algemeen beschreven in het hoofdstuk BEDIENING de volgende uitleg helpt je om je eten op de juiste manier op te bergen Voedsel mag niet rechtstreeks in contact komen met de oppervlakken in het apparaat Het moet apart worden verpakt in aluminiumfolie of in cellofaanfolie of in luchtdichte plastic dozen VOEDSEL BEWAREN IN HET KOELVAK Het koelvak in d...

Page 111: ...sloten verpakking Eieren moeten in het koelgedeelte worden bewaard ROOD VLEES Leg vers rood vlees op een bord en bedek het met waspapier plasticfolie of folie Bewaar gekookt en rauw vlees op afzonderlijke borden Dit voorkomt dat het sap dat verloren gaat van het rauwe vlees het gekookte product besmet GEVOGELTE Verse hele gevogelte moeten van binnen en van buiten worden afgespoeld met koud stromen...

Page 112: ...or dat u het volgende niet bewaart bij temperaturen van minder dan 7 0 C gedurende lange periodes citrusfruit meloenen ananas papaja passievrucht komkommer paprika s tomaten Ongewenste veranderingen zullen optreden bij lage temperaturen zoals verzachting van het vlees bruin worden en of versneld rotten Koel geen avocado s totdat ze rijp zijn bananen en mango s INVRIEZEN EN BEWAREN VAN VOEDSEL IN H...

Page 113: ... VOEDSEL IS GESCHIKT OM IN TE VRIEZEN Taarten en gebak Vis en zeevruchten Vlees wild en gevogelte Groenten fruit en kruiden Eieren zonder schaal Zuivelproducten zoals kaas en boter Kant en klaarmaaltijden en restjes zoals soepen stoofschotels gekookt vlees en vis Aardappelgerechten en soufflé Desserts HET VOLGENDE VOEDSEL IS NIET GESCHIKT OM IN TE VRIEZEN Soorten groenten die meestal rauw worden g...

Page 114: ... maand Brood ijs worstjes taarten bereide schaaldieren vette vis 2 maanden Niet vette vis schaaldieren pizza scones en muffins 3 maanden Ham cakes koekjes rund en lamskoteletten stukken gevogelte 4 maanden Boter groenten geblancheerd eieren hele en dooiers gekookte rivierkreeft gehakt rauw varkensvlees rauw 6 maanden Fruit droog of in siroop eiwitten rundvlees rauw hele kip lam rauw fruitcake 12 m...

Page 115: ...ddelen Gebruik geen organische reinigingsmiddelen 10 Gebruik geen etherische oliën Deze instructies gelden voor alle oppervlakken van uw apparaat EXTERNE REINIGING 1 Gebruik een vochtige doek en een mild zuurvrij reinigingsmiddel Gebruik een geschikt reinigingsmiddel voor hardnekkige vlekken 2 Gebruik schoon water om te spoelen 3 Droog de gereinigde oppervlakken met een doek af INTERNE REINIGING 1...

Page 116: ...oeken in de vriezer compartiment om het water tegen te houden 5 Ondersteunen de ontdooiing niet met heet water 6 Verwijder eerst de grote stukken ijs Verwijder daarna de kleine stukjes ijs 7 Reinig en droog het apparaat en deurrubbers met een zachte doek 8 Laat de deur van het apparaat een tijdje open KOELKAST Het koelvak wordt automatisch ontdooid Het water loopt in een container bij de compresso...

Page 117: ...KT TE LANG Het apparaat is uitgeschakeld voor een tijdje Te veel of te warm eten in het apparaat Deuren te vaak of te lang geopend Het apparaat heeft enige tijd nodig om de vooraf ingestelde temperatuur te bereiken Verwijder eventueel warm eten Laat de deur niet te vaak te lang open STERKE VORMING VAN INGELEGDE IJS De deur is niet goed gesloten De deurrubber is beschadigd of vervuild Sluit de deur...

Page 118: ... is DUIDELIJKE RUIS Wanneer u het apparaat bediend voor de eerste keer of de temperatuur onder een bepaald niveau daalt zal het apparaat werken met een hoog vermogen om de vooraf ingestelde temperatuur te bereiken CONDENSWATER IN OP HET APPARAAT kan binnen of buiten het apparaat worden gegenereerd door een hoge vochtigheid of zeer warm omgevingstemperaturen KLIKKEN U zult de compressor horen klikk...

Page 119: ...mte c bevriezen alle voedsel dat geschikt is om te worden ingevroren ALS U HET APPARAAT WILT VERPLAATSEN 1 Sla alle verwijderbare onderdelen veilig op en verpak de inhoud van het apparaat afzonderlijk indien nodig 2 Vervoer het apparaat alleen in een rechtopstaande positie Alle andere posities kunnen schade aan de compressor veroorzaken 3 Laat de voeten van het apparaat niet beschadigd ONTMANTELIN...

Page 120: ...harnierpositie Ja Verschuifbare scharnieren Ja Ontdooiende koelgedeelte vriezer automatisch handmatig Vriezer flappen 1 Glasplanken deur bakjes fles vak 1 2 1 Frisser 1 Afmetingen apparaat H B D in cm 88 00 54 00 54 00 Afmetingen verpakking H B D in cm 94 00 57 00 56 00 Gewicht netto bruto in kg 29 00 31 00 Technische wijzigingen voorbehouden Volgens verordening EU nr 1060 2010 Op een schaal van A...

Page 121: ...le netsnoer door Gooi het netsnoer en de stekker onmiddellijk weg Verwijder de deur volledig zodat kinderen niet in staat zijn om in het apparaat te kruipen daar dit hun leven in gevaar kan brengen 5 Alle papier en karton dient afgedankt te worden in de bijbehorende containers 6 Alle kunststof dient afgedankt te worden in de bijbehorende containers 7 Indien geschikte containers niet verkrijgbaar z...

Page 122: ... bediening 4 schade als gevolg van agressieve milieuomstandigheden chemicaliën schoonmaakmiddelen 5 schade veroorzaakt door niet professionele installatie en transport 6 schade veroorzaakt door niet normale huishoudelijk gebruik 7 schade die buiten het toestel is veroorzaakt door een PKM product tenzij er een verplichting wordt opgelegd door wettelijke bepalingen De geldigheid van de garantie zal ...

Page 123: ...n the leaflet inside this instruction manual Veuillez contacter le magasin où vous avez acheté l appareil Aftersales service informatie te vinden op de folder in deze handleiding Änderungen vorbehalten Subject to alterations Sous réserve de modifications Onder voorbehoud van wijzigingen STAND UPDATED MISE À JOUR BIJGEWERKT 28 06 2019 06 28 2019 28 06 2019 06 28 2019 PKM GmbH Co KG Neuer Wall 2 474...

Reviews: