Step 5
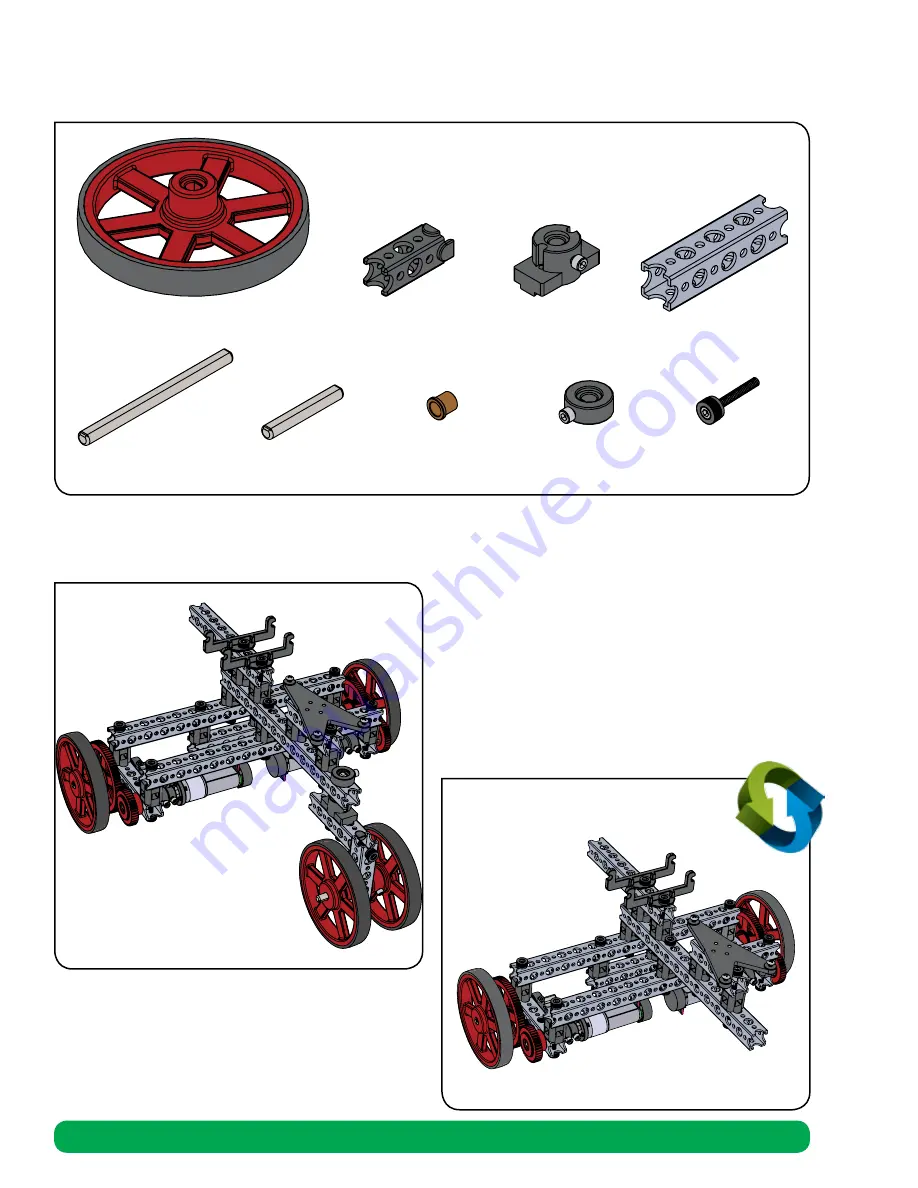
Partial assembly should look like this.
Parts Needed
2x
4-Hole Beam 40201
1x
Beam End
Connector 40214
1x
Beam Attachment
Hub 40228
Rotate build to match this view.
1x
40 mm Axle 40226
1x
80 mm Axle 40225
3x
Thumbscrew 40323
1x
Shaft Collar 40229
4x
Bronze Bushing
40227
2x
90 mm Wheel & Tire 40222
70
Rover Vehicle Assembly
Summary of Contents for 41427
Page 1: ...RobotBuilder sGuide for NI myRIO 41427 POWERED BY...
Page 2: ......
Page 20: ......
Page 23: ...Finished Assembly Step 5 Subassembly Construction Instructions 21...
Page 25: ...Step 5 Step 6 Step 7 Step 9 Step 8 Step 10 Subassembly Construction Instructions 23...
Page 26: ...Step 12 Step 14 Step 16 Step 11 Step 13 Step 15 24 Subassembly Construction Instructions...
Page 27: ...Step 18 Step 17 Finished Assembly Subassembly Construction Instructions 25...
Page 29: ...Step 6 Finished Assembly Step 5 Subassembly Construction Instructions 27...
Page 54: ......
Page 57: ...Step 1 0 Step 1 1 Rover Vehicle Assembly 55...
Page 58: ...Step 1 2 Step 1 3 56 Rover Vehicle Assembly...
Page 59: ...Step 1 4 Rover Vehicle Assembly 57...
Page 61: ...Step 2 0 Step 2 1 Rover Vehicle Assembly 59...
Page 62: ...Step 2 2 60 Rover Vehicle Assembly...
Page 64: ...Step 3 0 Step 3 1 62 Rover Vehicle Assembly...
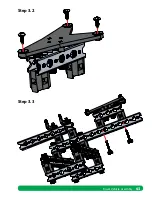
Page 65: ...Step 3 2 Step 3 3 Rover Vehicle Assembly 63...
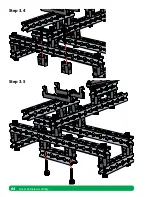
Page 66: ...Step 3 4 Step 3 5 64 Rover Vehicle Assembly...
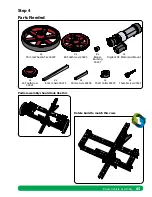
Page 68: ...Step 4 0 Step 4 1 66 Rover Vehicle Assembly...
Page 69: ...Step 4 2 Step 4 3 Rover Vehicle Assembly 67...
Page 70: ...Step 4 4 Step 4 5 68 Rover Vehicle Assembly...
Page 71: ...Step 4 6 Step 4 7 Rover Vehicle Assembly 69...
Page 73: ...Step 5 1 Step 5 0 Step 5 2 Step 5 3 Step 5 4 Step 5 5 Rover Vehicle Assembly 71...
Page 74: ...Step 5 6 Step 5 7 72 Rover Vehicle Assembly...
Page 76: ...Step 6 0 Step 6 1 74 Rover Vehicle Assembly...
Page 77: ...Step 6 2 Step 6 3 Rover Vehicle Assembly 75...
Page 78: ...Step 6 4 76 Rover Vehicle Assembly...
Page 84: ......
Page 87: ...Step 1 0 Step 1 1 Step 1 2 BalancingArmAssembly 85 Balancing Arm Assembly 85...
Page 88: ...Step 1 4 Step 1 3 86 BalancingArmAssembly 86 Balancing Arm Assembly...
Page 89: ...Step 1 6 Step 1 5 BalancingArmAssembly 87 Balancing Arm Assembly 87...
Page 90: ...Step 1 8 Step 1 7 88 BalancingArmAssembly 88 Balancing Arm Assembly...
Page 91: ...Step 1 10 Step 1 9 BalancingArmAssembly 89 Balancing Arm Assembly 89...
Page 92: ...Step 1 12 Step 1 11 90 BalancingArmAssembly 90 Balancing Arm Assembly...
Page 93: ...Step 1 14 Step 1 13 BalancingArmAssembly 91 Balancing Arm Assembly 91...
Page 94: ...Step 1 16 Step 1 15 92 BalancingArmAssembly 92 Balancing Arm Assembly...
Page 95: ...Step 1 17 BalancingArmAssembly 93 Balancing Arm Assembly 93...
Page 97: ...Step 2 0 Step 2 1 BalancingArmAssembly 95 Balancing Arm Assembly 95...
Page 98: ...Step 2 2 Step 2 3 96 BalancingArmAssembly 96 Balancing Arm Assembly...
Page 99: ...Step 2 4 Step 2 5 BalancingArmAssembly 97 Balancing Arm Assembly 97...
Page 100: ...Step 2 6 Step 2 7 98 BalancingArmAssembly 98 Balancing Arm Assembly...
Page 101: ...Step 2 8 Step 2 9 BalancingArmAssembly 99 Balancing Arm Assembly 99...
Page 102: ...Step 2 10 Step 2 11 100 BalancingArmAssembly 100 Balancing Arm Assembly...
Page 103: ...Step 2 12 Step 2 13 BalancingArmAssembly 101 Balancing Arm Assembly 101...
Page 105: ...Step 3 0 Step 3 1 BalancingArmAssembly 103 Balancing Arm Assembly 103...
Page 106: ...Step 3 2 Step 3 3 104 BalancingArmAssembly 104 Balancing Arm Assembly...
Page 108: ...Step 4 0 Step 4 1 106 BalancingArmAssembly 106 Balancing Arm Assembly...
Page 109: ...Step 4 2 Step 4 3 BalancingArmAssembly 107 Balancing Arm Assembly 107...
Page 110: ...Step 4 4 Step 4 5 108 BalancingArmAssembly 108 Balancing Arm Assembly...
Page 111: ...Step 4 6 Step 4 7 BalancingArmAssembly 109 Balancing Arm Assembly 109...
Page 112: ...Step 4 8 Step 4 9 110 BalancingArmAssembly 110 Balancing Arm Assembly...
Page 113: ...Step 4 10 BalancingArmAssembly 111 Balancing Arm Assembly 111...
Page 115: ...Step 5 1 Step 5 0 BalancingArmAssembly 113 Balancing Arm Assembly 113...
Page 116: ...Step 5 3 Step 5 2 114 BalancingArmAssembly 114 Balancing Arm Assembly...
Page 117: ...Finished assembly should look like this BalancingArmAssembly 115 Balancing Arm Assembly 115...
Page 124: ......
Page 127: ...Step 1 0 Step 1 1 Self Balancing Robot Assembly 125...
Page 128: ...Step 1 2 Step 1 3 126 Self Balancing Robot Assembly...
Page 129: ...Step 1 4 Step 1 5 Step 1 6 Self Balancing Robot Assembly 127...
Page 131: ...Step 2 0 Step 2 1 Self Balancing Robot Assembly 129...
Page 132: ...Step 2 2 Step 2 3 130 Self Balancing Robot Assembly...
Page 133: ...Step 2 4 Step 2 5 Self Balancing Robot Assembly 131...
Page 135: ...Step 3 0 Step 3 1 Self Balancing Robot Assembly 133...
Page 136: ...Step 3 2 Step 3 3 134 Self Balancing Robot Assembly...
Page 137: ...Step 3 4 Step 3 5 Self Balancing Robot Assembly 135...
Page 138: ...Step 3 6 Step 3 7 136 Self Balancing Robot Assembly...
Page 139: ...Step 3 8 Step 3 9 Self Balancing Robot Assembly 137...
Page 140: ...Step 3 10 Step 3 11 138 Self Balancing Robot Assembly...
Page 141: ...Step 3 12 Self Balancing Robot Assembly 139...
Page 143: ...Partial assembly should look like this Self Balancing Robot Assembly 141...
Page 144: ...Step 4 1 Step 4 0 142 Self Balancing Robot Assembly...
Page 145: ...Step 4 3 Step 4 2 Self Balancing Robot Assembly 143...
Page 146: ...Step 4 5 Step 4 4 144 Self Balancing Robot Assembly...
Page 147: ...Step 4 7 Step 4 6 Self Balancing Robot Assembly 145...
Page 148: ...Step 4 8 Step 4 9 146 Self Balancing Robot Assembly...
Page 149: ...Step 4 10 Self Balancing Robot Assembly 147...
Page 151: ...Step 5 0 Step 5 1 Self Balancing Robot Assembly 149...
Page 152: ...Step 5 2 150 Self Balancing Robot Assembly...
Page 153: ...Finished assembly should look like this Self Balancing Robot Assembly 151...


