Pitney Bowes D1500 Operator'S Manual Download Page 74

5 • Optical Mark Recognition (OMR)

5-16 

SV40221  Rev. A

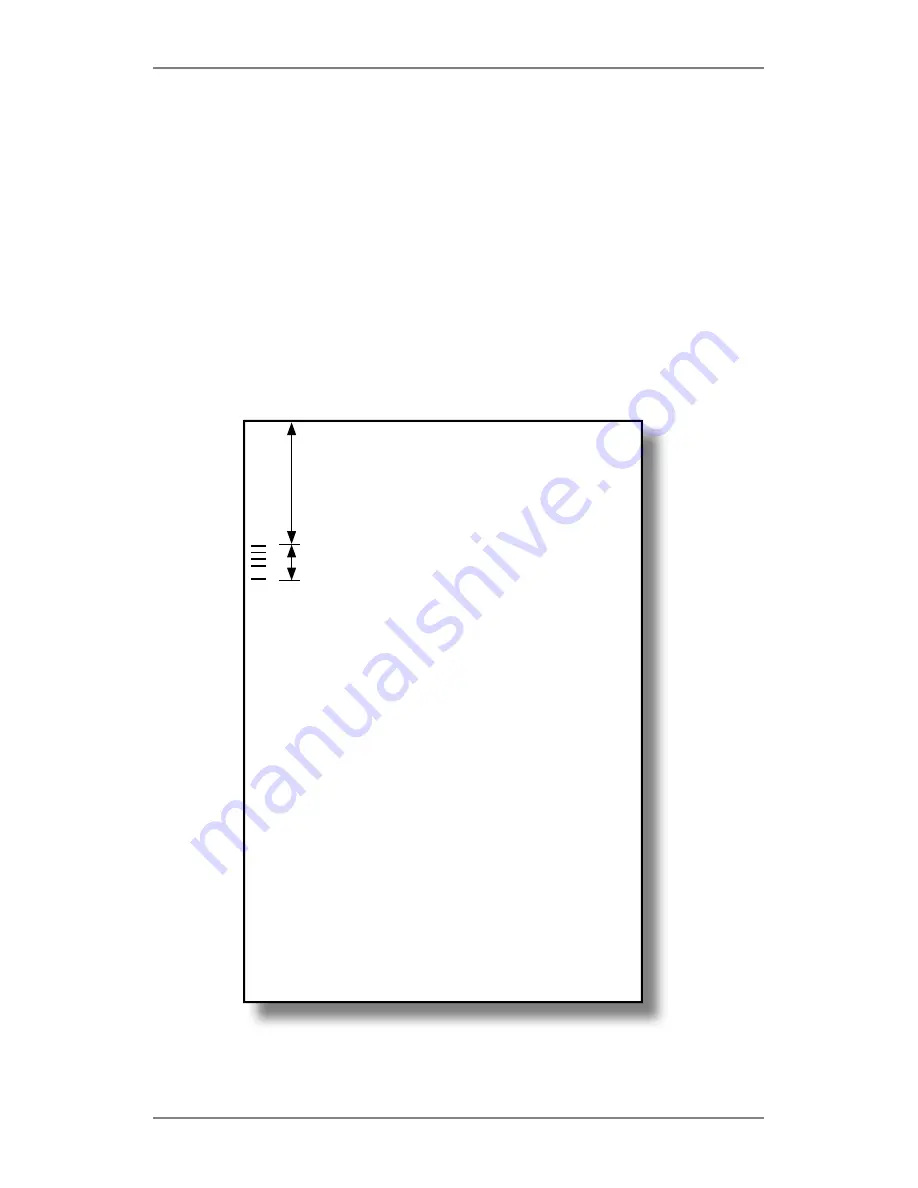
 Defining the first mark position and code length

Take a sheet that 

has at least the FIRST and LAST OMR mark 

printed on it

.

When requested by the machine, measure and enter the distance 
(A) from the top edge of the sheet to the FIRST OMR mark, in 
millimetres.
Again, when requested by the machine, measure and enter the 
distance (B) from the FIRST OMR mark to the LAST OMR mark, in 
millimetres.

A

B

TOP OF SHEET

SV40221 Rev A book.indb   5-16

9/14/2004   5:51:20 PM

Summary of Contents for D1500

Page 1: ...Document Inserting System DI500 DI600 Operator Guide US Canada English Version ...

Page 2: ...he equipment Canada EMC Compliance This Class A digital apparatus complies with Canadian ICES 003 Cet appareil numérique de la classe A est conforme à la norme NMB 003 du Canada SV40221 Rev A 9 04 2004 Pitney Bowes Inc All rights reserved This guide may not be reproduced in whole or in part in any fashion or stored in a retrieval system of any type or transmitted by any means electronically or mec...

Page 3: ... v Chapter 1 Introduction Safety 1 2 To The Operator 1 3 Machine Configurations 1 4 Machine Identification 1 6 PacPilot Control Panel 1 8 Control Panel Keys 1 8 Mail Piece Icon Tree 1 10 Common Terms 1 14 Chapter 2 Using the Menus The Home Screen 2 2 The Menu Structure 2 4 ...

Page 4: ... 3 12 Setting the Envelope Feeder 3 14 Setting the Insert Feeder s 3 16 Filling the Envelope Sealer 3 18 Menu 3 19 Language 3 19 Display Adjustments 3 19 Safe Seal 3 19 System Information 3 19 Chapter 4 Supervisor Functions About this Chapter 4 2 Supervisor Access Code 4 2 Create Job 4 3 Edit Job 4 4 Create From 4 6 Delete Job 4 7 OMR Menu 4 8 System Menu 4 8 Manual Feed Option 4 8 ...

Page 5: ... Troubleshooting Troubleshooting Tips 6 2 General Troubleshooting 6 3 Machine 6 3 Envelopes 6 4 Sheets 6 5 Inserts 6 6 Double Detect 6 7 Clearing Material Stalls 6 8 The Manual Advance Knob 6 8 Removal Replacement of Sheet Feeder Trays 6 9 Removal Replacement of Insert Tray s 6 9 Access to Internal Areas 1 to 5 6 10 Access to Area 6 6 12 Access to Areas 7 and 8 6 12 Access to Removeable Paper Path...

Page 6: ...tions 7 2 Sheet Feeders 7 2 Fold Type and Overall Thickness Limits 7 3 Insert Feeders 7 4 Envelope Feeder 7 4 Envelope Sealer 7 6 Drop Stacker 7 6 Material Requirements 7 6 Machine Specifications 7 7 Changing the Envelope Sealer Unit Felts 7 8 Service 7 10 Index I i ...

Page 7: ... Online Store To view and pay invoices online go to www pb com and click on My Account To view inventory go to www pb com and click on My Account For direct questions call 1 800 522 0020 Customer Service Representatives are available Monday through Friday 8 00 AM 8 00 PM ET Canada Contacts Product Name DI500 or DI600 For frequently asked questions or to order supplies go to www pitneybowes ca For ...

Page 8: ...vi SV40221 Rev A ...

Page 9: ...ty information and describes the main controls and features of your machine Important Safety Notes 1 2 To The Operator 1 3 Machine Configurations 1 4 Machine Identification 1 6 PacPilot Control Panel 1 8 Control Panel Keys 1 8 Mail Piece Icon Tree 1 10 Common Terms 1 14 ...

Page 10: ...imum operating performance and could cause the equipment to malfunction Contact your Pitney Bowes Customer Service Representative for required service schedule Use the power cord supplied with the machine Plug it and all other supplied power cords into a properly grounded wall outlet that is located near the machine and easily accessible meaning it is free from obstruction and there is enough room...

Page 11: ...feeders only Option of single fold C fold Z fold and double fold 20 Job recall facility User programmable SwiftStart allows you to quickly execute and save simple jobs without programming Linked Feeding multiple feeders can be linked to allow continuous operation OMR functionality storing up to 10 codes on models where OMR is enabled Load on the fly operation Manual Feed facility for occasional on...

Page 12: ...e full complement of feeders will use feeder designations which are not in alphabetical sequence this is normal The processing speed will also vary depending on machine configuration See Specifications in Chapter 7 for further details The illustration on the next page shows feeder locations and designations In addition an Optical Mark Recognition OMR option can be added to any model This allows co...

Page 13: ...Introduction 1 1 5 SV40221 Rev A Sheet Feeders Feeder Configuration Insert Feeders Envelope Feeder Manual Feeder A B C D E H G F ...

Page 14: ...n option to link these feeders so that when the first feeder runs out of material feed will automatically switch to the next linked feeder This allows a higher volume of material to be processed before refilling is required PacPilot Control Panel This is where you enter commands to run the machine or configure Job Settings The control panel display also shows you the machine status loading instruc...

Page 15: ... machine to collect the finished Mail Pieces This unit can be latched against the machine when not in use Power stacker not illustrated This is an optional extra which automatically collects and neatly stacks finished Mail Pieces It locates at the exit of the machine in place of the Drop Stacker Sealer Bottle The sealer bottle is located inside an opening cover at the front right side of the machi...

Page 16: ...not available in some markets Press this key to view an electronic Quick Reference Guide giving you quick access to basic information regarding operation of your machine Cancel Press this key to take you back to the previous screen If you have made changes or defined settings on the screen you are cancelling these will be lost Multiple presses of the Cancel key will step you back through the scree...

Page 17: ...pe it will be unsealed so that the contents can be easily checked Clear Deck Press this key to drive the material through and out of the system It can be used to clear the machine ready for automatic operation after a stoppage has occurred etc Stop Stops automatic operation at the end of the next cycle Navigation Keys OK These keys are used to move a highlighted area around the display Once the de...

Page 18: ...oading orientation of each object It is therefore extremely important that you become familiar with the icons themselves and the make up of the Mail Piece Icon Tree Loading Instructions The and navigation keys can be used to scroll through the Mail Piece Icon Tree When an item is highlighted the machine will give you the loading instructions associated with that item When you have viewed the loadi...

Page 19: ... the feeders indicated When one feeder becomes empty feed will automatically switch to the next linked feeder and so on in a continuous cycle If Double Detect is in use the Double Detect Icon will appear immediately to the left of the relevant Mailing Object Icon If any Sheet Feeder s are programmed to feed Pre Collated Sets multiple sheets a modified icon indicating multiple sheets will appear to...

Page 20: ...Face Up Bottom First Top address Face Up Top First Bottom address Face Down Bottom First Bottom address Face Down Top First Bottom address Face Up Bottom First Bottom address Face Up Top First Sheet Icons Reply envelope Flap side down Flap First Booklet Face Down Bound Edge First Slip Face Up Bottom First Pre Folded Insert Closed Side First Insert Icons Seal On Safe Seal On Seal Icons C Fold lette...

Page 21: ...fed Flap Last Envelope sealing turned on loaded into feeder E C Fold selected Prime Sheet with Top Address loaded Face Up fed Top First loaded into feeders A and B feeders A and B Linked Double Detect turned on Additional Sheet loaded Face Up fed Top First loaded into feeders C and D feeders C and D Linked Reply Envelope loaded Flap Side Down fed Flap First loaded into feeder G Booklet loaded Face...

Page 22: ...inter that will be loaded into a feeder or feeders on the machine A stack might consist of numerous individual Sheets or numerous Pre Collated Sets depending on how it was printed Prime Sheet or Prime Set This sheet or set normally contains the address It will be positioned closest to the envelope window or the front face of a windowless envelope Additional Sheet or Additional Set Additional sheet...

Page 23: ... single thickness piece of paper or card Pre Folded Insert A sheet that has been folded prior to loading and requires no further folding by the machine Outer Envelope The envelope which contains all the items placed into it by the machine Mail Piece A single assembled article of mail usually an envelope with correct contents Fan The process of flicking through a stack of material to separate the i...

Page 24: ...iece Test piece run by the machine before automatic operation can be started A Trial Piece allows the machine to calibrate itself and the Mail Piece make up to be checked Safe Seal A modified sealing mode that allows better sealing of poor envelopes Safe Seal will allow more time for the envelope flap gum to soften but will slow machine operation Linked Feeders Allows more than one feeder to be co...

Page 25: ...2 1 SV40221 Rev A 2 Using the Menus This chapter explains the Home Screen and the menu structure accessed via the PacPilot Control Panel The Home Screen 2 2 The Menu Structure 2 4 ...

Page 26: ...h the icon tree and highlight individual items As you do this the loading instructions associated with the highlighted item will be shown From this screen you can run the job displayed Alternatively press the relevant Screen Key to Select Another Job from those already programmed into the machine See page 3 3 Initiate the SwiftStart feature See page 3 6 Select the Menu Screen Key to access Operato...

Page 27: ...READY Batch Count Invoice Job Use to view loading instructions Screen Name Counter s Mail Piece Icon Tree Machine Graphic Screen Key Selections Instructional Text Name of selected Job Machine Status The Home Screen Select Job SwiftStart Job comments text area ...

Page 28: ... might be required when running jobs on the machine The second section is only available to a Supervisor upon entry of a Supervisor Access Code This section allows supervisors to create edit and delete jobs as well as set more advanced features The following two chapters in this guide Operator Functions and Supervisor Functions give details of the functions available to each level of user Use this...

Page 29: ...ents p 3 19 Safe Seal p 3 19 System Information p 3 19 Supervisor Functions p 4 1 Create Job p 4 3 Edit Job p 4 4 Create From p 4 6 Delete Job p 4 7 OMR Menu p 4 8 Systems Menu p 4 8 Manual Feed Option p 4 8 Menu items below this line require a Supervisor Access Code OPERATOR FUNCTIONS SUPERVISOR FUNCTIONS The Menu Structure ...

Page 30: ...2 Using the Menus 2 6 SV40221 Rev A ...

Page 31: ...nning the various operator modes and loading material About this Chapter 3 2 Connecting Power 3 2 Running a Job 3 3 SwiftStart 3 6 Manual Feed 3 9 Setting the Sheet Feeders 3 12 Setting the Envelope Feeder 3 14 Setting the Insert Feeder s 3 16 Filling the Envelope Sealer 3 18 Menu 3 19 Language 3 19 Display Adjustments 3 19 Safe Seal 3 19 System Information 3 19 ...

Page 32: ... the feeders Filling the sealer Functions that can only be carried out after entry of a Supervisor Access Code are described in the next chapter Supervisor Functions Connecting Power Read the safety information on page 1 2 before connecting the machine Connect the power cord to the socket on the back of the machine Plug the power cord into a suitable power outlet Make sure the power outlet is near...

Page 33: ...ess the Screen Key alongside the desired job to select it immediately If you need confirmation of the job details use the and keys to scroll through the list As each job is highlighted the Mail Piece Icon Tree and Job Comments if entered will change to reflect the highlighted job When you are certain which job you want press the corresponding Screen Key to select it TIP In either case if the job y...

Page 34: ...ion see page 6 15 Once the adjustment is made and any further Trial Piece is OK you will be asked if you wish to save the changed settings as part of the Job Definition If you choose Yes The machine will save the changed setting s as part of the current job Next time the original Job Definition is selected the modified adjustment s will be remembered A Supervisor Access Code see page 4 2 will be r...

Page 35: ...ment s will have returned to the value saved within the Job Definition TIPS If you reload material during a run which seems to have different characteristics weight colour shade etc or if you have any problems with double detect run another Trial Piece This allows the machine to recalibrate the double detect function for the new material in case the batches vary slightly When loading a C folded in...

Page 36: ...essary Constraints and Requirements Only use closed flap envelopes Feeds only single sheets from each Sheet Feeder This mode cannot be used to run fold only or inserts only You cannot link Sheet Feeders in this mode The Envelope Sealer is always on except for the Trial Piece The Batch Count is always off The Maximum Sheet Length is 11 Can run 10 and 6 x 9 sized envelopes This mode will not work wi...

Page 37: ...ttom First Loading Insert Feeder s If either or both Insert Feeders are loaded with material when SwiftStart is selected the machine will feed the Inserts and make them part of the SwiftStart job For a single Insert load Insert Feeder F For two Inserts load Insert Feeders F and G Booklets must be loaded into Insert Feeder F only and should be loaded with the binding edge first Pre folded Inserts s...

Page 38: ...iece is NOT OK select No and follow the on screen instructions to correct the error You can adjust the address position fold panel length and or the envelope stop position The envelope stop position will rarely need adjusting for more information see page 6 15 Saving a SwiftStart Job After confirming a Trial Piece is OK you will be given the option to save the current SwiftStart setup as a Job Def...

Page 39: ...r inserts only Sheet Feeders do not operate in this mode The Envelope Sealer is always on except for the Trial Piece The Batch Count is always off Sets should contain sheets of the same length This mode will not work with OMR Loading Material for Manual Feed Mode Loading Insert Feeder s Insert Feeder s will only operate if they have been enabled by a Supervisor using the Manual Feed Option explain...

Page 40: ... a guide for feeding the Manual Feed set C Fold Feed the set Face Up Top First Single Fold Feed the set Face Down Bottom First Double Fold Feed the set Face Up Top First Set the Manual Feeder side guides to control the sets to be fed The guides are self centering Take one set and feed it gently into the Manual Feeder until the machine automatically starts and draws the set from you A Trial Piece i...

Page 41: ...e motor runs the machine will remain in Manual Feed mode If no further sets are fed whilst the motor is running after a brief delay the motor stops and the machine reverts to the previous Job Definition selected If you wish to leave Manual Feed mode while the motor is running press Cancel twice The Manual Feed settings will be lost once a pre programmed Job Definition is selected or SwiftStart is ...

Page 42: ...fold jobs This will be indicated by the Mail Piece Icon Tree Sheet Feeders can feed single Sheets or Pre Collated Sets depending on job setup The Mail Piece Icon Tree will tell you the quantity of sheets that the machine is programmed to run from each feeder if Pre Collated sets are programmed If you need help understanding the terms Sheet or Pre Collated Set refer to page 1 14 of this guide 1 Adj...

Page 43: ...ll show the correct orientation of the sheets in the Stack Make sure you load sheets in the orientation indicated 5 The Sheet Feeders take the paper Stack in a similar way to a photocopier paper cassette Place the Stack onto the deck of the feeder Depress the Stack and slide it fully under the feed roller ...

Page 44: ...ation If you need help understanding the envelope icons refer to page 1 12 of this guide 1 Press the Envelope Feeder loading switch to lower the feeder tray ready for loading 2 Adjust the side guides to the width of the envelopes being fed using the Side Guide Adjustment Knob then back off 1 4 of a turn This will set the correct clearance between the guides and envelopes 3 Take the stack of envelo...

Page 45: ... envelope stack to the normal feeding position TIP To quickly load envelopes during a run without the need to stop and start the machine Press the Envelope Feeder loading switch to lower the feeder tray Load envelopes as described above Press the Envelope Feeder loading switch again The envelope stack will rise to the normal feeding position and processing will continue automatically ...

Page 46: ...ge 1 12 of this guide 1 Adjust the side guides to the width of the Inserts being fed using the Side Guide Adjustment Knob then back off 1 4 of a turn This will set the correct clearance between the guides and Inserts 2 Refer to the labels located on each Insert Feeder Match your insert type Slip Reply Envelope Pre Folded or Booklet with the relevant icon and colour indicator on each label Where a ...

Page 47: ...the inserts to be run so that they look like the photograph on the right and place them onto the feed deck The Mail Piece Icon Tree will show the correct orientation of the Inserts 7 Let the Wedge slide down behind the stack so that the Inserts are supported Note If Insert Feeders F and G are linked running the same inserts make sure the lever settings in steps 3 and 4 are set the same on both fee...

Page 48: ...screw the cap and fill the bottle with sealing solution EZ Seal Refit the cap and place the bottle back into the machine Close the Sealer Bottle Cover TIPS If filling the Envelope Sealer for the first time or if the sealer has been allowed to completely empty you should allow time for the solution to soak through the sealer mechanism before processing material The use of water in the sealer is not...

Page 49: ...al service engineer at installation Display Adjustments Select this option and follow the simple on screen instructions to change the contrast or brightness levels of the display to suit your needs Safe Seal This option allows you to switch Safe Seal on or off When on the Safe Seal icon appears on the Mail Piece Icon Tree alongside the Outer Envelope icon Safe Seal allows more time for moisture to...

Page 50: ...3 Operator Functions 3 20 SV40221 Rev A ...

Page 51: ...nctions that can be carried out by a Supervisor Primarily this includes creating editing and deleting jobs About this Chapter 4 2 Supervisor Access Code 4 2 Create Job 4 3 Edit Job 4 4 Create From 4 6 Delete Job 4 7 OMR Menu 4 8 System Menu 4 8 Manual Feed Option 4 8 ...

Page 52: ...Code This prevents unauthorised access to functions mainly related to administration of jobs and OMR Your installing engineer will tell you the Supervisor Access Code If you wish you can write it in the box on this page as a reminder However please be aware that this is then available to anyone using this Operator Guide and so you may wish to make a note of it and keep it in a more secure location...

Page 53: ...equence will vary from job to job As you create the job the Mail Piece Icon Tree will be built on the left side of the display This shows how to load material into each feeder Once the job is created named and any comments entered you must select Save to store it in the machine s memory TIPS Placing a job description in the job comments will make it easy for an Operator to select the correct job U...

Page 54: ...t From the Home Screen select Menu select Supervisor Functions enter the Supervisor Access Code see page 4 2 select Edit Job Action Once Edit Job has been selected choose the Job Definition you wish to edit from the alphabetical job list using the keys in the normal way Edit Job allows a Supervisor to modify all Job Definition parameters except for adding or removing the Outer Envelope and the Fir...

Page 55: ...et up Highlight the Envelope icon to edit envelope and sealing settings The Outer Envelope and First sheet cannot be added or deleted Don t forget to edit the job comments to correspond to your revised job setup When editing a job it is recommended that you start at the top of the Mail Piece Icon Tree and work downwards OMR jobs cannot utilise linked feeders ...

Page 56: ...s Where is it From the Home Screen select Menu select Supervisor Functions enter the Supervisor Access Code see page 4 2 select Create From Action Once Create From has been selected choose the Job Definition you wish to use as the basis of the new job from the alphabetical job list using the keys in the normal way Once the Job Definition that you are creating from has been selected the machine wil...

Page 57: ...ter the Supervisor Access Code see page 4 2 select Delete Job Action Once Delete Job has been selected choose the Job Definition you wish to delete from the alphabetical job list using the keys in the normal way Once the required Job Definition is selected a message will be displayed which requires confirmation before the job is deleted TIP Make sure the Job Definition you are deleting is the corr...

Page 58: ...ion Where is it From the Home Screen select Menu select Supervisor Functions enter the Supervisor Access Code see page 4 2 select System Menu Manual Feed Option This function lets a Supervisor choose whether or not the Insert Feeder s are active when a Manual Feed operation is carried out The default setting is for both Insert Feeders to be ignored with a Manual Feed Changing this setting will fee...

Page 59: ...Recognition OMR on a machine equipped with the OMR option OMR Availability 5 2 What is OMR 5 2 OMR Marks Available 5 3 OMR Mark Options 5 6 OMR Specifications 5 8 Creating Deleting and Viewing OMR Codes 5 10 Create New OMR Code 5 11 Delete OMR Code 5 13 View OMR Code 5 14 Creating an OMR Job 5 15 OMR Scanner Adjustments 5 18 ...

Page 60: ...i Mark options which have a maximum of 24 marks The OMR scanner working with the OMR system software checks for one or more different marks on the sheets while they are being fed through the system The tracking of these OMR marks by the system will aid the integrity of your mailing through error checking so generally the more marks you use the better the integrity of your Mail Piece As mentioned o...

Page 61: ... the first set This mark may only be selected once within the code SAF Safety This mark improves the integrity of your Mail Piece It can be placed anywhere within the code but benefits from being at the opposite end of the code to the Benchmark When the Safety mark is placed in this position with the option Always Present and No other marks other than the OMR code in the margin is chosen when crea...

Page 62: ...F n Select Feed These marks instruct the machine to select material from specified feeders This feature is only available to select sheets when C fold is used and the material is under 12 305mm in length Selectively fed inserts are available for all types of folds and sheet lengths within the specifications of the machine Up to 8 Select Feed Marks can be within to the code 5 of these marks can be ...

Page 63: ... can be within the code Options available Increment Ascending or Decrement Descending Include or Omit Zero 0 as a value within the sequence Continuous Sequence or Page 1 Reset Least or Most Significant Mark nearest to Bench Mark code orientation Number of Wrap Around Sequence Marks TM Timing This mark is needed by some other machines to read OMR marks correctly This machine does NOT need Timing ma...

Page 64: ...e relevant code s binary value will decrease Include Zero or Omit Zero 0 as a Value If Include Zero is chosen the relevant code s binary value would allow zero which is represented by no marks being printed within that section of the code When choosing to use Omit Zero the relevant code s binary value will NOT include zero as a value Therefore a mark will ALWAYS be printed within that section of t...

Page 65: ...y be expected on the first or last page fed depending on the option chosen Marked Piece to be left Unsealed Yes or No If Yes is selected the machine will stop when it sees the Stop mark with the relevant unsealed envelope in the stacker If No is selected the machine will also stop with the envelope in the stacker when it sees the Stop mark but envelope sealing will be processed as programmed in th...

Page 66: ...4 108mm from the center line of the sheet The OMR marks should not be closer than 3 4 20mm from the Lead Edge or 1 3 16 30mm from the Trail Edge of the sheet An area around the marks should be kept clear from print etc that may be read by the scanner in error this area is called the Clear Zone The Clear Zone must be at least 1 8 3mm each side of the marks 3 4 20mm before the first mark and 3 4 20m...

Page 67: ...ar Top Scanner Single Z Fold Rear Bottom Scanner Place marks in this area for C Double Fold Front Top Scanner Single Z Fold Front Bottom Scanner The white areas in the diagram show the possible areas where OMR marks can be placed and depend on the physical location of the scanners fitted to the machine LEADING EDGE 4 3 4 108mm max 4 3 4 108mm max 2 3 8 59mm min ...

Page 68: ...odes Where is it From the Home Screen Select Menu Select Supervisor Functions Enter the Supervisor Access Code see page 4 2 Select OMR Menu Action Once the OMR Menu has been selected the three following options will appear Create New OMR Code Delete OMR Code View OMR Code Note that some options will be unavailable if you have no current OMR code s stored in the machine s memory ...

Page 69: ...en When complete you will be asked to name the OMR Code see tips on following page If Multi Mark is selected You will be able to select from the available OMR Marks in the list on the screen This is done by scrolling up or down the list by using the and navigation keys The marks must be selected in the correct order starting with the mark located towards the top head of the page first Once the req...

Page 70: ...activated After all the required marks have been entered select the Finish screen key You will now be asked to name the OMR code Once the name of the code has been entered correctly select the Save screen key to save the code within the machine s memory TIPS The representation of the OMR mark on the left hand side of the screen will display as a dashed line if the Absent option is selected Up to 9...

Page 71: ...ted a message will be displayed asking you to confirm that you want to delete the selected code Either Select Yes to confirm deletion Select No to return you to the OMR Menu without deleting any codes TIPS Make sure that the code you are deleting is the correct code Once deleted it cannot be retrieved This function is not available if there are no OMR codes to delete Any code that is being used wi...

Page 72: ...screen If you require more detailed information about the code either select the relevant screen key for that code or press the OK key once the relevant code has been highlighted Scroll up and down the selected OMR code by using the and navigation keys to review detailed information about the selected code From this screen you can select the corresponding screen key to Delete this Code View anothe...

Page 73: ... can be used in a non Selective Feed Job Definition by not allocating any of the Select Feed SF marks to a feeder when creating the Job Definition Setting the OMR Scanning Area Material is scanned as it feeds through the machine This means that the OMR Scanner reads a vertical strip or margin down the page defined by the OMR Specifications on pages 5 8 and 5 9 The machine must now be told if the e...

Page 74: ... least the FIRST and LAST OMR mark printed on it When requested by the machine measure and enter the distance A from the top edge of the sheet to the FIRST OMR mark in millimetres Again when requested by the machine measure and enter the distance B from the FIRST OMR mark to the LAST OMR mark in millimetres A B TOP OF SHEET ...

Page 75: ...e to STOP scanning This is called the Clear Zone Note that setting the Clear Zone closer to the beginning and end of the OMR marks decreases the possibility of any poor print or imperfections on the material being interpreted as OMR marks Conversely setting the Clear Zone too close to the beginning and end of the OMR marks could cause problems if the position registration of the printing on the ma...

Page 76: ...Scanners It is essential that the OMR Scanner being used is correctly aligned over the OMR marks printed on the sheet s Failure to align the scanner will result in scanning errors It is therefore essential that the scanner alignment is checked before commencing any OMR job Measure the OMR mark position Take a sheet printed with the OMR marks to be used and fold it in half in the direction of feed ...

Page 77: ...djustment scale for the side the scanner is fitted Rotate the adjusting knob until the indicator is aligned with the measurement X you just made The Top Scanner will now be aligned Top Scanner Adjusting Knob Adjustment Scale Indicator NOTE Illustration shows adjustment for a front scanner If using a rear scanner refer to the scale towards the rear of the machine Rear Adjustment Scale Front Adjustm...

Page 78: ...for Z and Single Folds Open the upper central front door and locate the blue Bottom Scanner adjusting knob and adjustment scale Rotate the adjusting knob until the indicator is aligned with the measurement X you just made The Bottom Scanner will now be aligned Bottom Scanner Adjusting Knob Adjustment Scale Indicator ...

Page 79: ...djusting the Top Scanner as described on page 5 19 but to a setting 10mm 3 8 different to the Bottom Scanner setting For example if the Bottom Scanner is set to 70mm set the Top Scanner to 80mm When setting the Top Scanner use the appropriate adjustment scale depending on the location of the Bottom Scanner The front scale for a Front Bottom Scanner and the rear scale for a Rear Bottom Scanner Top ...

Page 80: ...5 Optical Mark Recognition OMR 5 22 SV40221 Rev A ...

Page 81: ...ring Material Stalls 6 8 The Manual Advance Knob 6 8 Removal and Replacement of Sheet Feeder Trays 6 9 Removal and Replacement of Insert Tray s 6 9 Access to Internal Areas 1 to 5 6 10 Access to Area 6 6 12 Access to Areas 7 and 8 6 12 Access to Removeable Paper Path 6 13 Access to Top Cover Sheet Feed Area 6 13 Access to Envelope Exit Area 6 14 Access to Envelope Inserting Sealing Area 6 14 Envel...

Page 82: ...require This Operating Guide contains additional troubleshooting information which with the troubleshooting sources above should resolve most problems If problems related to material handling persist make sure your material conforms to the machine specifications given in Chapter 7 of this guide If you still cannot resolve the problem call your machine supplier for help Contact details can be found...

Page 83: ...ceptable setting 3 19 Performance Machine runs slowly Is Safe Seal selected icon in Icon Tree Safe Seal provides improved sealing of difficult envelopes but slows machine operation 3 19 Insertion Problems Outer Envelope contents do not enter the envelope correctly Check envelope troubleshooting table Check envelope depth setting for the job is correct within the Edit Job function If running heavy ...

Page 84: ...velopes loaded incorrectly Load envelopes flap side up with the flap feeding last 3 15 Poor envelope quality Check envelopes are not stuck due to excessive dampness Try a new box of envelopes Envelope Sealing Problems No sealing solution Refill Sealer Unit 3 18 Seal mode not selected If selected Mail Piece Icon Tree will show Seal icon alongside the Envelope icon 1 13 Envelope flaps spring open Tr...

Page 85: ... to feed pre collated sets Correct loading or have Supervisor correct Job Definition as necessary 1 11 4 4 Address in wrong position in envelope window First Sheet Set incorrectly loaded Load First address bearing Sheet or Set in the correct orientation as shown by the Mail Piece Icon Tree 1 11 1 12 Address Position incorrectly set Run a Trial Piece Say No to Trial Piece OK and adjust the address ...

Page 86: ...ing Changing the orientation of the Insert stack may help 3 17 Insert Feeder Wedge used incorrectly Let the Wedge slide down behind the Insert stack to support it 3 17 Booklets not feeding correctly Booklets must only be run from Insert Feeder F Check the Mail Piece Icon Tree loading instructions 1 15 3 16 1 12 1 13 Inserts out of specification Check specifications in this guide 7 4 Inserts won t ...

Page 87: ...etect OFF Machine stops for doubles that aren t there or feeds doubles without stopping Double Detect is not turned ON Check Double Detect status Double Detect icon will appear alongside all items where Double Detect is operational Correct loading or have Supervisor correct Job Definition as necessary 1 11 1 12 4 4 Double Detect is not correctly calibrated Run a Trial Piece whenever a new batch of...

Page 88: ...ggest remedial action First press Clear Deck to attempt to feed the material through the machine If not successful the sections below tell you how to gain access to the material The Manual Advance Knob Having located the material you may need to use the Manual Advance Knob to manually feed material out of the grip of rollers etc The Manual Advance Knob is located behind the lower door at the cente...

Page 89: ... prevent it sliding forward as the tray is removed To replace Place the tray into its location guides in the side frames Lift the rear of the tray slightly and push it into the machine The tray will automatically drop into its correct location Removal Replacement of the Insert Tray s F and G To remove Pull the Insert Tray straight outwards from the machine To replace Slide the tray into its locati...

Page 90: ...hin the internal areas of the machine the display will indicate an area or areas labelled 1 to 5 where the stalled material is located Open both central front doors and the access points as shown below will be exposed 4 5 3 2 The illustrations on the next page show each area in more detail 1 ...

Page 91: ...mly down at the center Area 4 Rotate counterclockwise to unlatch Push assembly back into position and relatch by rotating lever fully clockwise Area 3 Rotate counterclockwise to unlatch Push assembly back into position and relatch by rotating lever fully clockwise Area 5 Rotate clockwise to unlatch Push assembly back into position and relatch by rotating lever fully counterclockwise ...

Page 92: ...ce the trays are removed access to stalled material can be gained by unlatching the access covers shown Access to Area 6 Area 6 is located under Sheet Feeder D where envelopes are fed into the system Therefore before access can be gained to a material stall in this area Sheet Feeder Tray D should be removed as described on page 6 9 Once the tray is removed access to stalled material can be gained ...

Page 93: ...his area Insert Tray F must be removed as described on page 6 9 Access can be gained by lifting the blue handle and then pulling the plate outwards When refitting the plate make sure it is fully latched into position Access to the Top Cover Sheet Feed Area Access can be gained to this area by unlatching the blue handle on the Top Cover and raising the cover When closing the cover make sure it is f...

Page 94: ...lled material When closing the door make sure it is firmly latched into position Access to the Envelope Inserting Sealing Area Access can be gained to the insertion and sealing areas by lifting the plastic cover and lowering the envelope exit area door Points arrowed in the illustration can be unlatched to allow access to stalled material ...

Page 95: ...e which may be useful for light or thin material 1 2 Reduces how far the material goes into the envelope which may be useful for thicker or heavier material After carrying out this adjustment you will be offered two options 1 You can save the adjustment as part of the current Job Definition so that it is automatically recalled in future This requires a Supervisor Access Code to be entered because ...

Page 96: ...6 Troubleshooting 6 16 SV40221 Rev A ...

Page 97: ...at may only need to be carried out occasionally Specifications 7 2 Sheet Feeders 7 2 Fold Type and Overall Thickness Limits 7 3 Insert Feeders 7 4 Envelope Feeder 7 4 Envelope Sealer 7 6 Drop Stacker 7 6 Material Requirements 7 6 Machine Specifications 7 7 Changing the Envelope Sealer Unit Felts 7 8 Service 7 10 ...

Page 98: ...t length limits before folding Single fold 6 7 8 12 175mm 305mm C fold 9 1 2 13 5 8 242mm 347mm Z fold 9 1 2 13 5 8 242mm 347mm Double fold 12 1 2 16 319mm 406mm Double Document Detector Material range 16 lb 60g m2 Minimum 32 lb 120g m2 Maximum Sheet Feed tray capacity Up to a maximum of 325 sheets of 20 lb 80g m2 Manual Feed mode Stapled or unstapled sets up to 5 sheets of 20 lb 80g m2 to a maxim...

Page 99: ...r collated for each fold type based on different weights of paper It is important that jobs exceeding these maximums are NOT programmed into the machine or imposed by OMR code printing and or OMR selective feed ALL SPECIFICATIONS ARE SUBJECT TO CHANGE WITHOUT NOTIFICATION AND ARE SUBJECT TO TEST Sheets above 12 305mm in length can only be folded C Z and D up to 5 sheets All the above sheet limits ...

Page 100: ... 2mm from feeder F 06 1 5mm from feeder G Double Detect material range 16 lb 60g m2 Minimum 32 lb 120g m2 Maximum Insert feed tray capacity Up to a maximum of 300 Inserts in each feeder dependent on thickness and weight of inserts Envelope Feeder Minimum envelope size 3 7 8 98mm Depth 8 5 8 220mm Width Maximum envelope size 6 1 2 164mm Depth 9 1 2 242mm Width Envelope depths for SwiftStart and Man...

Page 101: ...ent should be taken with all Mail Piece contents placed into the envelope Depth Clearance The Mail Piece Contents must allow a minimum clearance of 1 8 3mm for unfolded inserts and 1 4 6mm for folded material below the flap crease after being fully inserted into the envelope Envelope flap and throat requirements Min 1 25 5mm Max 2 1 2 63mm Min 1 4 6mm Max 1 5 8 41mm 3 4 19mm Min 1 16 1 6mm Max 1 4...

Page 102: ...Pieces This is dependent on the size and contents of the envelope Material Requirements For best performance use only materials approved by your machine supplier Materials should be good quality and properly stored Recommended storage conditions 65 F 18 C to 77 F 25 C 40 to 60 relative humidity ALL SPECIFICATIONS ARE SUBJECT TO CHANGE WITHOUT NOTIFICATION AND ARE SUBJECT TO TEST ...

Page 103: ...les per hour depending on model fold type and material quality Figures stated are based on 2 sheets of 24 lb 80g m2 Z folded and 1 insert placed into a 26 lb 90g m2 10 envelope Compliance It is certified that the Folding Inserting machine complies with the requirements of the Low Voltage Directive 73 23 EEC and the EMC Directive 89 336 EEC The product was tested in a typical configuration WARNING ...

Page 104: ... the following way 1 Hinge open the Sealer Bottle cover located at the front right hand side of the machine Remove the Sealer Bottle 2 Remove the Insert Trays see page 5 9 Lift the insertion area plastic cover and open the envelope exit area access door 3 Squeeze together the two blue tabs A and lift the blue tab B to gain access to the sealer unit felts A B ...

Page 105: ...on the back of the felt assembly into the corresponding holes in the mounting bar and slide the felt towards the rear of the machine Make sure it has fully latched into position 6 Using the plastic tweezers provided in the kit remove all four felts from the Sealer Tank Discard these old felts 7 Fit the four new felts into the Sealer Tank They will only fit one way round Make sure they are pushed f...

Page 106: ...for your new Folding Inserting machine is available throughout the world Should you have questions about your machine or require service or assistance with your particular application please call your machine supplier Your machine supplier will also offer a service maintenance contract to keep your machine in top condition at nominal cost Contact details can be found On the Pitney Bowes Contact In...

Page 107: ...he Envelope Sealer Unit Felts 7 8 Clear Deck Button 1 9 Clear Zone for OMR 5 8 Common Terms 1 14 Configurations Machine 1 4 Connecting Power 3 2 Control Panel 1 8 Cancel Button 1 8 Clear Deck Button 1 9 Description 1 6 Help Button 1 8 Home Button 1 9 Navigation Keys 1 9 Reset Counters Button 1 8 Screen Keys 1 9 Start Button 1 9 Stop Button 1 9 Trial Piece Button 1 9 Convenience Feeder See Manual F...

Page 108: ...scription 1 7 Envelope Stop Position 6 15 Loading switch 3 14 Material Specifications 7 5 Setting the Envelope Feeder 3 14 Side Guide Adjustment Knob 3 14 Envelope Icons 1 12 Envelope Sealer 3 18 7 6 Filling 3 18 Sealer Bottle Cover 3 18 Envelope Stop Position 6 15 Envelope Feeder loading switch 3 15 F Fan 1 15 Features Machine 1 3 Fold Icons 1 12 Fold Type 1 14 Fold Type and Overall Thickness Lim...

Page 109: ... 1 12 Insert Tray s Removal Replacement 6 9 Instructional Text 2 3 J Jobs Automatic Processing 3 4 3 5 Create Job 4 3 Creating an OMR Job 5 15 Delete Job 4 7 Edit Job 4 4 Envelope Stop Position 6 15 Job Comments 4 5 Job Definition 4 6 Job Definitions 3 3 Job Name 4 5 Running a Job 3 3 Selecting a Job 3 3 Startup Screen 3 3 Job Comments 4 5 Job Definition 1 16 4 6 Job Definitions 3 3 Job Name 4 5 L...

Page 110: ...ers 1 11 Loading Instructions 1 10 Mail Piece Icon Tree Icons 1 11 Optical Mark Recognition OMR 1 11 Other Icons 1 12 Pre Collated Sets 1 11 Seal Icons 1 12 Sheet Icons 1 12 Mail Piece Icon Tree Icons 1 11 Manual Advance Knob 6 8 Description 1 7 Manual Feed 3 9 Constraints and Requirements 3 9 Feeding Further Sets 3 11 Folds 3 10 Loading Envelope Feeder 3 9 Loading Material for Manual Feed Mode 3 ...

Page 111: ...Code 4 2 6 15 System Menu 4 8 View OMR Code 5 14 Menu Structure 2 4 Multi Mark 5 2 N Name of selected Job 2 3 Navigation Keys 1 9 2 2 O OMR Optical Mark Recognition 1 4 1 11 All Sheets Page 1 Only Last Page Only 5 7 Always Present or Never Present 5 7 Beginning of Collation BOC 5 3 Benchmark BM 5 3 5 12 Clear Zone 5 8 5 9 Continuous Sequence or Page 1 Reset 5 6 Create New OMR Code 5 11 Creating De...

Page 112: ...cations 5 8 Parity PAR 5 5 Present or Absent 5 6 Safety SAF 5 3 Select Feed SF n 5 4 Setting Bottom Scanner 5 20 Setting the OMR Scanning Area 5 15 Setting the Type of OMR 5 15 Setting Top Scanner 5 19 Single Mark 5 11 Stop STP 5 4 View OMR Code 5 14 What is OMR 5 2 Wrap Around Sequence WAS 5 5 OMR Menu 4 8 OMR Scanner Adjustments 5 18 Operator Functions 2 5 Other Icons 1 12 Outer Envelope 1 15 P ...

Page 113: ...3 Insert Tray s F and G 6 9 Sheet Feeder Trays A to D 6 9 Reset Counters 1 8 Reset Counters Button 3 4 Running a Job 3 3 Running a Trial Piece 3 4 S Safety 1 2 Safety SAF OMR 5 3 Safe Seal 1 16 3 19 Scanners 5 9 Aligning the Scanners 5 18 Setting Bottom OMR Scanner 5 20 Setting Top OMR Scanner 5 19 Screen Name 2 3 Screen Keys 1 9 Screen Key Selections 2 3 Sealer Bottle Description 1 7 Sealer Bottl...

Page 114: ...ers 7 4 Machine 7 7 Material Requirements 7 6 Sheet Feeders A B C and D 7 2 Stack 1 14 Startup Screen 3 3 Start Button 1 9 Stop STP for OMR 5 4 Stop Button 1 9 Supervisor Access Code 4 2 6 15 Supervisor Functions 2 5 Support Information iii Support Web Sites iii SwiftStart 3 6 Constraints and Requirements 3 6 Folds 3 7 Loading Envelope Feeder 3 7 Loading Insert Feeder s 3 7 Loading Material 3 6 Op...

Page 115: ...5 Trial Piece 1 16 3 10 Running a Trial Piece 3 4 Trial Piece Button 1 9 Troubleshooting 6 2 Clearing Material Stalls 6 8 Double Detect 6 7 Envelopes 6 4 Inserts 6 6 Machine 6 3 Sheets 6 5 Tips 6 2 W Wedge 3 17 Wrap Around Sequence WAS for OMR 5 5 ...

Page 116: ...Index I 10 SV40221 Rev A ...

Page 117: ......

Page 118: ...1 Elmcroft Rd Stamford Connecticut 06926 0700 www pitneybowes com 5500 Explorer Drive Mississauga Ontario L4W5C7 www pitneybowes ca PB Form SV40221 Rev A 9 04 Printed in the USA or Canada Printed on recyclable paper ...

Reviews: