ENGLISH
7
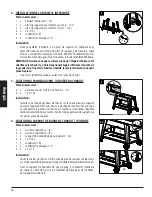
5. INSTALLING THE HOPPER HANDLE
Parts Required:
1 x Hopper Handle
(#8)
4 x Screw
(#A)
4 x Washer
(#B)
4 x Locking Washer
(#C)
Installation:
• Secure the Hopper Handle to the Hopper using four screws, locking
washers, and washers.
6. SECURING THE LID STOPPER
Parts Required:
2 x Lid Stopper
(#3)
Installation:
• Secure the Lid Stopper onto the top of the Main Barrel using the pre-
installed screw on top of the Main Barrel.
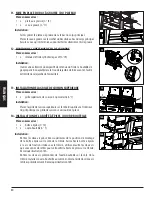
7. MOUNTING THE CART TO THE MAIN BARREL
Parts Required:
1 x Main Barrel
(#9)
16 x Screw
(#A)
16 x Washer
(#B)
16 x Locking Washer
(#C)
Installation:
• Prepare the Main Barrel to be mounted to the Cart. Position the Cart
next to the Main Barrel, with both facing the same direction. Lock the
Caster Wheels on the Cart. Using a second person, prepare to lift the
Main Barrel onto the Cart. With one person lifting from the hopper side,
and the other person lifting from the opposing barrel end, carefully lift
the Main Barrel, and slowly lower onto the Cart.
• Next, open the Main Barrel lid. Adjust the rotation as needed to align
the screw holes of the Main Barrel to the Cart. Once aligned, secure each
leg to the Main Barrel using three screws, washers, and locking washers.
• Next, secure the Cart Front Panel to the Main Barrels using two screws,
washers, and locking washers. Repeat installation for Cart Back Panel.
5
8
A C B
6
3
3
7A
7B
C
B
A


