


4-1
No Diving or Jumping. Observe all Safety Rules
GENERAL INSTRUCTIONS - BRACELESS OVAL POOLS
ASSEMBLING THE POOL FRAME
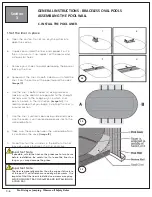
A. INSTALLATION OF THE UPRIGHTS - Straight Section
Section
4
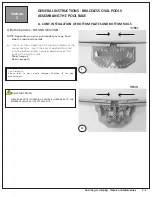
1. Install the uprights - Straight Section
NOTE: Depending on your pool model you may have
steel or resin bottom plates/rails.
a. The wall joint is hidden behind the upright on most
pools. This assures that the skimmer and skimmer
return holes are not obstructed.
b. Insert an upright into the bottom plate. The upright
will cover the vertical sleeve. Ensure that the
upright is correctly inserted into the bottom plate.
(Image 1)
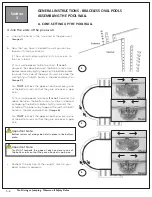
c. Please note that the holes meant to receive the
ledge cover are placed asymmetrically. This means
that the holes which are at each extremity of the
upright are not placed at the same distance from
each extremity of the upright.
d. Using two (2) screws (Steel-V12x34/Resin 2PPS101)
attach the bottom of the uprights to the bottom
plates.
(Images 2 & 3)
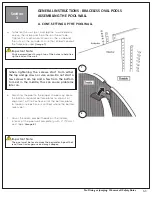
Proceed with the installation of the uprights
See Diagram:
Please refer to your pool’s footprint (Section 1) for gap
measurement.
Important Note:
Use the ridges in the pool wall to make sure the upright
column is straight up and down.
Important Note:
Ensure to leave a gap between the two bottom rails.
2
1
3
STEEL
STEEL
RESIN


