


30
TAURUS ELECTRO
www.pipistrel.si
REV. 0
Normal procedures
Introduction
This chapter provides information on everything needed to fly Taurus Electro safely.
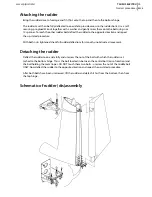
Assembling and disassembling the aircraft
CAUTION!
PRIOR TO EACH ASSEMBLING OR DISASSEMBLING ACTION THE TAURUS Electro
SHOULD NOT BE PLACED UNDER STRONG SUNSHINE, AS COMPOSITE PARTS EXPAND AND
CONTRACT AND YOU MAY NOT BE ABLE TO ASSEMBLE OR DISASSEMBLE THE AIRFRAME. UNDER
NO CIRCUMSTANCES ATTEMPT TO ASSEMBLE OR DISASSEMBLE ANY PARTS OF THE AIRCRAFT
FURCEFULLY!
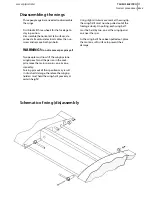
Assembling the wings
Three people (or two with a stand) are needed
to assemble the wings to the fuselage.
First block all three wheels for the fuselage to
stay in position.
Clean and grease the main wing pins and in-
sertion openings. Open the canopy. Inside the
cockpit set the flap handle to neutral position
and unlock the spoilers’ handle. Make sure
you have all bolts, nuts, washers and spanners
needed within reach of a hand.
Lift one wing-half (one person at each end)
and bring it closer to the fuselage. While the
two are holding the wing-half high up, the
third person directs their movement to put the
wing’s main spar into the opening on the adja-
cent side of the fuselage.
Now push the wing-half into its final position
slowly. The person closest to the fuselage must
make sure the spoiler and flap connectors have
fitted into adequate fuselage fittings prop-
erly. At the same time, the person holding the
wingtip must start with slight circular move-
ments (1cm each direction) in order to assure a
tight fit of the wing and its adequate bushings.
As this is done the person at the wingtip must
remain in positon holding the wing, whereas
the other two move over to the other wing-
half, lift it and bring it closer to the fuselage.
Do not forget to make sure the spoiler and flap
connectors have fitted into adequate fittings
properly on this wing-half as well.
Both wing-halfs should now be in their final
position but still being held at wingtips. The
person not holding the wings must now insert
both pre-greased spar pins. First insert the pin
on the right-hand side of the cockpit because
of easier insersion (thinner spar infront), then
the pin on the lefe-hand side of the cockpit.
If necessary, the two at the wingtips can assist
by rocking the wings a couple of
millimeters up and down.
Only when both spar pins have been inserted
and secured, wingtips may be released.
Now check all control deflections as well as
flap and spoilers’ extensions for smooth,
unobstructed movement.
Insert all bolts and pins and secure them with
self-locking nuts. Do not forget to put alumini-
um washers underneath the nuts!
Connect all electical clables and fuel hoses to
their correct fittings.
Finally tape the gap between the fuselage and
the wing using self-adhesive tape.
Summary of Contents for Taurus ELECTRO G2
Page 6: ...6 TAURUS ELECTRO www pipistrel si REV 0 This page is intentionally left blank...
Page 8: ...8 TAURUS ELECTRO www pipistrel si REV 0 This page is intentionally left blank...
Page 11: ...11 TAURUS ELECTRO www pipistrel si REV 0 3 view drawing General...
Page 12: ...12 TAURUS ELECTRO www pipistrel si REV 0 This page is intentionally left blank...
Page 52: ...52 TAURUS ELECTRO www pipistrel si REV 0 This page is intentionally left blank...
Page 60: ...60 TAURUS ELECTRO www pipistrel si REV 0 This page is intentionally left blank...
Page 94: ...94 TAURUS ELECTRO www pipistrel si REV 0 This page is intentionally left blank...


