PIONEERPOS Asterix Touch-X5 Installation And Configuration Manual Download Page 3

3 | 

P a g e


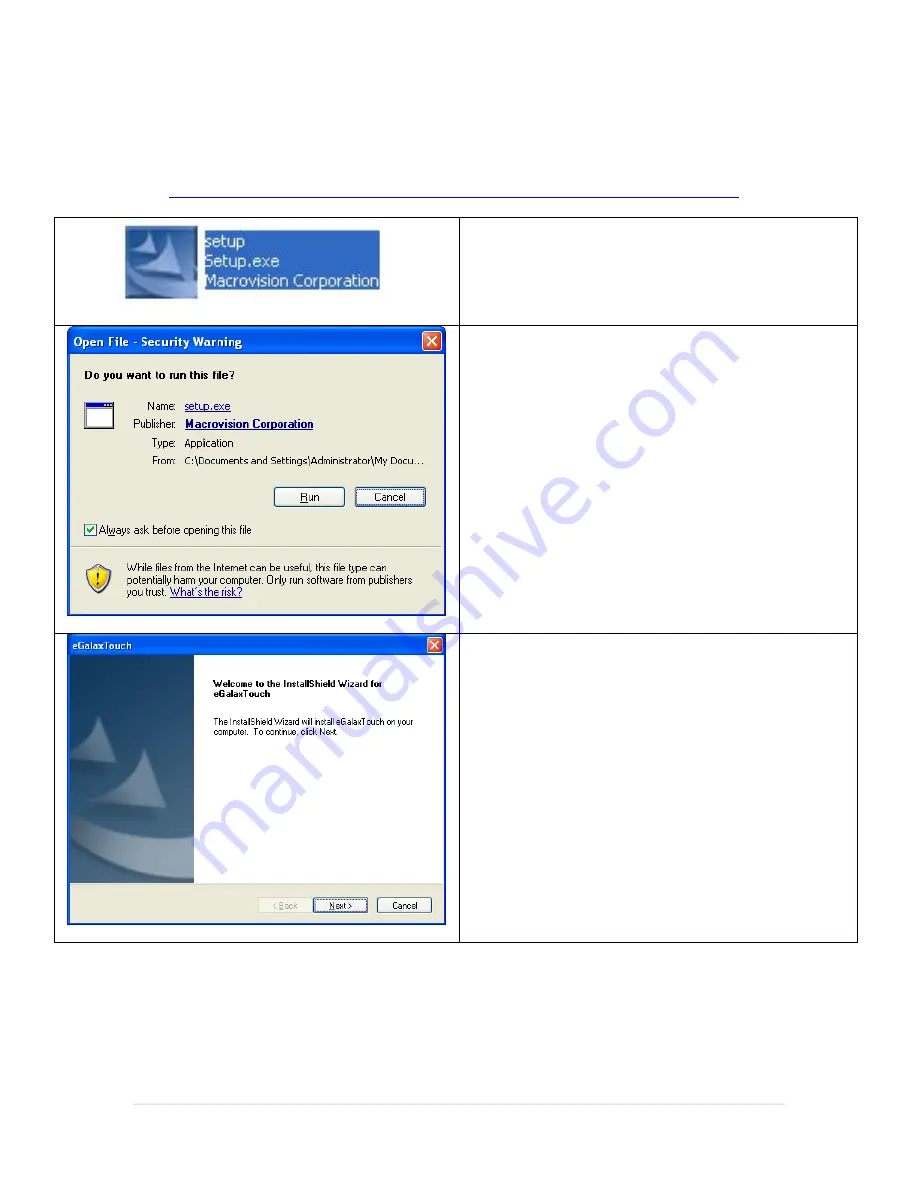
Touchscreen Driver Installation 

The driver for the touchscreen monitor can be downloaded from: 


http://download2.pcamerica.com/drivers/Manufacturer/PioneerPOS/AsterixTouch-X5_TS.zip


1.


Run the extracted 

Setup.exe

 file. 


2.


If prompted select 

Run


3.


Select 

Next

Summary of Contents for Asterix Touch-X5

Page 1: ...0 Fax 845 920 0880 1 P a g e Pioneer Stealth AsterixTouch X5 Installation and Configuration This document provides step by step instructions for setting up your Pioneer system which contains the follo...

Page 2: ...onitor MSR Configuration MSR Configuration Enable Configuration Mode MSR Configuration Carriage Return MSR Configuration Read Track 2 ONLY MSR Configuration Testing New Settings Installing Microsoft P...

Page 3: ...stallation The driver for the touchscreen monitor can be downloaded from http download2 pcamerica com drivers Manufacturer PioneerPOS AsterixTouch X5_TS zip 1 Run the extracted Setup exe file 2 If pro...

Page 4: ...4 P a g e 4 Select Install PS 2 interface driver 5 Select Next 6 Select OK 7 Select Install RS232 interface driver 8 Select Next...

Page 5: ...5 P a g e 9 Select Next System boot up 10 Select Next 11 Select OK 12 If you are using multiple monitors select Support Multi Monitor System 13 Select Next...

Page 6: ...6 P a g e 14 Select Next 15 Select Next 16 Select Yes I want to restart my computer now 17 Select Finish...

Page 7: ...7 P a g e 18 After the restart you should be presented with the screen to calibrate the monitor Touch the center of each target to calibrate the monitor If you do not then please see the next section...

Page 8: ...ight of the monitor this will be located next to the date time on the taskbar 2 Select the Tools tab then select 4 Points Calibration 3 You should be presented with the screen to calibrate the monitor...

Page 9: ...notepad the swipe looks like this B1234567891234567 TEST CARD 12345678912345678912 1234567891234567 12345678912345678912 It is reading from tracks 1 and 2 and the MSR needs to be configured to work w...

Page 10: ...ad after connecting the MSR to the Computer To open notepad and enable configuration mode follow the directions below 1 Select Start 2 Select All Programs 3 Select Accessories 4 Select Notepad After N...

Page 11: ...Select 3 on your keyboard to choose carriage return carriage return 1 don t send carriage return 2 after all tracks 3 after each track 4 after all data 0 back 3 Select 3 on your keyboard to choose af...

Page 12: ...ode 8 output cr if read nothing 9 raw data output 0 back 2 Select 1 on your keyboard to choose set enable tracks 3 Select 2 on your keyboard to choose track 2 1 set enable tracks 2 set require tracks...

Page 13: ...R Configuration Testing New Settings 1 Open Notepad 2 Swipe the card through the attached MSR 3 When swiped into notepad it should read like this including the carriage return 1234567891234567 1234567...

Page 14: ...downloaded at http download2 pcamerica com drivers POS_for_ Net exe Double click the installer and follow these steps Select Yes Select Browse and select a folder to unzip all files to Select Unzip Na...

Page 15: ...15 P a g e Provide a user name and organization Select Next Select Accept Select Next...

Page 16: ...16 P a g e Select Install Select Finish...

Page 17: ...on The driver for the pole display can be downloaded from http download2 pcamerica com drivers Manufacturer PioneerPOS ppos_opos_setup_v11a zip 1 Select Next 2 Select Yes I Accept the terms of the Lic...

Page 18: ...below 3 Select the Line Display s 4 Select the default Device Name pposdisp 5 Make sure that Device Type is selected as Aedex COM1 as the display is connected to COM1 6 Select the Test button 7 Select...

Page 19: ...e Login Screen Enter your login information if prompted 11 Select Setup then Setup Screen 12 Select the Hardware tab 13 Under Pole Display Type select OPOS 14 Under OPOS Pole Display use the dropdown...

Reviews: