71
XR-VS90SW, XR-VS90, XR-VS70SW, XR-VS70
Playback Adjustment
(1) Head Azimuth Adjustment
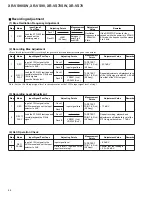
Recording Adjustment
(1) Bias Oscillation Frequency Adjustment
(2) Recording Bias Adjustment
• Do not switch between forward and reverse operation with the screwdriver inserted.
• Since this adjustment affects recording bias, prevent distortion from increasing due to underbias.
Note : No connecting to BIAS TP POINT at Step 2 REC
→
PLAY.
Deck
ΙΙ
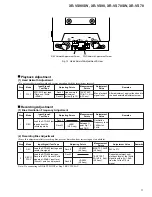
Fig. 12 Head Azimuth Adjustment Screw
REV Azimuth Adjustment Screw
FWD Azimuth Adjustment Screw
Step
Mode
Input Signal/
Test Tape
Adjusting Points
Measurement
Points
Adjustment
Value
Remarks
1
PLAY
STD-331E test tape
(Playback: 10kHz,
–20dB)
Deck
Ι
Head azimuth
adjustment
screw (Fig. 12)
TAPE TEST
POINT (L, Rch)
(AF Assy)
Max. playback
signal level
After adjustment, apply silicon bond to
the head azimuth adjustment screw.
Step
Mode
Input Signal/
Test Tape
Adjusting Points
Measurement
Points
Adjustment
Value
Remarks
1
REC
Load the STD-632 test
tape and set the
recording mode.
Deck
Ι
Oscillation
frequency to be
105.0kHz
±
2kHz.
Deck
ΙΙ
L2801
(AF Assy)
Between
A
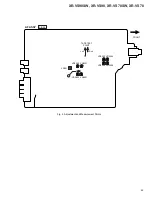
point Fig. 13
and GND
Step
Mode
Input Signal/Test Tape
Adjusting Points
Measurement
Points
Adjustment Value
Remarks
1
REC
Load the STD-632 test tape and
record (No signal)
Deck
ΙΙ
VR2802
(AF Assy)
BIAS TP POINT
(AF Assy)
24V to 27V
2
REC
→
PLAY
Load the STD-632 test tape.
Record the 315Hz and 10kHz
signals at –25dBV input level
(check
B
point) and playback.
Deck
Ι
TAPE TEST
POINT (L, Rch)
(AF Assy)
Repeat adjustment until
playback level of the 10kHz
signal is within 0
±
1.0dB
from that of the 315Hz
signal.
Deck
ΙΙ
VR2802
(AF Assy)


