Pioneer VSX-LX302 Basic Manual Download Page 25

25

Playback

Before Start

Part Names

Install

Initial Setup

Playback

Advanced Manual

Troubleshooting | Supplementary Information, etc.

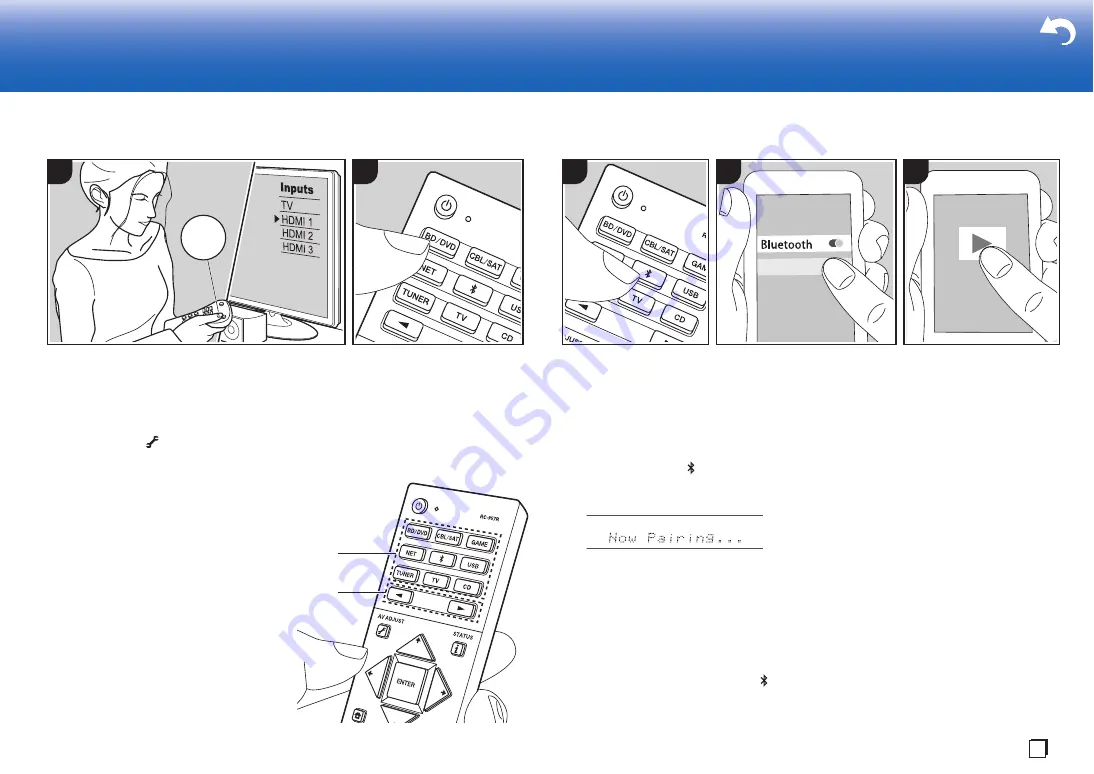
AV Component Playback

Basic Operations

You can play the audio from AV components 
such as Blu-ray Disc players through this unit.

0

When a TV is connected to the HDMI OUT 
SUB jack, press 

 (P6) on the remote 

controller and use "Other" - "HDMI Out" to 
switch between MAIN and SUB.

Perform the following procedure when the 
unit is on.
1. Switch the input on the TV to that 

assigned to the unit.

2. Press the input selector (a) on the 

remote controller with the same name as 
the jack to which you connected the 
player to switch the input.
For example, press BD/DVD to play the 
player connected to the BD/DVD jack. 
Press TV to listen the TV's sound. To play 
a device connected to the STRM BOX, 
PHONO, HDMI5, HDMI6 jack or the AUX 
INPUT AUDIO/HDMI jack on the front 
panel, press 

21

 (b) repeatedly to select 

the input.

0

When the CEC link function works, 
the input switches automatically when 
you have connected a CEC compliant 
TV and player to this unit using HDMI 
connection.

3. Start play on the AV component.

1

2

T

V

INPUT

b

a

BLUETOOTH

®

 Playback

You can wirelessly play music on a 
smartphone or other BLUETOOTH 
enabled device. Perform the following 
procedure when the unit is on.

Pairing

1. When you press the 

 button, "Now 

Pairing..." is displayed on this unit's 
display, and the pairing mode is enabled.

2. Enable (turn on) the BLUETOOTH 

function of the BLUETOOTH enabled 
device, then select this unit from 
amongst the devices displayed. If a 
password is requested, enter "0000".

0

This unit is displayed as "Pioneer 
VSX-LX302 XXXXXX".

0

To connect another BLUETOOTH 
enabled device, press and hold 


until "Now Pairing..." is displayed, 
then perform step 2. This unit can 

store the data of up to 8 paired 
devices.

0

The coverage area is 48´/15 m. Note 
that connection is not always 
guaranteed with all BLUETOOTH 
enabled devices.

Playing Back

1. Perform the connection procedure on 

the BLUETOOTH enabled device.
The input on this unit automatically 
switches to "BLUETOOTH".

2. Play music. Increase the volume of the 

BLUETOOTH enabled device to an 
appropriate level.

0

Due to the characteristics of 
BLUETOOTH wireless technology, the 
sound produced on this unit may slightly 
be behind the sound played on the 
BLUETOOTH enabled device.

Pioneer VSX-LX302 XXX

1

2

3

En

Summary of Contents for VSX-LX302

Page 1: ...yback 25 BLUETOOTH Playback 25 Network Functions 26 USB Storage Device 27 Listening To the AM FM Radio 28 Multi zone 30 Listening Mode 31 The Basic Manual includes information needed when starting up and also instructions for frequently used operations The Advanced Manual has more detailed information and advanced settings Basic Manual AV RECEIVER VSX LX302 Before Start Part Names Install Initial ...

Page 2: ...age arising from the connection of equipment manufactured by other companies 0 Functionality may be introduced by firmware updates and service providers may cease services meaning that some network services and content may become unavailable in the future Furthermore available services may vary depending on your area of residence 0 Details on the firmware update will be posted on our website and t...

Page 3: ...ator This lights when NET is selected with the input selector and the unit is connected to the network If the unit is in standby mode this lights when functions such as HDMI CEC and network standby are enabled It does not light when ZONE 2 is on however 11 WIRELESS indicator Lights when the unit is connected to the wireless network and when connected to a BLUETOOTH enabled device 12 Remote control...

Page 4: ...on When connected by BLUETOOTH When connected by Wi Fi NET When NET is selected with the input selector and the unit is connected to the network It will flash if the connection to the network is not correct USB When USB is selected with the input selector and the unit is connected by USB and the USB device is selected Flashes if the USB is not properly connected HDMI When HDMI signals are input an...

Page 5: ...o signals and audio signals with a HDMI cable connected to a monitor such as a TV or projector 9 HDMI IN jacks Transmit video signals and audio signals with a HDMI cable connected to an AV component 10 RS 232C port For connection to the home control system 11 AC IN The supplied power cord is connected 12 SIGNAL GND terminal The ground wire of the turntable is connected 13 AUDIO IN jacks Input AV c...

Page 6: ...ess to change the screen 6 button Displays the Home 7 Volume buttons 8 button Temporarily mutes audio Press again to cancel muting 9 LISTENING MODE buttons Allows you to select the listening mode P31 MAIN ZONE 2 buttons Controls the multi zone function P30 The ZONE 3 button is not used with this unit 10 Play buttons Used for play operations when playing Music Server or USB 11 button Used for repea...

Page 7: ...peakers To connect the speaker systems to this unit refer to P15 if you are using a speaker layout described on one of P8 to P12 and to P16 to use a speaker layout using Bi Amping speakers described on P13 The connection process will be smoother if you refer to the illustrations and explanations and prepare the required cables before hand Step3 Connect the TV AV Components Refer to P17 to P22 to c...

Page 8: ...when the input format is Dolby Atmos The front speakers should be positioned at ear height while the surround speakers should be positioned just above ear height Center speaker should be set up facing the listening position Placing the powered subwoofer between the center speaker and a front speaker gives you a natural sound even when playing music The optimal positioning is for surround back spea...

Page 9: ...from A B or A B Press on the remote control P6 and use Other Speakers to switch Note that no sound is played from the surround back speakers when playing from A B 0 Speaker combinations P14 introduces some detailed examples of speaker combinations Before Start Part Names Install Initial Setup Playback Advanced Manual Troubleshooting Supplementary Information etc 1 2 3 Speaker B Speaker B 1 22e to ...

Page 10: ...ont high speakers or rear high speakers should be situated at least 3 0 9 m higher than the front speakers Front high speakers should be situated directly above the front speakers and the distance between the rear high speakers should match the distance between the front speakers Both should be set up facing the listening position 0 Speaker combinations P14 introduces some detailed examples of spe...

Page 11: ... the seating position top middle speakers on the ceiling directly above the seating position and top rear speakers on the ceiling behind the seating position The distance between each pair should match the distance between the two front speakers 0 Dolby Laboratories recommends placing this type of height speakers to obtain the best Dolby Atmos effect 0 Speaker combinations P14 introduces some deta...

Page 12: ...ming from overhead By installing height speakers you can select the Dolby Atmos listening mode which realizes the most up to date 3D sound including overhead sounds when the input format is Dolby Atmos Place them either above the front speakers above the surround speakers or above surround back speakers 0 Speaker combinations P14 introduces some detailed examples of speaker combinations 9 10 Heigh...

Page 13: ... so it is not possible to connect height speakers and surround back speakers with this connection Other than front speakers you can also connect a center speaker surround speakers and a powered subwoofer 0 Speaker combinations P14 introduces some detailed examples of speaker combinations 1 2 Front Speakers Bi Amping 3 Center Speaker 4 5 Surround Speakers 6 Powered Subwoofer Before Start Part Names...

Page 14: ...nly output audio from one of these at a time When both are connected you can set which speakers to prioritize 0 Press on the remote control P6 and use Other Speakers to switch speakers A and B and to switch between surround back speakers and height speakers Before Start Part Names Install Initial Setup Playback Advanced Manual Troubleshooting Supplementary Information etc Speaker Channels FRONT CE...

Page 15: ...of the speakers do not stick out of the speaker terminals when connecting If the exposed wires of the speakers touch the rear panel or the and wires touch each other the protection circuit will be activated Before Start Part Names Install Initial Setup Playback Advanced Manual Troubleshooting Supplementary Information etc a b OR Speaker B 1 2 12 mm a Speaker cable b Subwoofer cable Setup 0 Setting...

Page 16: ...kers touch the rear panel or the and wires touch each other the protection circuit will be activated Before Start Part Names Install Initial Setup Playback Advanced Manual Troubleshooting Supplementary Information etc a 1 2 12 mm For high frequency For low frequency a Speaker cable Setup 0 Settings for the speaker configuration you have connected need to be made in 1 Full Auto MCACC in Initial Set...

Page 17: ...is feature transfers TV audio signals via HDMI cable so that you can play the audio from the TV through this unit Connection to an ARC compatible TV is complete with one HDMI cable Refer to the instruction manual for your TV to see if it supports ARC 2 Another TV or projector can be connected to the HDMI OUT SUB jack Press P6 on the remote control and use Other HDMI Out to switch between MAIN and ...

Page 18: ... or from this unit and adjusting the volume using the remote controller of a CEC compliant TV and automatically switching this unit to standby when the TV is turned off Before Start Part Names Install Initial Setup Playback Advanced Manual Troubleshooting Supplementary Information etc BD DVD GAME a Cable Satellite set top box Streaming media player a HDMI cable Setup 0 When Yes is selected for 5 A...

Page 19: ...al coaxial cable or a digital optical cable 0 It is possible to change assignment of the input jacks you see in the illustration at left so you can also connect to any jack other than BD DVD For details see the Advanced Manual Before Start Part Names Install Initial Setup Playback Advanced Manual Troubleshooting Supplementary Information etc BD DVD OR a b c a Component video cable b Digital optica...

Page 20: ... another AUDIO IN jack Further if the turntable uses an MC type cartridge install an audio equalizer compatible with the MC type cartridge between the unit and the turntable then connect to any AUDIO IN jack other than the PHONO jack If the turntable has a ground wire connect it to the SIGNAL GND terminal of this unit Before Start Part Names Install Initial Setup Playback Advanced Manual Troublesh...

Page 21: ...room with an analog audio cable ZONE SPEAKER It is possible to connect speakers in a separate room and play 2 ch sources 0 You cannot use ZONE SPEAKER if you have connected the front speakers using Bi Amping connection or if you have connected a Speakers B System 0 No sound is played from the height speakers when playing audio from ZONE SPEAKER Before Start Part Names Install Initial Setup Playbac...

Page 22: ...tration To connect by Wi Fi then after selecting Wireless in 3 Network Connection P24 in Initial Setup select the desired setting method and follow the onscreen instructions to configure the connection Power Cord Hookup This unit includes removable power cords Connect the power cord to the power outlet after completing all other connections Connect the power cord to AC IN of the unit and then conn...

Page 23: ...evious screen press b 0 If you terminate the procedure on the way or want to change a setting made during Initial Setup press on the remote controller and from the Home select System Setup Miscellaneous Initial Setup and press ENTER 1 Full Auto MCACC Place the supplied speaker setup microphone in the listening position measure the test tones emitted by the speakers then the unit automatically sets...

Page 24: ...he images appear on the TV and that sound is played 3 Network Connection Set up Wi Fi connection with an access point such as a wireless LAN router There are the following two methods of connecting by Wi Fi Scan Networks Search for an access point from this unit Find out the SSID of the access point beforehand Use iOS Device iOS7 or later Share the iOS device s Wi Fi settings with this unit If you...

Page 25: ...DMI connection 3 Start play on the AV component 1 2 T V INPUT b a BLUETOOTH Playback You can wirelessly play music on a smartphone or other BLUETOOTH enabled device Perform the following procedure when the unit is on Pairing 1 When you press the button Now Pairing is displayed on this unit s display and the pairing mode is enabled 2 Enable turn on the BLUETOOTH function of the BLUETOOTH enabled de...

Page 26: ...atible with the Music Server feature are those PCs with players installed that have the server functionality of Windows Media Player 11 or 12 or NAS that are compatible with home network functionality Note that with PCs only music files registered in the library of Windows Media Player can be played 0 You may need to make some settings on the PC in advance to use Windows Media Player 11 or 12 with...

Page 27: ... next screen The list of folders and music files on the USB storage device are displayed Select the folder with the cursors and press ENTER to confirm your selection a 5 With the cursors on the remote controller select the music file and then press ENTER to start playback 0 To return to the previous screen press c 0 The USB port of this unit conforms with the USB 2 0 standard The transfer speed ma...

Page 28: ...er than stereo irrespective of the sensitivity of the reception Tuning Manually Note that if you tune manually the reception for FM broadcasts will be monaural rather than stereo irrespective of the sensitivity of the reception 1 Press TUNER a on the remote controller repeatedly to select either AM or FM on the display 2 Press MODE e on the remote controller so that the TunMode Manual is displayed...

Page 29: ...o select a number between 1 and 40 3 Press Fav again on the remote controller to register the station When registered the preset number stops flashing Repeat this procedure for all of your favorite AM FM radio stations Selecting a Preset Radio Station 1 Press TUNER a on the remote controller 2 Press cursors b on the remote controller to select a preset number Deleting a Preset Radio Station 1 Pres...

Page 30: ...remote controller switches to the mode for controlling ZONE 2 2 Point the remote controller at the main unit and press Í a Z2 lights on the main unit display 3 Press the input selector button b of the input to be played in the separate room 0 On the main unit after pressing ZONE 2 CONTROL within 8 seconds turn the input selector dial to select the input to be played in the separate room 4 To adjus...

Page 31: ...e control features so you can enjoy even better sound quality The Pure Direct mode shuts down even more processes that affects sound quality so you get a more faithful reproduction of the original sound In this case the speaker calibration made with MCACC is disabled 0 Depending on the input signal and speaker configuration the Dolby Surround and DTS Neural X modes that expand 2 channel and 5 1 ch...

Page 32: ... iPod iPhone or iPad may affect wireless performance AirPlay works with iPhone iPad and iPod touch with iOS 4 3 3 or later Mac with OS X Mountain Lion or later and PC with iTunes 10 2 2 or later PANDORA the PANDORA logo and the Pandora trade dress are trademarks or registered trademarks of Pandora Media Inc Used with permission The BLUETOOTH word mark and logos are registered trademarks owned by B...

Page 33: ...ts de reproduction et de traduction réservés 2 9 4 0 3 0 1 5 F1702 0 SN 29403015 Корпорация О энд Пи 2 3 12 Яэсу Чуо ку г Токио 104 0028 ЯПОНИЯ Germany Hanns Martin Schleyer Straße 35 47877 Willich Germany Tel 49 0 8142 4208 188 Product Support UK Anteros Building Odyssey Business Park West End Road South Ruislip Middlesex HA4 6QQ United Kingdom Tel 44 0 208 836 3612 France 6 Avenue de Marais F 95...

Page 34: ... Listening Modes 43 Network Functions Internet Radio 49 Spotify 50 AirPlay 51 Music Server 52 Supplementary information for player functions 54 Troubleshooting 55 Supplementary Information 62 The Basic Manual includes information needed when starting up and also instructions for frequently used operations The Advanced Manual has more detailed information and advanced settings VSX LX302 Advanced Ma...

Page 35: ... dB IHF A PHONO IN SP OUT Speaker Impedance 4 Ω 16 Ω Headphone Output Impedance 330 Ω Headphone Rated Output 80 mW 32 Ω 1 kHz 10 THD Video Section Signal level 1 Vp p 75 Ω Composite Video 1 Vp p 75 Ω Component Video Y 0 7 Vp p 75 Ω Component Video B R Maximum resolution supported by component video 480i 576i Tuner Section FM Tuning Frequency Range 87 5 MHz 107 9 MHz AM Tuning Frequency Range 530 k...

Page 36: ...from the HDMI OUT jack to the TV is the same resolution as the input When using a TV that supports 4K 1080p HDMI video signals can also be output as 4K Audio Inputs Digital OPTICAL 1 BD DVD 2 TV COAXIAL CD Analog BD DVD CBL SAT STRM BOX CD PHONO AUX front Audio Outputs Analog ZONE2 PRE LINE OUT 2 SUBWOOFER PRE OUT Speaker Outputs FRONT L R CENTER SURROUND L R SURROUND BACK ZONE 2 L R HEIGHT SP B L...

Page 37: ...y connecting devices supporting Deep Color video signals input from the devices can be reproduced on the TV with even more colors x v Color This technology realizes even more realistic colors by broadening the color gamut 3D You can transmit 3D video signals from AV components to the TV 4K This unit supports 4K 3840 2160p and 4K SMPTE 4096 2160p video signals LipSync This setting automatically cor...

Page 38: ...mats MPEG 1 MPEG 2 Audio Layer 3 Supported sampling rates 44 1 kHz 48 kHz Supported bitrates Between 8 kbps and 320 kbps WMA wma WMA Supported sampling rates 44 1 kHz 48 kHz Supported bitrates Between 5 kbps and 320 kbps WMA Pro Voice WMA Lossless formats are not supported WAV wav WAV WAV files include uncompressed PCM digital audio Supported sampling rates 44 1 kHz 48 kHz 88 2 kHz 96 kHz 176 4 kH...

Page 39: ...24 bit AIFF aiff aif AIFF AIF AIFF files include uncompressed PCM digital audio Supported sampling rates 44 1 kHz 48 kHz 88 2 kHz 96 kHz 176 4 kHz 192 kHz Quantization bit 8 bit 16 bit 24 bit AAC aac m4a mp4 3gp 3g2 AAC M4A MP4 3GP 3G2 Supported formats MPEG 2 MPEG 4 Audio Supported sampling rates 44 1 kHz 48 kHz 88 2 kHz 96 kHz Supported bitrates Between 8 kbps and 320 kbps FLAC flac FLAC Support...

Page 40: ...DMI Out MAIN Select the HDMI jack to be connected with the TV MAIN When connecting the TV to the HDMI OUT MAIN jack SUB When connecting the TV to the HDMI OUT SUB jack MAIN SUB When connecting to both the MAIN and SUB jacks Dolby Vision MAIN If you want to output the Dolby Vision video from the player to a TV that supports Dolby Vision select the HDMI OUT jack MAIN or SUB to which you have connect...

Page 41: ...CP 2 2 Assign a desired HDMI IN jack to the BD DVD input selector If you do not assign a jack select To select an HDMI IN jack already assigned to another input selector change its setting to first CBL SAT HDMI 2 HDCP 2 2 HDMI 1 HDCP 2 2 to HDMI 4 HDCP 2 2 Assign a desired HDMI IN jack to the CBL SAT input selector If you do not assign a jack select To select an HDMI IN jack already assigned to an...

Page 42: ...L 1 OPTICAL 2 Assign a desired DIGITAL IN jack to the TV input selector Supported sampling rates for PCM signals stereo mono from a digital input are 32kHz 44 1kHz 48kHz 88 2kHz 96kHz 16bit 20bit and 24bit Analog Audio Input You can change input assignment between the input selectors and AUDIO IN jacks If you do not assign a jack select Setting Item Default Value Setting Details BD DVD AUDIO 1 AUD...

Page 43: ...n environment of the speakers and change the volume level Settings are automatically configured if you use Full Auto MCACC This setting cannot be selected if headphones are connected or audio is output from the speakers of the TV Configuration Setting Item Default Value Setting Details Speaker Channels 7 1 2 ch Select 2 1 ch 3 1 ch 4 1 ch 5 1 ch 6 1 ch 7 1 ch 2 1 2 ch 3 1 2 ch 4 1 2 ch 5 1 2 ch 6 ...

Page 44: ...r instruction manual Crossover Setting Item Default Value Setting Details Front Small Set the low range capabilities for each channel by setting either small or large Small For small speakers whose low range capabilities may be limited Large For full range speakers with sufficient low range capabilities If Configuration Subwoofer is set to No Front will be fixed to Large and the low pitched range ...

Page 45: ...ow frequency effect to play the bass The value from 50Hz to 200Hz can be set Setting Item Default Value Setting Details Double Bass Off This can be selected only when Configuration Subwoofer is set to Yes and Front is set to Large Boost bass output by feeding bass sounds from the front left and right and center speakers to the subwoofer On Bass output will be boosted Off Bass output will not be bo...

Page 46: ...ue between 12 0 dB and 12 0 dB in 0 5 dB increments A test tone will be output each time you change the value Select the desired level Front Right 0 0 dB Select a value between 12 0 dB and 12 0 dB in 0 5 dB increments A test tone will be output each time you change the value Select the desired level Height Left 0 0 dB Select a value between 12 0 dB and 12 0 dB in 0 5 dB increments A test tone will...

Page 47: ... to be used The function is not effective if the listening mode is Pure Direct This setting can be selected when Configuration Height Speaker is set to Dolby Speaker Audio Adjust Make advanced settings such as those related to multiplex audio or those related to the volume of this unit Dual Mono Mono Setting Item Default Value Setting Details Dual Mono Main Set the audio channel or language to be ...

Page 48: ...rence between the devices connected to the unit Select the input selector to configure Setting Item Default Value Setting Details Input Volume Absorber 0 0 dB Select a value between 12 0 dB and 12 0 dB Set a negative value if the volume of the target device is larger than the others and a positive value if smaller To check the audio start playback of the connected device This function is not effec...

Page 49: ...from HDMI IN jacks The setting can be selected only when the input is assigned to the HDMI jack in the Input Output Assign HDMI Input setting COAXIAL When giving priority to input signal from DIGITAL IN COAXIAL jacks The setting can be selected only when the input is assigned to the COAXIAL jack in the Input Output Assign Digital Audio Input setting OPTICAL When giving priority to input signal fro...

Page 50: ...e the volume of the unit If abnormal operation occurs when you set the setting to On set it to Off When connecting a non CEC compatible component or when you are not sure whether it is compatible set the setting to Off Setting Item Default Value Setting Details HDMI Standby Through Off When this is set to anything other than Off you can play the video and audio of an HDMI connected player on the T...

Page 51: ...corrects any desynchronization between the video and audio signals based on data from the HDMI LipSync compatible TV On Automatic correction will be enabled Off Automatic correction will be disabled Power Management Setting Item Default Value Setting Details Sleep Timer Off Allows the unit to enter standby automatically when the specified time elapses Select a value from 30 minutes 60 minutes and ...

Page 52: ...k Standby and Bluetooth Wakeup cannot be selected It will appear when the network feature is started 12V Trigger A Set when outputting the control signal maximum 12 V 100 mA through the 12V TRIGGER OUT A jack Different settings can be set for each input selector You can enable power link operation when you connect the unit and the external devices equipped with 12V trigger input jack Setting Item ...

Page 53: ... output setting to each input Off No output Main Output when NET is selected as input source for the main room Zone2 Output when NET is selected as input source for ZONE2 Setting Item Default Value Setting Details USB FRONT Off Set the 12V trigger output setting to each input Off No output Main Output when USB FRONT is selected as input source for the main room Zone2 Output when USB FRONT is selec...

Page 54: ... ZONE2 CD Off Set the 12V trigger output setting to each input Off No output Main Output when CD is selected as input source for the main room Zone2 Output when CD is selected as input source for ZONE2 Setting Item Default Value Setting Details TV Off Set the 12V trigger output setting to each input Off No output Main Output when TV is selected as input source for the main room Zone2 Output when T...

Page 55: ...volume for the separate room Zone 2 Setting Item Default Value Setting Details Output Level Fixed Select whether to adjust the volume on the pre main amplifier in the separate room or on this unit when outputting to Zone 2 Fixed Adjust on the pre main amplifier in the separate room Variable Adjust on this unit Volume Limit Off Set the maximum value for Zone 2 to avoid too high volume Select Off or...

Page 56: ...the same network feature Miscellaneous Change the frequency step for the tuner update the firmware and perform Initial Setup etc Tuner Setting Item Default Value Setting Details AM FM Frequency Step 10 kHz 0 2 MHz Select a frequency step depending on your area of residence Select 10 kHz 0 2 MHz or 9 kHz 0 05 MHz When this setting is changed all radio presets are deleted Remote ID Setting Item Defa...

Page 57: ...have Internet access or there is nothing to update Update via USB Press ENTER to select when you want to update the firmware via USB You will not be able to select this setting if a USB storage device is not connected or there is nothing to update in the USB storage device Wait for a while if Firmware Update cannot be selected It will appear when the network feature is started Initial Setup You ca...

Page 58: ...r the crossover frequencies and the distance from the listening position This also automatically adjusts the equalizers for the speakers and enables correction of distortion caused by the acoustic environment of the room Calibration takes between 3 and 12 minutes to be completed The speakers emit the test tone at high volume during measurement so be careful of your surroundings Keep the room as qu...

Page 59: ...ferences You can adjust the volume of the different sound ranges for each of the speakers You can set three different equalizers in Preset 1 to 3 You can select up to 4 bands for the Subwoofer and 9 bands for all other speakers Setting Item Default Value Setting Details Front Left 0 dB After selecting the speaker frequency from between 63 Hz and 16 kHz with the cursors adjust the volume of that fr...

Page 60: ...number of connected channels Setting Item Default Value Setting Details Surround Right 0 dB After selecting the speaker frequency from between 63 Hz and 16 kHz with the cursors adjust the volume of that frequency between 12 0 dB and 12 0 dB with 63 Hz can only be selected when this speaker is set to Large in System Setup Speaker Crossover If an item cannot be selected even though connection is cor...

Page 61: ...his cannot be selected if No is set in System Setup Speaker Configuration Subwoofer The result may not be as expected depending on the input source and listening mode setting If you want to make the adjustments while listening to something press on the remote controller and select the Preset you want to adjust in AV Adjust MCACC Manual EQ Select first MCACC Data Check You can check the number of s...

Page 62: ... to your LAN such as Subnet Mask and Gateway Setting Item Default Value Setting Details Wi Fi Off Wired Connect the unit to network via wireless LAN router On Wireless LAN connection Off Wired Wired LAN connection Wi Fi Setup You can configure wireless LAN settings by pressing ENTER when Start is displayed Wi Fi Status The information of the connected access point will be displayed SSID SSID of th...

Page 63: ...ors and press ENTER Repeat it to input 31 or less characters A a Switches between upper and lower cases Pressing MODE on the remote controller also toggles between upper and lower cases Moves the cursor to the arrow direction Removes a character on the left of the cursor Enters a space To select whether to mask the password with or display it in plain text press Fav on the remote controller Pressi...

Page 64: ...vice connected last when you change the input to BLUETOOTH On When this function is to be used Off When this function is not to be used This may not work with some BLUETOOTH wireless technology enabled devices Setting Item Default Value Setting Details Pairing Information You can initialize the pairing information saved on this unit Pressing ENTER when Clear is displayed initializes the pairing in...

Page 65: ...ot be set if the listening mode is Pure Direct Phase Control Correct phase disturbance in the low range to enhance the bass This enables you to achieve powerful bass reproduction that is faithful to the original sound It cannot be set if the listening mode is Pure Direct Theater Filter Adjust the soundtrack that was processed to enhance its high pitch range in order to make it suitable for home th...

Page 66: ...f the front channel when playing in the Dolby Surround listening mode To spread the width of the sound field to the left and right set to On To concentrate sound in the center set to Off Depending on the speaker settings this becomes Off Dialog Control You can increase the dialog portion of the audio in 1 dB steps up to 6 dB so that you can make dialog easier to hear over background noise This can...

Page 67: ...een is displayed in the internet browser 5 After changing the settings select Save to save the settings Device Information You can change the Friendly Name set an AirPlay Password etc Control4 Register this unit if you are using a Control4 system Firmware Update Select the firmware update you have downloaded to your PC so you can update this unit Network Setting Status You can see information for ...

Page 68: ... remote controller even when you are in a separate room or operate the unit with the remote controller even if its remote control sensor is difficult to see You can also connect a device with the unit and operate it with the remote controller Signal flow Zone Main room Remote controller Connecting block This unit IR receiver Other companies may use indications other than IR on their products Confi...

Page 69: ...ars on the display and updating will be complete Disclaimer The program and accompanying online documentation are furnished to you for use at your own risk Our company will not be liable and you will have no remedy for damages for any claim of any kind whatsoever concerning your use of the program or the accompanying online documentation regardless of legal theory and whether arising in tort or co...

Page 70: ...us with your ISP provider Others Disconnect then reconnect the AC power cord then repeat from the beginning Updating via USB Preparation Prepare a 128MB or larger USB storage device FAT16 or FAT32 file system format Media inserted in a USB card reader may not be used for this function USB storage devices with security function are not supported USB hubs and USB devices with hub function are not su...

Page 71: ...at case check the progress on the display of the unit The TV screen will remain black until the update is complete and the power is turned on again During the update do not turn off or disconnect then reconnect the USB storage device Completed is displayed when the update is complete 8 Disconnect the USB storage device from the unit 9 Press STANDBY ON on the main unit to turn the unit into standby...

Page 72: ...hanges automatically The Direct mode shuts down some processing that can affect sound quality such as the tone control features so you can enjoy even better sound quality The Pure Direct mode shuts down even more processes that affects sound quality so you get a more faithful reproduction of the original sound In this case the speaker calibration made with MCACC is invalid SURR button By pressing ...

Page 73: ...uch as the Surround Back channel added for a maximum of 7 1ch To enable transfer of this audio format connect via HDMI cable and set audio output on the player to bitstream output Dolby Surround This listening mode allows you to expand the playback signal to 5 1 channels or 7 1 channels to suit the connected speaker configuration when the input signal is 2 channels or 5 1 channels Along with past ...

Page 74: ...onfiguration when the input signal is 2 channels or 5 1 channels DTS X This mode faithfully reproduces the sound design recorded in the DTS X audio format The DTS X audio format is a combination of the mixing methodology based on past channel based formats 5 1ch and 7 1ch and object based dynamic audio mixing and it is characterized by the precise positioning of sounds and the ability to express m...

Page 75: ...ementary Information etc Basic Manual Stereo In this mode sound is output from the front left and right speakers and subwoofer Unplugged Suitable for acoustic instruments vocals and jazz This mode emphasizes the front stereo image giving the impression of being right in front of the stage ...

Page 76: ... Listening modes available when headphones are connected are Pure Direct and Stereo only Selectable listening modes Input Format Listening Mode Analog Stereo Mono Dolby Surround DTS Neural X Classical 1 Unplugged 1 Ent Show 1 Drama 1 AdvancedGame 1 Action 1 Rock Pop 1 Sports 1 Ext Stereo 2 Ext Mono 2 F S Surround 1 Surround speakers or height speakers need to be installed 2 A center speaker surrou...

Page 77: ... Listening Mode DSD Stereo DSD 1 2 Dolby Surround DTS Neural X Classical 3 Unplugged 3 Ent Show 3 Drama 3 AdvancedGame 3 Action 3 Rock Pop 3 Sports 3 Ext Stereo 4 Ext Mono 4 F S Surround 1 Cannot be selected when the input format is monaural or 2 ch 2 A center speaker or surround speakers need to be installed 3 Surround speakers or height speakers need to be installed 4 A center speaker surround s...

Page 78: ...urround Classical 3 Unplugged 3 Ent Show 3 Drama 3 AdvancedGame 3 Action 3 Rock Pop 3 Sports 3 Ext Stereo 4 Ext Mono 4 F S Surround 1 Cannot be selected when the input format is 2 ch 2 A center speaker or surround speakers need to be installed 3 Surround speakers or height speakers need to be installed 4 A center speaker surround speakers or height speakers need to be installed Input Format Listen...

Page 79: ...ral X Classical 3 Unplugged 3 Ent Show 3 Drama 3 AdvancedGame 3 Action 3 Rock Pop 3 Sports 3 Ext Stereo 4 Ext Mono 4 F S Surround 1 Cannot be selected when the input format is 2 ch 2 A center speaker or surround speakers need to be installed 3 Surround speakers or height speakers need to be installed 4 A center speaker surround speakers or height speakers need to be installed Input Format Listenin...

Page 80: ...ral X Classical 3 Unplugged 3 Ent Show 3 Drama 3 AdvancedGame 3 Action 3 Rock Pop 3 Sports 3 Ext Stereo 4 Ext Mono 4 F S Surround 1 Cannot be selected when the input format is 2 ch 2 A center speaker or surround speakers need to be installed 3 Surround speakers or height speakers need to be installed 4 A center speaker surround speakers or height speakers need to be installed Input Format Listenin...

Page 81: ...ic Manual Input Format Listening Mode DTS X Stereo DTS X Classical 1 Unplugged 1 Ent Show 1 Drama 1 AdvancedGame 1 Action 1 Rock Pop 1 Sports 1 Ext Stereo 2 Ext Mono 2 F S Surround 1 Surround speakers or height speakers need to be installed 2 A center speaker surround speakers or height speakers need to be installed ...

Page 82: ...radio service menus You can register certain stations as your favorites or delete stations you have registered from your favorites The menu displayed depends on the service currently selected Menu icons are displayed at the bottom right of the screen while playing a station When just this icon is displayed you can display the menu on the screen just by pressing ENTER on the remote controller When ...

Page 83: ...ailable Device 4 Select this unit 5 This unit turns on automatically and the input selector changes to NET and streaming of Spotify starts If System Setup Hardware Power Management Network Standby is set to Off in the Home manually turn the unit on and then press NET on the remote controller Notes for using multi zone for compatible models only To enjoy Spotify music in a separate room manually se...

Page 84: ...list of devices displayed 4 Play the music files on the iOS device The default status is for the Network Standby feature to be on so when you do steps 3 and 4 above this unit automatically comes on and input switches to NET To reduce the amount of power consumed in standby mode press the button on the remote controller then in the Home displayed set System Setup Hardware Power Management Network S...

Page 85: ... If media streaming is already turned on select More streaming options in the Stream menu to list players in the network and then go to step 4 3 Click Turn on media streaming to list players in the network 4 Select this unit in Media streaming options and check that it is set to Allow 5 Click OK to close the dialog Depending of the version of Windows MediaR Player there may be differences in the n...

Page 86: ... there may be differences in the names of items you can select Remote playback 1 Turn on the power of the unit 2 Turn on your PC and start Windows MediaR Player 12 3 Select and right click the music file to play with Windows MediaR Player 12 To remotely play a music file on another server open the target server from Other Libraries and select the music file to play 4 Select this unit in Play to to...

Page 87: ...or firmware changes during production of the product there may be additions or changes to the features available compared to what is in the instruction manual For information about player functions that have been added or changed see the following references Refer to Supplementary Information etc Supplementary Information for information about changes to settings etc other than player functions Su...

Page 88: ...oblem resetting the unit to the status at the time of shipment may solve the problem If you reset the unit status your preferences will be reset to the defaults Note them down before the operation below 1 While pressing the AUTO DIRECT button on the main unit press STANDBY ON 2 Clear appears on the display and the unit returns to standby Do not unplug the power cord until Clear disappears from the...

Page 89: ...C in Initial Setup Check in Initial Setup in the Basic Manual Depending on the source and current listening mode not much sound may be produced Select another listening mode to see if sound is output If you are installing surround back speakers for compatible models only surround speakers are required A maximum of 5 1 ch playback is possible when Bi Amping connection is used for compatible models ...

Page 90: ...ally because the DTS bitstream has been processed e g output level sampling rate or frequency response changed and the unit does not recognize it as a genuine DTS signal In such cases you may hear noise Playing DTS program material using the pause or skip function on your player may produce a short audible noise This is not a malfunction Video Confirm that the connection between the output jack on...

Page 91: ...ry plugging unplugging the power of the unit and try turning on off the BLUETOOTH wireless technology enabled device Re startup of the BLUETOOTH wireless technology enabled device may be effective The BLUETOOTH wireless technology enabled devices must support the A2DP profile Near components such as microwave oven or cordless phone which use the radio wave in the 2 4 GHz range a radio wave interfe...

Page 92: ...e for listening make sure the registered URL is correct or whether the format distributed from the radio station is supported by this unit Depending on ISP setting the proxy server is necessary Make sure that the used router and or modem is supported by your ISP Cannot access the network server This unit needs to be connected to the same router as the network server This unit is compatible with Wi...

Page 93: ...Cannot ZONE output audio of external AV component Depending on the model input by HDMI cable may not be supported Check in Multi zone Connection in the Basic Manual and if input by HDMI cable is not supported connect using a cable that is supported The audio from externally connected AV components can only be output when the audio is analog or 2ch PCM audio signals If you have connected the AV com...

Page 94: ...to the magnetic field static electricity or radio wave interference from radio communication equipment using the same frequency band 2 4 GHz as the AV receiver such as a 2 4 GHz wireless LAN device IEEE802 11b g n or microwave oven If you live in a heavily populated residential area apartment townhouse etc and if your neighborʼs microwave oven is placed near your AV receiver you may experience rad...

Page 95: ... firmware changes during production of the product there may be additions or changes to the settings and operation available compared to what is in the instruction manual For information about the settings and operations that have been added or changed see the following references Refer to Network Functions Supplementary information for player functions for information about changes to player func...

Page 96: ...Lion or later and PC with iTunes 10 2 2 or later The BLUETOOTH word mark and logos are registered trademarks owned by Bluetooth SIG Inc PANDORA the PANDORA logo and the Pandora trade dress are trademarks or registered trademarks of Pandora Media Inc Used with permission The Spotify software is subject to third party licenses found here https developer spotify com esdk third party licenses This Mar...

Page 97: ...France 6 Avenue de Marais F 95816 Argenteuil Cedex FRANCE Tel 33 0 969 368 050 2 3 12 Yaesu Chuo ku Tokyo 104 0028 JAPAN U S A 18 PARK WAY UPPER SADDLE RIVER NEW JERSEY 07458 U S A Tel 1 201 785 2600 Tel 1 844 679 5350 SN 29403017 PDF_EN Pioneer ELITE and MCACC logo are trademarks of Pioneer Corporation and are used under license 2017 Onkyo Pioneer Corporation All rights reserved 2017 Onkyo Pionee...

Reviews: